Need tips on atrophotgraphy methods/post processing
Jul 25, 2017 19:53:08 #
SirMontgomery
Loc: Seattle
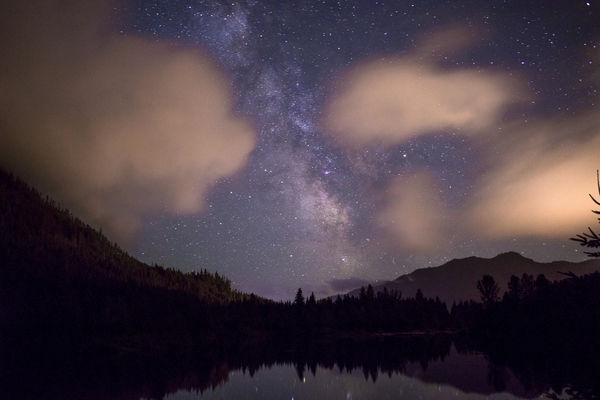
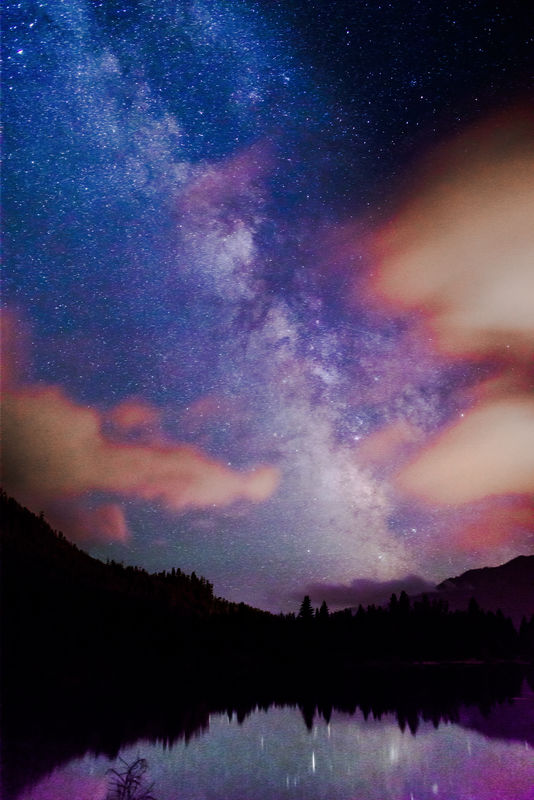
I understand the basics of astrophotography,how to get an exposure ect. I recently upgraded to one of the best cameras on the market for this, the pentax k1, and I want to push it to it's limits. These are just 30 second exposures (a touch too long) at ISO 1600 on an old 28mm SMC f2.8 film lens at f/3.5 to help with the extreme vignetting. I'll be buying a 24mm f/1.4 later this week as I do a lot of landscape photography. I also ordered a remote shutter so I caan start to use the astrotracer function.
Photos were taken around 11:30pm to 12PM on sunday at Gold Creek Pond, NF-9080, Snoqualmie Pass, WA 98068.
I need advice on the post processing methods and pointers on stacking/dark images/ect, it's all new to me. I've never stacked images, I was always a one shot and done photographer (probably stems from film).
In the google drive folder I added the raw DNG files, if you can show me the way these come out properly edited and how it was done I would be incredibly thankful, I played with both of these for about 90 minutes a piece with shoddy results even after reading some online guides.
https://drive.google.com/open?id=0B5asYiM2YoEQRVZneGdYQU1ZTG8
Jul 26, 2017 03:56:39 #
Hi! And Welcome to UHH, and the nocturnal corner.
Beautiful Images!
I've never stacked either. Oh, I've tried innumerable times, I even finally got some to actually go through the process. But they were horrible.
The guys who really manage their stuff will be along to help. There are some really accomplished Artists here.
And then there's me.... But I'm getting better rubbing elbows with the great ones here.
I noticed in your top image the stars are trailing at 30 seconds. Try cutting that back, say 20 seconds. And if you are going to stack, you can drop back more.
That will stop the trailing of the stars. (What makes them elongate)
I've had successes using my tripod, wide angle lens, and an Intervalometer to take pictures of the night sky that I enjoy making time lapse video from. Another of my interests.
Recently I discovered I could take images from my telescope in a sequence, and turn them into a GIF file. The subtle changes from one frame to another gave the sky a twinkling effect.
http://static.uglyhedgehog.com/upload/2017/6/26/488745-recycling_twinkle.gif
The other way around that is with a mount that guides to counteract the natural rotation of the Earth. That's what I have done. Worked hard on my guiding.
Astrophotography is a difficult thing to come to grips with. But the rewards can be amazing. Looks like you are off to a great start!

Beautiful Images!
I've never stacked either. Oh, I've tried innumerable times, I even finally got some to actually go through the process. But they were horrible.
The guys who really manage their stuff will be along to help. There are some really accomplished Artists here.
And then there's me....
But I'm getting better rubbing elbows with the great ones here.I noticed in your top image the stars are trailing at 30 seconds. Try cutting that back, say 20 seconds. And if you are going to stack, you can drop back more.
That will stop the trailing of the stars. (What makes them elongate)
I've had successes using my tripod, wide angle lens, and an Intervalometer to take pictures of the night sky that I enjoy making time lapse video from. Another of my interests.
Recently I discovered I could take images from my telescope in a sequence, and turn them into a GIF file. The subtle changes from one frame to another gave the sky a twinkling effect.
http://static.uglyhedgehog.com/upload/2017/6/26/488745-recycling_twinkle.gif
The other way around that is with a mount that guides to counteract the natural rotation of the Earth. That's what I have done. Worked hard on my guiding.
Astrophotography is a difficult thing to come to grips with. But the rewards can be amazing. Looks like you are off to a great start!
Jul 26, 2017 09:50:56 #
SirMontgomery wrote:
I understand the basics of astrophotography,how to... (show quote)
Hi & a warm Welcome to the dark side :)
As Sonny has already said there seems to be a lot of star drift within your images, 20s or under should cure that.
The focus looks to be a little off too. Night time focus is a pain to achieve sometimes. I always practice infinity focus with my lens during daytime, then marking the true infinity marker on the lens with sticky tape.
Astrophotography, even single exposures really benefit with the use of dark frames. These frames are easy to take by simply covering the lens & taking the exposure again with the same settings. Blending / Stacking your light & dark frames will really assist in eliminating thermal (sky) & sensor noise.
Stacking images can be achieved upon a standard non tracking mount with short focal length lens & short exposures but with limitations.
When it comes to post processing I personally find subtle incremental adjustments in curves, levels to be the best approach & always create a new layer after adjustments in case you need to revert back after a boo boo :)
There are some very useful posts upon post processing here on UHH & all over the net. Don't expect miracles, practice practice & practice.
The composure of your images are brilliant & in time I am certain you will produce a knock ya socks off image.
Please feel free to view some of my wide field AP work using a star adventurer mount.
All the best & good luck Marc
Jul 26, 2017 10:26:37 #

SirMontgomery wrote:
I understand the basics of astrophotography,how to... (show quote)
Your images look really nice. As for stacking, stars move across the sky, and the land objects do not. So this adds some difficulty to the problem. I use DSS and Nebulosity for stacking, but I avoid land objects in those stacks. But there is a stacking program that is free that seems to have the means to handle stars and land, and it is called Sequator: https://sites.google.com/site/sequatorglobal/home
Having clouds is another obstacle too. They move, and at a different speed than the stars, so there is no way to deal with this other than shorter exposures and to not stack. Thus, this results in using higher ISO levels to capture enough light.
Something else that is commonly done is to take separate images for the stars and for the land objects and then to cut out the sky in the land objects image and lay it over the sky image such that it looks like it came from one single image. This allows you to properly expose the land to get a lower noise result, which by the way causes the stars to leave very noticeable trails. And then to expose for the stars so that there are no noticeable trails, or if there are no clouds, to stack multiple star shots which tends to improve the signal to noise ratio and also to cause stars to take on more roundness. This method also allows you to focus separately for the land and separately for the stars which also helps.
As for stars, they have to be absolutely, perfectly focused. If off even the slightest bit, they don't look good. I use the focus magnifier and really work on getting a perfect focus. I start with a bright star and get close to focus and then as it gets close to focus, the dimmer stars come into view and I pick the dimmest star I can work with to focus now for it to be the brightest it can be. What you will find is that this spot is very, very critical and just touching the focus ring may change the focus. I also find manual lens focusing to be easier than more modern lenses with focus-by-wire focusing. For example, the Rokinon/Samyang lenses all have wonderfully smooth focus rings.
As for lenses, not all lenses are good candidates for star imaging. Stars are point sources of light and tend to exasperate any faults of the lens. Some show coma distortion which causes stars to stretch away from the center. Some show astigmatism which causes the corner stars to look like flying sea gulls, or having mustaches. Some have CA problems which cause sharp edges to have blue/purple fringes. All of these problems are hard to get rid of, but usually stopping down a bit makes things better. In looking at your images, I do see some astigmatism and CA problems, but your focus seems good.
Many people my something like the iOptron SkyTracker which rotates the camera to keep the stars from trailing. They are actually quite good at doing this. And of course, you would want to turn it off to do the land objects.
You are certainly off to a good start, and I'm sure future tries will be even better.
As for noise, the best program for this is DxO Optics Pro, Elite Version. Their Prime Noise removal is absolutely the best. It is very computational and takes some time to remove the noise, but it does so without doing the pixel blurring that most of the others make use of. Its only requirements are that you use the original RAW image, and you do it first.
Let us know what 24mm lens you intend to buy as not all of them do well with stars.
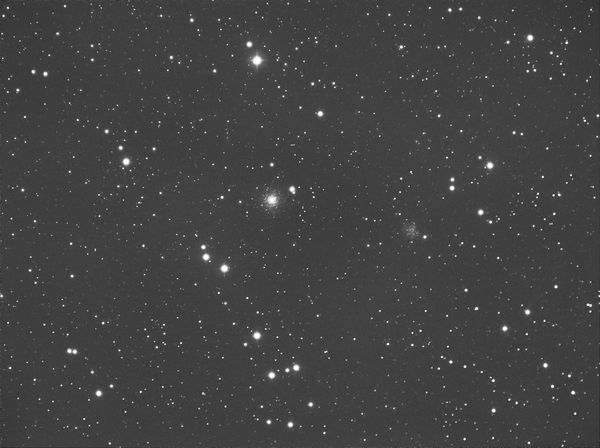
I am adding an image taken using a Rokinon 135mm f2 lens (stopped down a notch) showing desired round stars. This one was done with a mono Atik Infinity camera and is a stack of 17 images of 15 sec each and shows the globular cluster m53 in the center, and a fainter NGC5053 off to the right, another globular cluster, in an image that is a 3.8 x 2.8 degrees FOV. The night sky is certainly addicting!
Jul 26, 2017 14:32:55 #
SirMontgomery wrote:
I understand the basics of astrophotography,how to... (show quote)
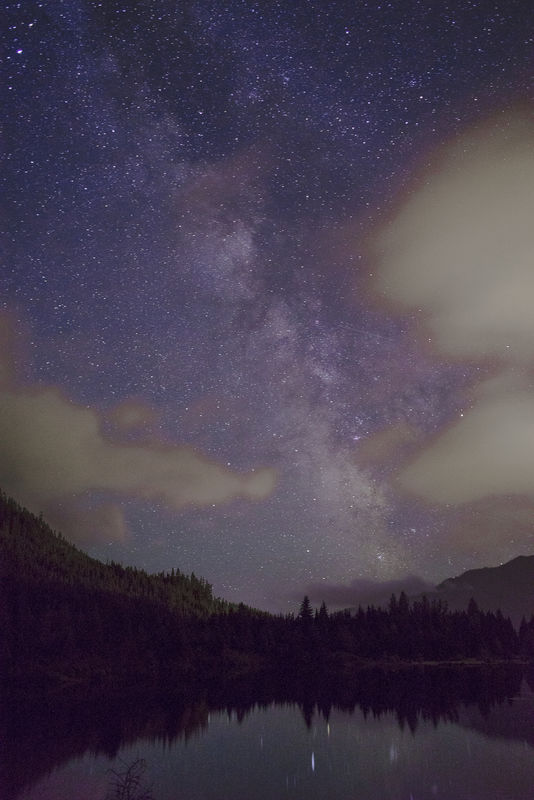
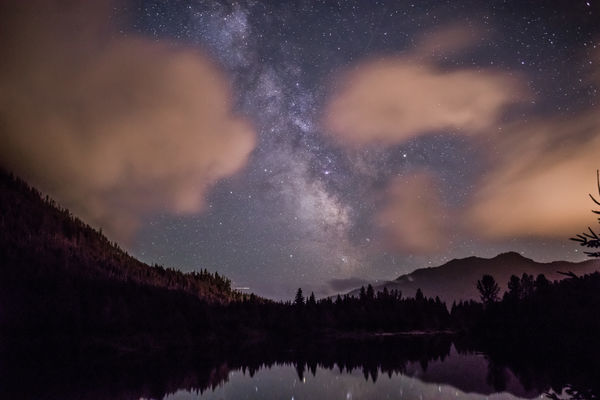
I downloaded your DNG files and played with the one I liked the best (about 5 minutes). Good focus, reasonable exposure, a bit too much star stretch.
If you're going to continue shooting off a tripod, I would suggest adhering to the 500 Rule, i.e.: max. exposure (in seconds) = 500/focal length. With your 28mm lens that would be about 20 sec. max.
I didn't do much to your image:
Lightroom:
- a bit of noise reduction; probably didn't really need any.
- Gradient filter on sides, // to Milkway, to reduce cloud brightness and saturation a bit. How far you go here is totally personal taste!
- Gradient filter on top to brighten up Milky Way and "extend" it a touch
- Gradient filter on btm to brighten reflection and smooth it a bit
- a few other minor tweaks
- Exported to Photoshop
Photoshop:
- created duplicate layer
- set blending to Darken
- moved layer to eliminate star trailing. Of course it is preferable not to have star trailing unless you're actually doing a star trails image!
- applied noise reduction to reduce artifacts after the above operation. I didn't push this too far; some "grit" left in the image.
- applied a minor Curves adjustment
- reduced image size (which also helps clean up artifacts from the above operation)
- saved as JPG for uploading
Astrophotography postprocessing is like postprocessing of any other image; done to taste. My goal with your image was to focus on the Milky Way and "pop" it out of its surroundings.
Enjoy!
bwa
Jul 26, 2017 16:51:08 #
bwana wrote:
I downloaded your DNG files and played with the on... (show quote)
Brian, I'm afraid the re-tweak is over cooked.
I did download and try to do something with the first image. I was able to do something with noise on the mountain in Lightroom. And then I tried to do something with the star trails with Focus Magic, but I didn't like the artifacts that I got. I had selected the sky but failed to set the border close enough, and when done, there was a noticeable border between the tops of the mountains and the sky. Then I tried to reduce the length of the reflected star trails in the lake, but they were too long and Focus Magic was only good enough for a blur of 20 pixels and they were just too long.
So in looking at it, the stars are in good focus, but the exposure is too long and star trails are too obvious. The mountains have too much noise. And the reflections of the stars in the lake have stretched the trails even longer.
Definitely needs to be two images, one for land and one for sky. The clouds also show movement, but probably not much that can be done there. But since their edges are less definite, I would probably just leave them alone.
Jul 26, 2017 18:21:03 #
JimH123 wrote:
Brian, I'm afraid the re-tweak is over cooked. br ... (show quote)
Everyone to their own taste!
BTW, those "streaks" in the reflection aren't star trails. They're quite legit. The star trails are horizontal.
So, where is your attempt at reprocessing!? It doesn't appear to be attached?
bwa
Jul 26, 2017 18:30:08 #
bwana wrote:
Everyone to their own taste!
BTW, those "streaks" in the reflection aren't star trails. They're quite legit. The star trails are horizontal.
So, where is your attempt at reprocessing!? It doesn't appear to be attached?
bwa
BTW, those "streaks" in the reflection aren't star trails. They're quite legit. The star trails are horizontal.
So, where is your attempt at reprocessing!? It doesn't appear to be attached?
bwa
I didn't post it because I didn't like it.
***********************************
Tried it again. Fixed some noise in the distant mountain. Then selected just the sky and used Focus Magic to reduce the length of the star trails. These trails were about 13 pixels long, and in the process, some artifacts were added which I don't care for. Not sure it really helped.
If you want to reply, then register here. Registration is free and your account is created instantly, so you can post right away.