Metal Prints from CG Pro Prints
Jun 26, 2017 12:51:46 #

I just received my metal prints today from CGproprints.com, and I have to admit–I'm blown away once again by their quality. They had a special earlier this month where their metal prints were 15% off, so I had 2 shots printed...a 16x20 and a 24x36. The larger image is for me (to be hung in our bathroom) and the smaller one is a gift for my in laws. Without a doubt, if you need or want to try a metal print, I'd highly recommend them. Pick a super colorful image and go for it!
On a side note, I've been told that m4/3 is no good for anything over 8x10 or 11x14–those people are flat out wrong. The 24 x 36 has a ton of detail, and it's even a pretty decent crop of the original. I ran it past 3 other graphic designers here, and they all agree with me (that it looks awesome). When I'm prepping files to be printed at this size, I start in LR with the RAW files to get it close, then I switch over to Color Efex Pro 4 to finalize contrast/details, then its over to Photoshop CC to check if any noise reduction needs to be run and to set the final image size (up-rezzing the file if needed) to match the printing requirements. In this case, the printer wanted 250ppi @ 24 x 36. I'll snap a shot of the installed photo after I find the right mounting bracket.
On a side note, I've been told that m4/3 is no good for anything over 8x10 or 11x14–those people are flat out wrong. The 24 x 36 has a ton of detail, and it's even a pretty decent crop of the original. I ran it past 3 other graphic designers here, and they all agree with me (that it looks awesome). When I'm prepping files to be printed at this size, I start in LR with the RAW files to get it close, then I switch over to Color Efex Pro 4 to finalize contrast/details, then its over to Photoshop CC to check if any noise reduction needs to be run and to set the final image size (up-rezzing the file if needed) to match the printing requirements. In this case, the printer wanted 250ppi @ 24 x 36. I'll snap a shot of the installed photo after I find the right mounting bracket.
Jun 26, 2017 12:57:57 #

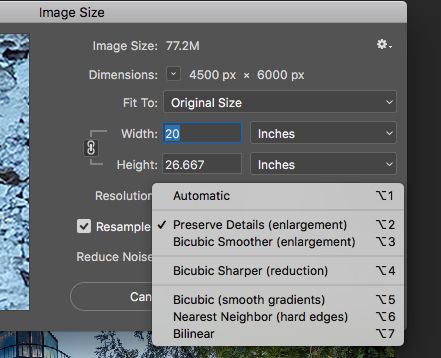
So, you are quite the post-processor ......curious, what/how do you up-rez ?? Thanks, ....
Jun 26, 2017 13:14:18 #
imagemeister wrote:
So, you are quite the post-processor ......curious, what/how do you up-rez ?? Thanks, ....
In photoshop, Command + option (alt for PC users) + I
It pulls up the image size dialog box. Check the resample box and set it to preserve details (enlargement). I've been to told (or read, can't remember) that slowly approaching your final image size a few inches at a time is better than going for it all at once. It seems to work for me as I've never hand an issue.
Jun 26, 2017 14:51:19 #
Cdouthitt wrote:
In photoshop, Command + option (alt for PC users) + I
It pulls up the image size dialog box. Check the resample box and set it to preserve details (enlargement). I've been to told (or read, can't remember) that slowly approaching your final image size a few inches at a time is better than going for it all at once. It seems to work for me as I've never hand an issue.
It pulls up the image size dialog box. Check the resample box and set it to preserve details (enlargement). I've been to told (or read, can't remember) that slowly approaching your final image size a few inches at a time is better than going for it all at once. It seems to work for me as I've never hand an issue.
Yes, that is what I do - only in Elements - I believe that is "Bicubic smoother" ....
Jun 26, 2017 14:53:29 #
imagemeister wrote:
Yes, that is what I do - only in Elements - I believe that is "Bicubic smoother" ....
Similar but not the same...I believe this is just one of many slight differences between Elements a Photoshop.
Jun 26, 2017 14:56:57 #
Cdouthitt wrote:
Similar but not the same...I believe this is just one of many slight differences between Elements a Photoshop.
Hmmmmm, interesting .......
Jun 26, 2017 14:58:04 #
imagemeister wrote:
Hmmmmm, interesting .......
I want to say that this was added in an update in the 2017 CC version of Photoshop.
Jun 26, 2017 15:02:47 #
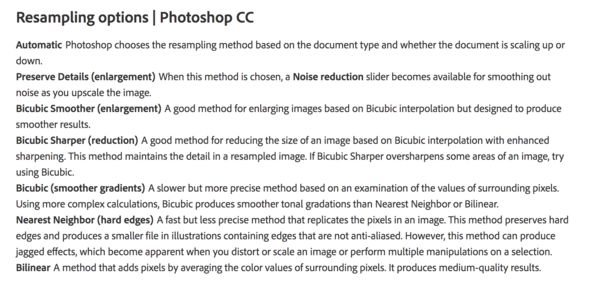
Jun 26, 2017 15:13:55 #
Cdouthitt wrote:
Found a description of each
Thanks again ! .......Hmmmm, preserve details and add noise reduction - I always thought that was mutually exclusive !
Jul 4, 2017 20:13:21 #
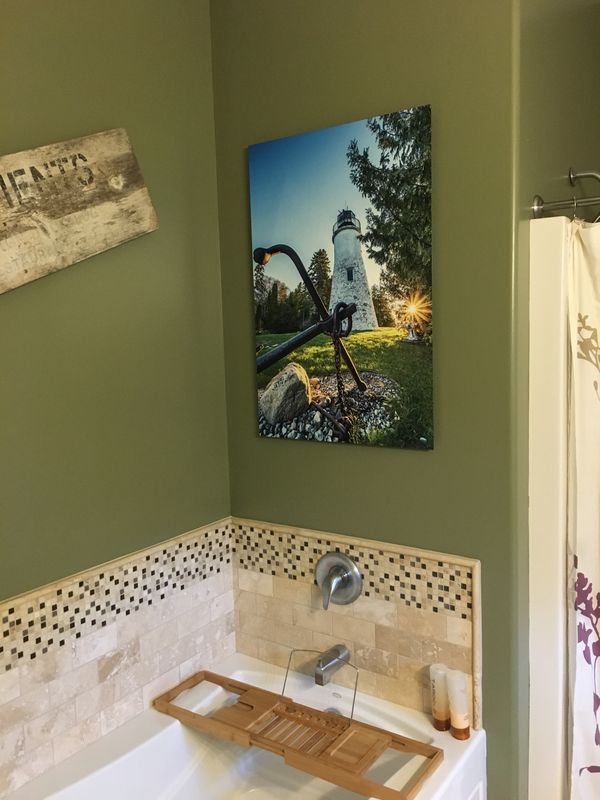
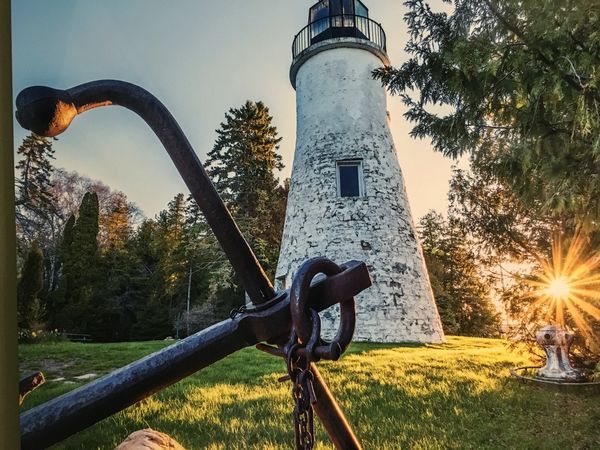
Finally got around to hanging it. These were taken with my iPhone 6s, but it still gives you a good idea of the quality. First one is an overall, and the second is a closeup.
Jul 18, 2017 17:18:55 #

Thanks for the tip on CGproprints! also, great image. Thanks for sharing.
Jul 18, 2017 18:14:00 #
Jul 18, 2017 19:20:54 #

If you want to reply, then register here. Registration is free and your account is created instantly, so you can post right away.