HDR practice images
Jun 19, 2017 10:56:08 #
Experimenting with a Fuji X70 compact camera. Lens is an 18.5mm (28mm field of view).
HDR processing in Photomatix Pro, subsequent cropping and minor tweeks in Lightroom v5.7.
Shooting handheld from the passenger seat.
Settings: AE (three shot) bracket mode - 1/1000 sec @ f/8 or f/7.1, ISO 400
First image captured as we headed eastbound on I-29 (65mph) from Shawano to Green Bay, WI
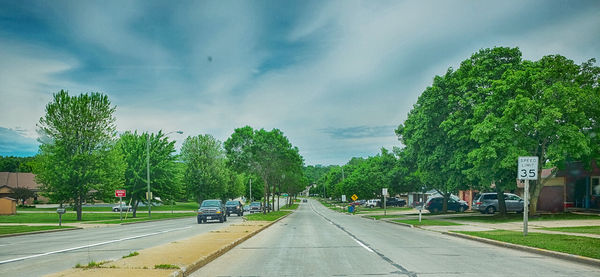
Second image captured running an errand on a thru street (35mph) in Ashwaubenon, WI
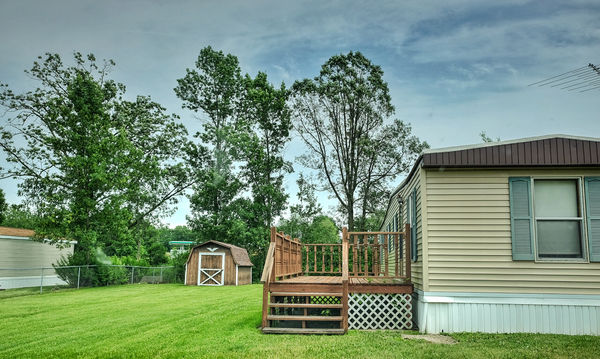
Third image captured while inspecting a realtor-listed property for possible storm damage in Cecil, WI.
Process in Photomatix was largely automated with straight-forward steps.
Not trying for great art or meaningful subjects in this instance, but was pleased with the results. /Ralph
HDR processing in Photomatix Pro, subsequent cropping and minor tweeks in Lightroom v5.7.
Shooting handheld from the passenger seat.
Settings: AE (three shot) bracket mode - 1/1000 sec @ f/8 or f/7.1, ISO 400
First image captured as we headed eastbound on I-29 (65mph) from Shawano to Green Bay, WI
Second image captured running an errand on a thru street (35mph) in Ashwaubenon, WI
Third image captured while inspecting a realtor-listed property for possible storm damage in Cecil, WI.
Process in Photomatix was largely automated with straight-forward steps.
Not trying for great art or meaningful subjects in this instance, but was pleased with the results. /Ralph

Jun 19, 2017 11:24:47 #

I really like your leading lines composition; you show that even mundane, work-a-day subjects can be artfully presented. However, they all seem a bit flat to my eye, and numbers 1 and 2 have what appear to be sensor dust specks.
Jun 19, 2017 12:08:46 #
Rdgreenwood - I think the specks may be birds flying across the path of the vehicle I was in. My X70 was only recently acquired and has not been used much outdoors, so I'd be surprised to find dust on the sensor. But anything is possible, I guess. Sorry you felt the renderings were flat. Any suggestion as to how I might improve that? So far, I have only limited experience using HDR software. Do you have a preferred app that might be better? /Ralph
Jun 19, 2017 12:30:12 #
You've got haloing and fringing, artifacts that are created when you "overcook" and HDR image. Quite common when you just start out with Photomatix and with Topaz Adjust. Try blending layers to adjust opacity to soften the HDR effect with the original image.
Here's an excellent tutorial on reducing fringing:
https://www.youtube.com/watch?v=gLMKrcdfjmE&t=20s
Here's an excellent tutorial on reducing fringing:
https://www.youtube.com/watch?v=gLMKrcdfjmE&t=20s
Jun 19, 2017 12:39:20 #
I understand about the specks. My suggestion, regardless of what they are, would be to take the 10 seconds it requires and use a healing brush to delete them. They're a distraction, and such nice images deserve better.
As for the flatness, you're on a slippery slope, so take my advice with a grain of salt. If I were working with a RAW file or in LR, I'd first try to adjust the haze control and/or the clarity. If I were working with TIFFs or JPEGs, I'd ease up the contrast and/or the structure. Be careful with structure, however, as it has a tendency to introduce blotches in your sky or haloes at the base of your sky.
You're doing great, though, so don't let the learning curve get you down. The hardest part of photography is seeing what's interesting; the rest is mechanics. I'd much rather have your sense of composition than anyone's undisciplined editing skills.
Jun 23, 2017 16:13:19 #
I agree with "flat". In my mind, this means lack of contrast and less dynamic range -- which is the purpose of bracketing and blending. #1 is also "soft" -- not as sharp in focus as the other two shots. Best to always post your "normal" exposure, non-blended shot for comparison.
Jan 16, 2021 17:07:27 #

I think the last one came out the best, with touches of HDR but not overdone. The first two looked artificially colored to me, especially the green. Keep in mind that I am just looking and you are doing. I have never attempted this, so my kudos to you 
Jan 17, 2021 00:57:26 #
If you want to reply, then register here. Registration is free and your account is created instantly, so you can post right away.