Can someone please explain this to me??
Jun 13, 2017 11:02:06 #
Mr.Ft
Loc: Central New Jersey
My question involves my canon 80d and photoshop. Now I'm very new to photoshop, but no matter what resolution I set my camera to when I upload it to photoshop the resolution in 72 dpi. Now is this a function of my camera or photoshop? Is there a way to raise the dpi or resolution? Any help would be greatly appreciated!
Jun 13, 2017 11:09:45 #
DGStinner
Loc: New Jersey
The 72dpi means nothing on a computer screen. As long as your images are ~4000 pixels by ~6000 pixels, you're getting the full resolution. When you go to print the image, that's where dpi/ppi will come into play.
https://fstoppers.com/originals/understanding-file-resolution-and-why-it-doesnt-matter-when-showing-your-photos-106631
https://fstoppers.com/originals/understanding-file-resolution-and-why-it-doesnt-matter-when-showing-your-photos-106631
Jun 13, 2017 11:17:52 #

You can change the dpi without changing the overall resolution of the image. In Photoshop go to Image...Image size, make sure the "Resample image" is clicked OFF and you can change to 300 or whatever you want, and the width and height will change to match.
Jun 13, 2017 11:32:13 #

Pretty much what they said, it's a meaningless value most of the time. unless you are printing at around 55" by 83" photo's
Jun 13, 2017 11:34:03 #

You can change it if you want but it really means nothing. I don't know why Photoshop still have that information. If they want to include that information they should include the printed size or display size entry. For example you have an image with a number of x horizontal pixels and y vertical pixels then if you enter the size you want to print then it should calculate your DPI (or more correctly PPI) or if you enter the size of your monitor then it could calculate the PPI for display.
Jun 13, 2017 12:28:10 #

Mr.Ft wrote:
My question involves my canon 80d and photoshop. Now I'm very new to photoshop, but no matter what resolution I set my camera to when I upload it to photoshop the resolution in 72 dpi. Now is this a function of my camera or photoshop? Is there a way to raise the dpi or resolution? Any help would be greatly appreciated!
It depends on what you mean by "upload it to Photoshop."
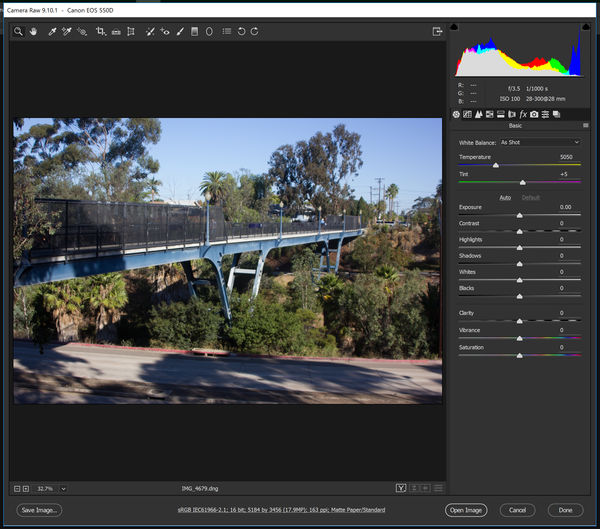
When I click on a picture it opens first in Adobe Camera Raw, where I make 95% of my adjustments. Once I'm done there, I can either leave ACR or open the image in Photoshop, which is my definition of "upload it to Photoshop." I do that because I have different PPI requirements for different finished products. At the middle bottom of the ACR screen, you will see a string of information with a link that tells you how your picture is going to be uploaded to Photoshop. Click on that link and you can change the upload instructions. In the screen shot, you'll notice that my PPI is set to 163 PPI. That's because I want my screen to display actual size so that a ruler inch in real life equals a ruler inch on my screen. I have a 4K screen, 23.5 inches wide and 3984 pixels, resulting in the 163 PPI. Once I finish working on my products, I save them at 100 PPI for printing purposes at Fine Art America, Costco, and my own photo printer.
Jun 13, 2017 13:00:33 #

Mr.Ft wrote:
My question involves my canon 80d and photoshop. Now I'm very new to photoshop, but no matter what resolution I set my camera to when I upload it to photoshop the resolution in 72 dpi. Now is this a function of my camera or photoshop? Is there a way to raise the dpi or resolution? Any help would be greatly appreciated!
I always use Windows to copy my image files from the SD card, just as I would copy any other file. Looking at my old images, apparently my Canon Rebels routinely set dpi to 72 dpi. I never paid particular attention to that because actual pixel count is what really matters. When I look at an image on my computer screen, Windows Photo Viewer automatically scales it to fill the screen {and then I can zoom in if I want to look at a particular section}. When I'm using gimp to edit an image, I use View | Zoom to determine how large I want it to be. The few times I've wanted to print it, I use gimp to set the print size in inches, and it adjusts dpi so pixels / dpi gives the required size document.
Jun 14, 2017 05:45:06 #
would be helpful in the future if you put a topic line that explained what you wanted - not just - can someone help me ! Thanks !
Jun 14, 2017 06:09:23 #

Mr.Ft wrote:
My question involves my canon 80d and photoshop. Now I'm very new to photoshop, but no matter what resolution I set my camera to when I upload it to photoshop the resolution in 72 dpi. Now is this a function of my camera or photoshop? Is there a way to raise the dpi or resolution? Any help would be greatly appreciated!
Yes, with ACR when copying your pix to your computer. Yes, 72dpi is normal at that point, but look at it's size perhaps 40x60", Set ACR to 300ppi and you'll have a 10x15" image or similar. I had to play with it a bit to show you initially using a different CellPhone image. See my Ps CS6 screen captures.
Not only does my CellPhone show a 72ppi image also notice the physical size, 73.8x41.5". That is from an 8 MP SmartPhone, image how huge a 24MP 14-bit camera supplies! Also note, Photoshop & Lightroom use the wrong terms as do many programs. ppi is digital resolution, dpi is printer resolution, and lpi is optical resolution. With Adobe they mean ppi=dpi even though that is wrong and makes little sense, yet makes little difference per your camera and computer; printer, then there may be issues. That is another question...
Read the other helpful answers too. You'll get it.
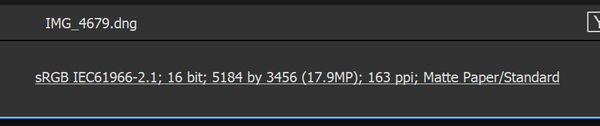
Note file spects at bottom of ACR page...
(Download)
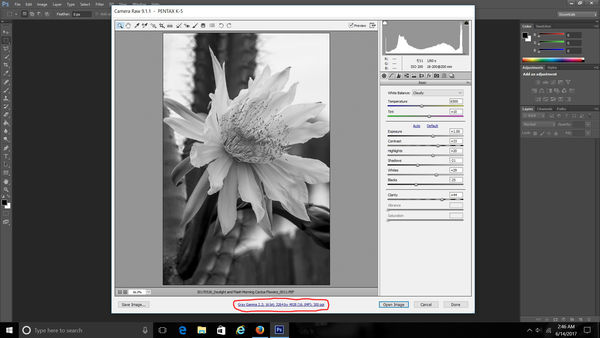
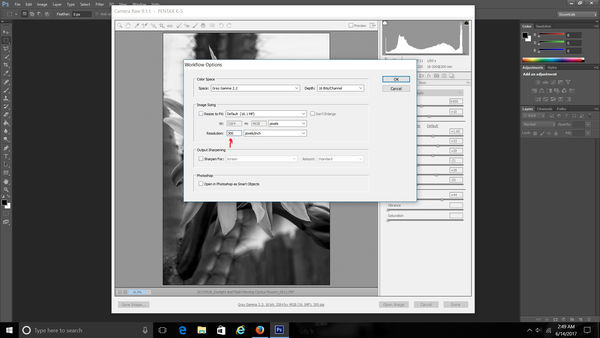
Click on "spec" to open this window to make changes...
(Download)
Here is an example of what you were talking about, 72ppi. Make the changes above to 300ppi.
(Download)
Jun 14, 2017 11:03:55 #

FILE SIZE EQUATION:
Width x Height x Depth (resolution in PPI) = file size.
Your file size is an equation. If you raise your resolution in PPI, your width and height go down and vice-versa.
It takes a special step on your part to un-constrain the equation, which you can do, and when you do that you are interpolating the file (making it bigger or smaller).
Jun 14, 2017 11:27:45 #

Mr.Ft wrote:
My question involves my canon 80d and photoshop. Now I'm very new to photoshop, but no matter what resolution I set my camera to when I upload it to photoshop the resolution in 72 dpi. Now is this a function of my camera or photoshop? Is there a way to raise the dpi or resolution? Any help would be greatly appreciated!
GAAAA! This topic is beaten to death on a weekly basis here on UHH. PLEASE, just do a search. That said, this is a summary of the basics. It's more than you asked for, but you need to know it all (and more).
72dpi is an EXIF or TIFF file header (metadata) field value that tells you NOTHING about the image. It simply tells graphic arts pagination software "how big to make the pixels" when representing them with dots on a printed page. 72dpi will make a very large print. 288dpi will make a print 1/2 that size on the diagonal, with 1/4 the area.
THE ONLY THING THAT REALLY MATTERS is the file dimension in *pixels* — THAT tells you the true potential of the file. You can reproduce ANY size file at "72dpi". The number of pixels tells you how big it will be at that resolution setting. 3000x2000 pixels at 72dpi makes a print 3000/72 by 2000/72, or 41.667 x 27.778 inches. Change the resolution without resizing (which JUST changes the EXIF resolution header value and NOTHING else), and suddenly the print is a different size. The same 3000x2000 pixels at 300dpi makes a print 10 x 6.667 inches. BOTH PRINTS appear equally sharp and detailed, but ONLY when viewed from their diagonal distances (50 inches away from the 72dpi image and 12 inches away from the 300 dpi image).
You can change the "resolution" in Photoshop in one of three ways. You can change JUST the resolution header without resizing the file. You can change BOTH the resolution header AND the pixel dimensions of the file. And you can change the resolution without resizing, but then CROP the file. Go to Image —> Image Size to get a dialog with all but crop controls. NOTE ALL the drop-down menu options. Cropping is done with the "scale-o-graph" tool (crop tool) in the tool palette. There are plenty of options at the top of your screen when you choose that tool.
There are, of course, many more subtle issues with resizing and cropping, most of which have to do with the loss of detail. You can spend many hours reading about them, or you can experiment to see what works acceptably well for you, or both.
One more big thing... Try to think of PIXELS as having no dimensions. They are just numbers — DATA in a FILE. Try to think of DOTS as having physical dimensions! A scanner scanning at 300dpi (300 physically discrete samples per inch of the original) creates a FILE with (300 x the size of the scan) pixels. So a 4x5 print scanned at 300dpi yields a file with 1200x1500 pixels. The scanner software probably sets the file header resolution to 300dpi, but you can change it as mentioned earlier.
A MONITOR displays an image with an array of red, green, and blue dots. MONITOR resolution can be anywhere from a few inches per dot to several hundred dots per inch, depending on the size (billboard or JumboTron vs iPhone). Regardless of that, when you view an image at "100%" each pixel in the file is displayed by one RGB monitor "dot."
Dots are used to create pixels (in a scanner) or to reproduce them (on a printer or a monitor). So don't confuse "INPUT resolution in pixels per inch" with OUTPUT resolution in dots per inch. What matters when printing is INPUT RESOLUTION IN PPI and OUTPUT RESOLUTION IN DPI. The two are usually entirely different. They are always different CONCEPTS.
INPUT resolution in PPI refers to how many original, from-the-camera or from-the-scanner (or interpolated) pixels you are spreading over each inch of printed output, REGARDLESS of the size dots used to print each pixel.
OUTPUT resolution in dpi refers to how many ink dots or LED flashes or laser pulses you are using to represent your input pixels.
An inkjet printer with 1440x2880 dpi resolution uses *up to* that many dots to represent however many pixels per inch you are feeding to the printer driver. So, *many* dots are used to represent each pixel! In that case, HOW MANY dots varies with the color and brightness of the pixel. This is called frequency modulated screening... More dots closer together yield darker colors, while a few dots, farther apart, yield lighter shades.
A mini-lab printer with 600dpi resolution uses that many dots per inch in a fixed grid pattern to represent however many pixels per inch you are feeding to the printer driver. The printer is using a laser or LED light source to expose a silver-halide based photosensitive paper.
The generally accepted number of PIXELS you need to reproduce photographic quality images (the point where adding MORE pixels would not yield any more perceivable detail in a print) is 240 PPI at 8x10 inches, assuming a viewing distance of 12.8 inches (diagonal of the 8x10 print). You need LESS input resolution for larger prints, and MORE for smaller prints. A 16x20 printed with an input resolution of 180 PPI is perfectly viewable from 26 inches, or even 20 inches. That's pretty close for a 16x20! (Photography nerds are known to get closer...)
Most graphic arts people want 300 PPI or more (they mistakenly call it 300dpi out of custom or habit in that industry). That is why Photoshop and similar programs have a resize tool... 300 PPI is usually more than enough for photos on letter-size pages. Heck, 200 PPI will do in most cases where conventional halftones or color separations are made.
I hope that helps. It's based on digital imaging experience in both the printing and photographic industries since 1979. I straddled the fence between the two, by working for a company that printed yearbooks and school portraits. Each side has plenty of myths and misconceptions to go around... some of which are touted from the podiums at prestigious international conventions.
Jun 14, 2017 11:38:48 #
A good reply following mine. I've taught this issue in Photoshop and watched the students' eyes glaze over. They need to see a light go on first such as the way I presented it (above, the equation concept) and then they need to explore the details as you have laid out.
burkphoto wrote:
GAAAA! This topic is beaten to death on a weekly b... (show quote)
Jun 14, 2017 11:50:00 #
Fotoartist wrote:
A good reply following mine. I've taught this issue in Photoshop and watched the students' eyes glaze over. They need to see a light go on first such as the way I presented it (above, the equation concept) and then they need to explore the details as you have laid out.
Yep. Good equation.
The amount of ignorance and manure surrounding that 72dpi header is amazing... It is worth time spent experimenting to understand the concepts, because you can always find people who insist on something that, bless their pointy little heads, they just don't need!
By the way, SOME camera manufacturers set the resolution header to something else by default. My GH4 uses 180dpi. Makes no difference to me...
Jun 14, 2017 12:09:33 #
burkphoto wrote:
Yep. Good equation.
The amount of ignorance and manure surrounding that 72dpi header is amazing... It is worth time spent experimenting to understand the concepts, because you can always find people who insist on something that, bless their pointy little heads, they just don't need!
By the way, SOME camera manufacturers set the resolution header to something else by default. My GH4 uses 180dpi. Makes no difference to me...
Yes, looking at old files from when I was a Canon user, I see that my Rebels set it to 72 dpi and my Elphs set it to 180 dpi
Jun 14, 2017 13:33:47 #
If you want to reply, then register here. Registration is free and your account is created instantly, so you can post right away.