Fixing Granddaughter In 6 Steps With Both Lightroom and Photoshop
Mar 4, 2017 13:05:36 #
I started learning Lightroom with version 4 when you bought it. When the $10 CC plan came I balked. Eventually, I decided to see it as a "free" way to get Photoshop. Once used to Lightroom, Photoshop is a challenge. Gradually, I'm getting it.
One key challenge is learning when to take advantage of specific tools in Photoshop when Lightroom works so well.
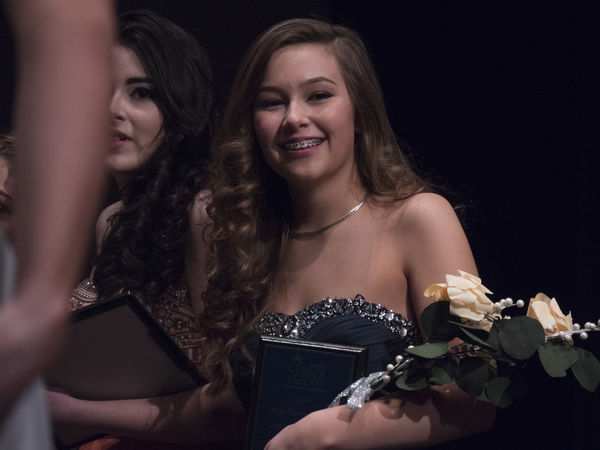
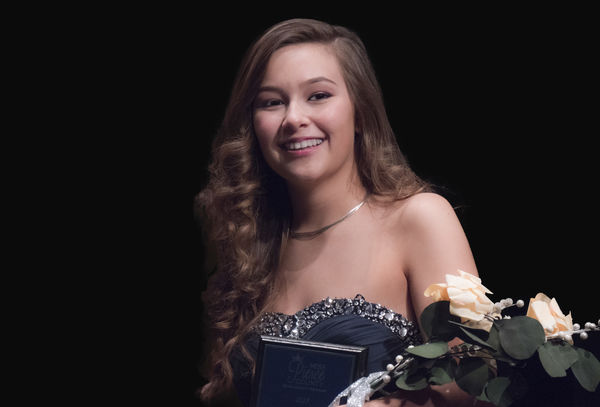
A week ago my 15 year old granddaughter was dressed in a formal at a busy event. I had no idea what to expect or plan for. I took a mirrorless and a midrange zoom. I did spray and pray burst shooting from within a crowd. One image seemed to have potential. RAW, 1/250th, f/5.5, ISO 3200, 125mm (250 for you FF shooters).
This is a bit of bragging and showing off new skills learned since my 70th birthday. Here is what I did using Topaz Remask, Photoshop adjustment layers, the Spot Healing Brush, the Clone Stamp Tool and the Brush Tool. In Lightroom I used the Noise Reduction and Clarity sliders.
One key challenge is learning when to take advantage of specific tools in Photoshop when Lightroom works so well.
A week ago my 15 year old granddaughter was dressed in a formal at a busy event. I had no idea what to expect or plan for. I took a mirrorless and a midrange zoom. I did spray and pray burst shooting from within a crowd. One image seemed to have potential. RAW, 1/250th, f/5.5, ISO 3200, 125mm (250 for you FF shooters).
This is a bit of bragging and showing off new skills learned since my 70th birthday. Here is what I did using Topaz Remask, Photoshop adjustment layers, the Spot Healing Brush, the Clone Stamp Tool and the Brush Tool. In Lightroom I used the Noise Reduction and Clarity sliders.
Original RAW Exported to JPG
(Download)
Results of Topaz Remask

(Download)
Removing Right Braces w/ PS Brush and Stamp Tools

(Download)
Removing Left Braces

(Download)
Paint White In Eyes with Opacity Adjustment
(Download)
PS Blemish Adjustment Content Aware Healing Brush

(Download)
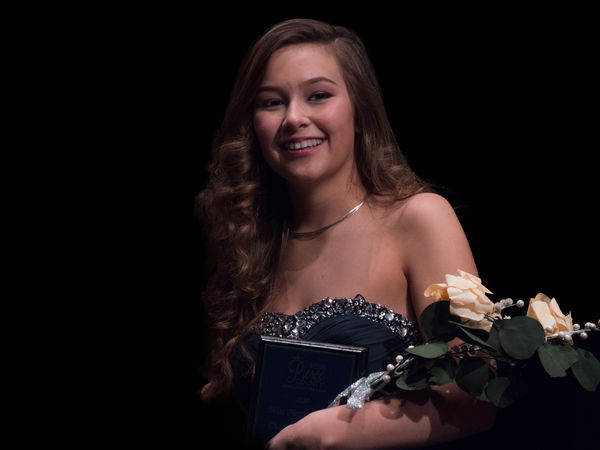
Final With Smoothing In LR with Noise and Minus Clarity

(Download)
Mar 4, 2017 13:27:47 #

Mar 4, 2017 14:07:47 #
northsidejoe wrote:
Very nice results thanks for sharing saying hello from Pittsburgh.
Thanks! I started with this photo stuff 6 decades ago! Photoshop and Lightroom for $10 a month and a cheap amazing Canon printer continue to blow my socks off!
Mar 4, 2017 14:19:30 #


Mar 4, 2017 15:12:45 #
quite a difference from the original one to the final. I like the last one in your demo the most. It takes lots of practice, some times by trial and error to find out which tool is best to use what different circumstances. Good post 
Mar 4, 2017 17:57:01 #
Fotoartist wrote:
You need to do something more like this (Photoshop).
Thank you for the suggestion!
But, I'm not seeing what you did. The exposure is up a little and the eyes are brighter. What did you do? Why? And, did you start from the first photo or did you just adjust the last?
Mar 5, 2017 11:09:03 #

Mar 5, 2017 12:34:37 #
bsprague wrote:
Thank you for the suggestion!
But, I'm not seeing what you did. The exposure is up a little and the eyes are brighter. What did you do? Why? And, did you start from the first photo or did you just adjust the last?
But, I'm not seeing what you did. The exposure is up a little and the eyes are brighter. What did you do? Why? And, did you start from the first photo or did you just adjust the last?
I like the showing of the progression of edits in the original post. They are very helpful in showing what was done and how it affected the image. At this point, the tweaks will be more subjective and one person doing one thing and another doing something else becomes more of a personal preference.
It appears the two main things that fotoartist did was the crop and the lighter tone. I think both helped the image in multiple ways. The crop removed a lot of unnecessary black on the left and made the person larger as the subject of the photo. Hint, it is all about her, not the background (unless the background has something important for context). The lighter tone also helps with the hair not disappearing into the shadows.
In an image like this, I prefer a background that is blacker. Unfortunately, his edit took the background in the wrong direction, as it lost some "blackness". And for me, I would crop up from the bottom to just above her arm. Because she is looking back to the viewer right, I like the face to be left of center, but if you prefer her face more centered, then also crop some from the right, perhaps leaving just one rose in the lower right.
(all IMHO, YMMV)
It is a really nice photo of a lovely young lady, and you definitely improved it a lot with your edits.
Jerry
Mar 5, 2017 23:57:54 #
Jerry and fotoartist made suggestions I used in the final print today. I brightened it a little and cropped a bit as well. I'm putting it and another in frames to give her parents that are my son and daughter-in-law. The prints look better than what is on my screen.

Mar 6, 2017 19:03:38 #

I think you did a really nice job with the lighting you had to work with. Really nice. I think I would have left the braces, however. It is who she is at this point in her life. She would probably disagree. Beautiful girl. You must be very proud.
If you want to reply, then register here. Registration is free and your account is created instantly, so you can post right away.