Remove paper texture from scanned images
Feb 27, 2017 14:05:11 #
I have Adobe CC for Photographers and I am running it on a 64-bit Windows 10 PC.
I have several hundred 30 to 40 year-old photos that were printed on textured paper. When I scan them the texture stands out and detracts from the image; in some cases, it seriously degrades the image.
I have read about using Fast Fourier Transform plugins to remove the texture without spoiling the image and have viewed several YouTube videos that demonstrate the capabilities of these plugins. None of the videos names a product and most, if not all, were run on MAC's. Most of the offerings on the Web that I have found are for MAC's, are hosted on insecure sites, or are 32-bit versions that are 4 or 5 years old, therefore having questionable compatibility with Photoshop 2017. I am not interested in any of these options.
Can any of you recommend a trusted site that has a recent Photoshop CC-compatible version for 64-bit Windows?
Outsourcing the job would be a last resort since most of these pictures are irreplaceable and I don't want to chance having them lost or damaged in transit.
Thanks for your help.
Feb 27, 2017 14:20:09 #
Voyager1 wrote:
I have Adobe CC for Photographers and I am running... (show quote)
Have you tried the noise filter in Photoshop. You can use despeckle and or dust and scratches.
Feb 27, 2017 14:22:06 #

You might want to look at ImageJ software.
https://imagej.nih.gov/ij/
--Bob
https://imagej.nih.gov/ij/
--Bob
Voyager1 wrote:
I have Adobe CC for Photographers and I am running... (show quote)
Feb 27, 2017 14:22:51 #
letmedance wrote:
Have you tried the noise filter in Photoshop. You can use despeckle and or dust and scratches.
Yes. I have used both of these on several test photos. The result only diminishes the problem slightly, it does not remove it.
Feb 27, 2017 14:35:25 #
rmalarz wrote:
Thanks for the link. There are a few fft projects listed there. Do you have a preference?
Feb 27, 2017 15:12:56 #
Download a trial copy of Topaz Clarity and Topaz Simplify. Both have filters that will selectively smooth portions of the image.
Feb 27, 2017 15:16:33 #
rgrenaderphoto wrote:
Download a trial copy of Topaz Clarity and Topaz Simplify. Both have filters that will selectively smooth portions of the image.
Thanks. I will check them out. Will either or both work on the entire image?
Feb 27, 2017 16:07:07 #
Yes, and you can do masks for selective editing. With the trial versions, you cannot save an image without a watermark (I think).
Feb 28, 2017 09:35:15 #
MCHUGH
Loc: Jacksonville, Texas
Have you considered copying them? I know you are interested in scanning them but in copying you can eliminate most if not all the texture surface by setting up polarized light from opposite sides of the print and using a polarizing filter on your camera. By turning the filter you can see the texture disappear. You have to make sure in both lights that the filter are oriented the same. This will also eliminate old prints that have silvered over the years. You will see detail in them that you can not see otherwise.
Feb 28, 2017 09:42:27 #
MCHUGH wrote:
Have you considered copying them? I know you are ... (show quote)
I would love to try this approach but I don't have the lights, filters or the space. Thanks for your suggestion.
Feb 28, 2017 09:52:44 #
Voyager1 wrote:
Thanks for the link. There are a few fft projects listed there. Do you have a preference?
I downloaded and installed ImageJ last night. In my not so exhaustive test (one JPEG), it diminished the texture quite a bit. The original looked like an image covered in bubble wrap. Before any further retouching, it still has a slight honeycomb texture. I think I can live with that at least for now.
Thanks again.
Feb 28, 2017 16:40:44 #
Voyager1 wrote:
I downloaded and installed ImageJ last night. In my not so exhaustive test (one JPEG), it diminished the texture quite a bit. The original looked like an image covered in bubble wrap. Before any further retouching, it still has a slight honeycomb texture. I think I can live with that at least for now.
Thanks again.
Thanks again.
Post before and after?
Feb 28, 2017 17:32:44 #
rgrenaderphoto wrote:
Post before and after?
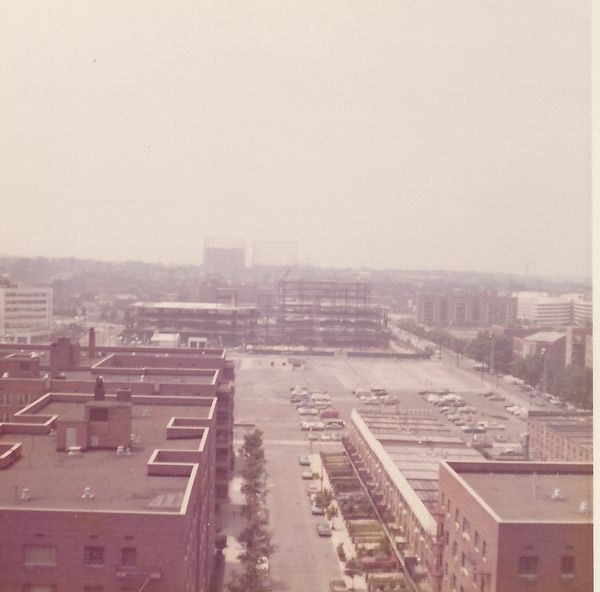
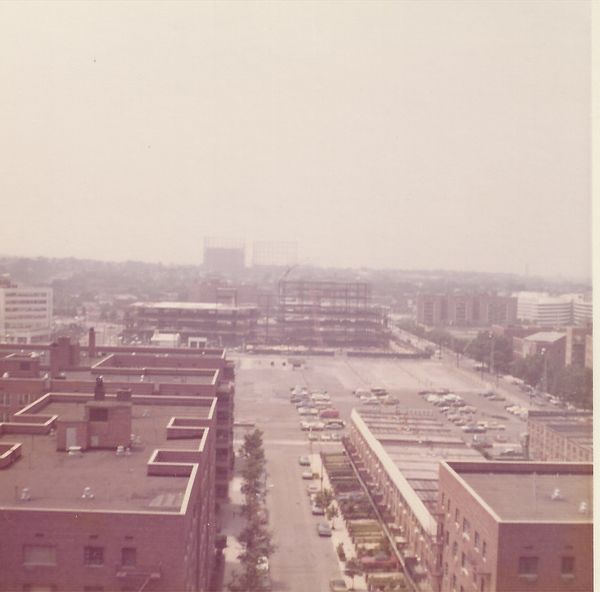
Here is a before and after example. This is a snapshot of the Queens Center Shopping Mall under construction circa 1971 or 1972. The Elmhurst Gas Tanks are barely visible in the distance.
The only work done on this image is to run it through the FFT/IFFT process in ImageJ.
I have some where the texture is much worse than this and the result is not so good but better than the original.
Feb 28, 2017 19:27:09 #
I tried imagej and got the following result:
Starting with an image scanned from a print on patterned paper
http://small-farm.org/images/Test/1.jpg
Loaded it into imagej and hit "process", then FFT, then chose FFT
http://small-farm.org/images/Test/FFT1.jpg
The hexagonal pattern gives dots on the FFT in a hexagonal pattern. I draw a box around the inner ring of dots one at a time and hit ctrl-x, which erases the dot.
http://small-farm.org/images/Test/FFT1A.jpg
Then hit "process", then FFT, then chose Inverse FFT
http://small-farm.org/images/Test/1A.jpg
The resulting image has much of the pattern removed, but there is still a small pattern left behind
So I take the FFT and erase as before the next ring of dots
http://small-farm.org/images/Test/FFTB.jpg
And take the inverse FFT as before
http://small-farm.org/images/Test/1b.jpg
DO NOT REMOVE THE CENTER DOT. It contains the photo information.
http://small-farm.org/images/Test/FFT1c.jpg
http://small-farm.org/images/Test/1c.jpg
Mar 1, 2017 14:27:09 #
DirtFarmer wrote:
I tried imagej and got the following result: br St... (show quote)
There is a brush tool in the menu. Double click it and a dialog box opens to allow you to specify the size of the brush and the color. Select any size that completely covers the dot or star; choose black as the color. Simply place the crosshairs over the star and click to place a black circle over it. I have found that blacking out even the very tiny and faint markings can improve the programs ability to remove the texture. Also, it seems to work better on JPEGs than TIFFs.
If you want to reply, then register here. Registration is free and your account is created instantly, so you can post right away.