Negative Restoration
Feb 10, 2017 11:20:00 #
I'm not sure this is the correct section to ask as the original was not digital??
Still, hopefully somebody might have an interest in early negatives.
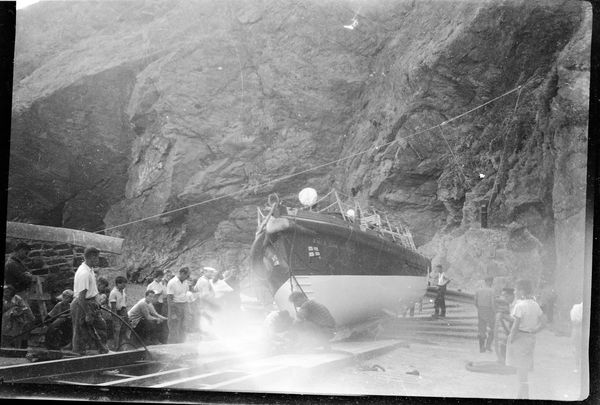
I scanned a rather poor glass plate negative of RNLI lifeboat Duke of York taken on the slip at The Lizard, probably around 1960 but could be earlier.
Unfortunately the plate has suffered from a light leak and, as you see has a blown section in the centre foreground and some uneven exposure to the right.
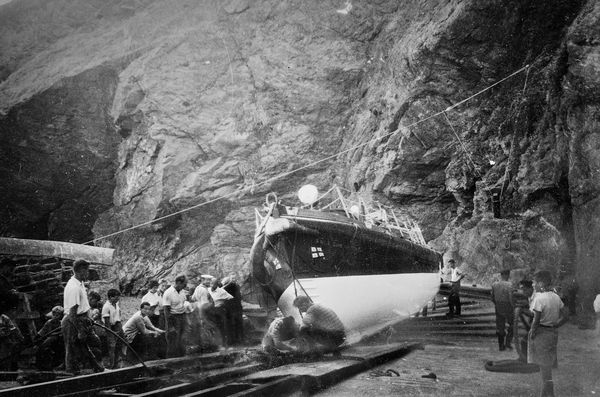
There are the usual scratches and blemishes from old age, which don't worry me too much. The second photo is after I've restored what I can and, to my mind is a big improvement, but I wonder if anybody has any suggestions as to the best way to tackle this sort of restoration. I've used Lightroom and photoshop to achieve the result shown, but technique is a bit hit and miss.
Obviously there are limitations as to what can be recovered, any suggestions would be appreciated.
Still, hopefully somebody might have an interest in early negatives.
I scanned a rather poor glass plate negative of RNLI lifeboat Duke of York taken on the slip at The Lizard, probably around 1960 but could be earlier.
Unfortunately the plate has suffered from a light leak and, as you see has a blown section in the centre foreground and some uneven exposure to the right.
There are the usual scratches and blemishes from old age, which don't worry me too much. The second photo is after I've restored what I can and, to my mind is a big improvement, but I wonder if anybody has any suggestions as to the best way to tackle this sort of restoration. I've used Lightroom and photoshop to achieve the result shown, but technique is a bit hit and miss.
Obviously there are limitations as to what can be recovered, any suggestions would be appreciated.
Feb 10, 2017 14:18:51 #


Feb 10, 2017 15:42:26 #

I suspect that you're already using a lot of brushwork and varying the size and feathering to suit the areas that need to be treated. For a large diffuse area like the bottom right hand corned I'd shrink the image size till it was surrounded by lots of space then I'd use a large, well-feathered brush working from mostly outside the image so that it's mostly the feathering that impinges on the image. I think you've done well to get it to the point that it's at just now.
Feb 10, 2017 17:31:32 #
Feb 10, 2017 17:39:34 #
R.G. wrote:
I suspect that you're already using a lot of brushwork and varying the size and feathering to suit the areas that need to be treated. For a large diffuse area like the bottom right hand corned I'd shrink the image size till it was surrounded by lots of space then I'd use a large, well-feathered brush working from mostly outside the image so that it's mostly the feathering that impinges on the image. I think you've done well to get it to the point that it's at just now.
Thanks for the shrink tip RG, I get it exactly! There are umpteen brushes used, as you suggest, but I guess one has to accept that some areas are beyond redemption - mostly quite small parts, but there's just nothing there. I'll give your suggestion for the larger area a go on another copy - the joy of Lr eh?
I have another image of a pub in the Lake District that is suffering in a similar fashion - part of quite a large collection I've accumulated over the years. All are found, not taken by me, and some are worth putting a bit of effort in. I'm experimenting at the moment - hopefully I'll get better at it.
Feb 10, 2017 21:09:47 #
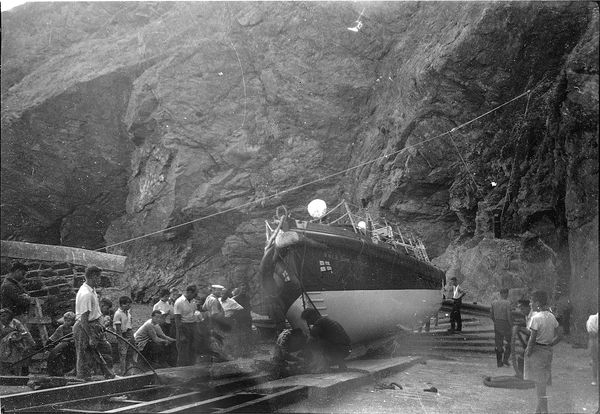
I decided to give this a try. The result is similar to yours, but a little different.
I first brought the image into Photoshop as if it were a raw file. This allowed me to play with the exposure and black level settings. Then, loading it into Photoshop "proper", rather than trying to repair any of the image by cloning or painting, I only used "Levels" layers and masks to control where the levels adjustments were applied. One layer was applied to the bright glare near the center, and another layer was applied to the lower right side. A third Levels layer was then applied to the entire image for best overall appearance.
I wasn't able to get rid of all of the artifacts, but I think it worked fairly well.
Feb 10, 2017 23:11:03 #

I agree, nice job. You've probably done about as much as could be done with the light leak. You could spend hours and hours cleaning up all the dust spots. Were those embedded in the original or were they just on the surface of the plate when it was scanned? If the latter maybe you could clean the plate carefully and re-scan.
Feb 11, 2017 04:37:28 #
magnetoman wrote:
Thanks for the shrink tip RG.....
Another point that I'm sure you're already familiar with is to make good use of the brush set to Erase. I'll mention it briefly for anyone following this thread that perhaps hasn't realised yet that you can modify the brush-selected area using Erase mode. The following description applies to Lightroom but there will probably be similar functions in other editors.
If you can't quite get the selection that you wanted using Size (changing as you go if necessary) and Feather (as and when required), you can switch over to Erase and again select an appropriate size and feathering, then fine tune the selected area ( this can be done with Auto Mask as and when required).
If you've already started to make adjustments and you don't want to turn the Exposure up fully to see the selection, you can press O (that's the letter O, not the number 0) to highlight the selection in red. Doing so doesn't affect any of the applied settings, and when you're happy with the selection you can press O again to get rid of the red highlight.
Sometimes it might be necessary to switch back and forth between erasing and re-selecting several times to get the selection just right.
Feb 11, 2017 06:09:47 #
R.G. wrote:
Another point that I'm sure you're already familia... (show quote)
Yes, another good tip RG. You can also hit alt (or option) and That changes the brush to erase - very fast way of swapping between the two and a great assistance as you say. Also handy to use this in conjunction with selecting the red mask.
While I'm here RG, you mentioned earlier reducing the size of the image to use a large brush/large feather - did you mean in Lr and, if so, how do you reduce the image, I can only increase??
Feb 11, 2017 06:15:32 #
10MPlayer wrote:
I agree, nice job. You've probably done about as much as could be done with the light leak. You could spend hours and hours cleaning up all the dust spots. Were those embedded in the original or were they just on the surface of the plate when it was scanned? If the latter maybe you could clean the plate carefully and re-scan.
Good point 10M, but I am always wary of damaging the negative, so opt to spend ages 'spotting-out' the white bits! You read so much about people damaging stuff beyond repair. I've even read of people trying to wash early negs and floating the emulsion off the nitrate!
Feb 11, 2017 06:19:03 #

R.G. wrote:
I suspect that you're already using a lot of brushwork and varying the size and feathering to suit the areas that need to be treated. For a large diffuse area like the bottom right hand corned I'd shrink the image size till it was surrounded by lots of space then I'd use a large, well-feathered brush working from mostly outside the image so that it's mostly the feathering that impinges on the image. I think you've done well to get it to the point that it's at just now.
Isn't that the same as increasing the canvas size without messing with the image size?
Feb 11, 2017 06:23:20 #
magnetoman wrote:
....you mentioned earlier reducing the size of the image to use a large brush/large feather.....
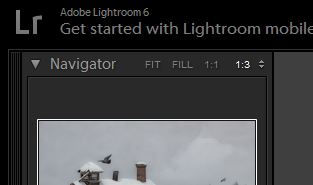
In Lr, if you change the zoom ratio in the top left corner to something like 1:3 (for a bigger file it would typically be 1:8 or so) it gives a bit of space round the image.
(I hope Linda doesn't mind me using her image. It was in Lr when I opened it).
-
Zoom ratio of 1:3 (usually it's higher, depending on file size).
Feb 11, 2017 07:03:13 #
R.G. wrote:
In Lr, if you change the zoom ratio in the top left corner to something like 1:3 (for a bigger file it would typically be 1:8 or so) it gives a bit of space round the image.
(I hope Linda doesn't mind me using her image. It was in Lr when I opened it).
-
(I hope Linda doesn't mind me using her image. It was in Lr when I opened it).
-
Thanks RG - I was being dumb - I see it reduce every time I use the zoom slider, its just that I whizz through it because I want it bigger! Very useful now I realise, much appreciated.
Feb 11, 2017 10:06:45 #

I'm wowed by what you've been able to do! How do you get people details in that central light area? I'd look at that and see nothing to bring out! Did you add them?
Feb 11, 2017 10:34:18 #

magnetoman, you have already done a good job and many have given good advice. How in the world did you get a glass negative in 1960? I would have thought they were long gone by then. What size and film was it? You are right not to touch anything. Between LR and PS, you can fix all the scratches, dust and the like. I wonder if you could improve the contrast and tonal range by scanning with under- and over-exposure and then use HDR or layers.
If you want to reply, then register here. Registration is free and your account is created instantly, so you can post right away.