Shadowlight Tutorial
Aug 15, 2016 13:44:34 #

This is in response to an earlier comment from pfrancke. Piet wrote: "If you ever have time or interest, for your favorite of these, having the original, then the B/W, then the inversion, and any thinking and working on the image that you do would be fascinating. YES - An In-Depth-Tutorial on what I think seems an easy to execute process with interesting writing on what you looked for in an image and choices you make - your journey if you will. What Were You Thinking?!"
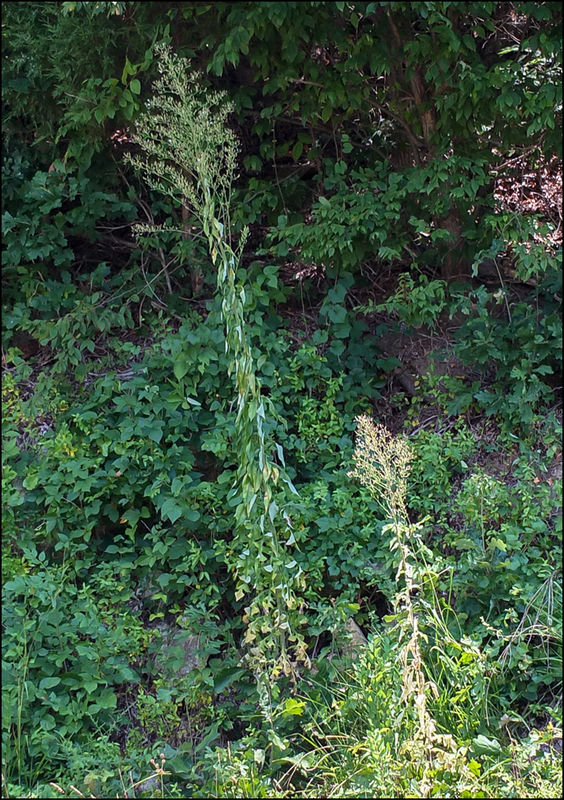
Image 1: I was driving around the countryside and noticed these two weeds standing out from a steep hillside. I liked that they had a nice dark background to set them off. When I first started working on this, my working title was "Big Brother, Little Brother". I knew almost from the start, though, that I did not intend to process this in color.
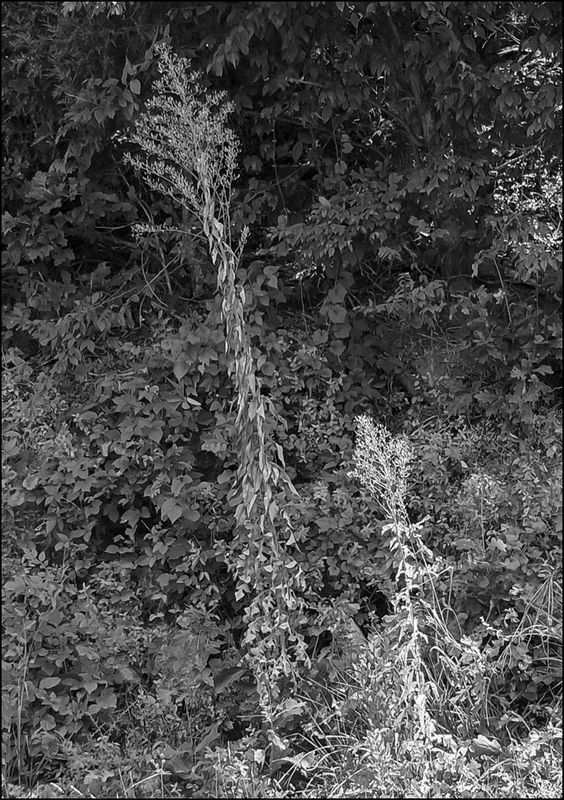
Image 2: I really wanted to see what this would look like in monochrome. I used NIK Silver Efex for the black and white conversion but was underwhelmed by the results. Basically the tonal values between Big Brother and the lower portions of the background were too similar. If I had wanted to, I could have made a much better image of the monochrome, but I was ready to move on to other things.
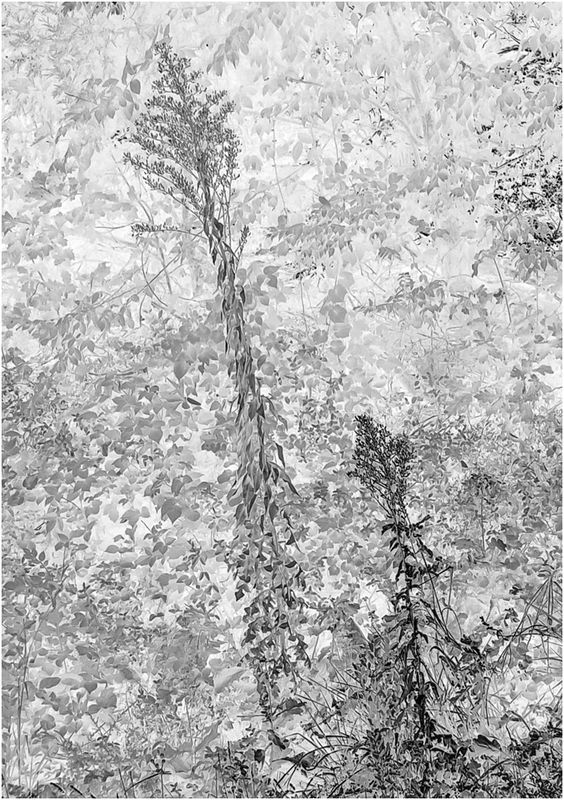
Image 3: Before abandoning the image altogether, I tried Shadowlight and thought "Aha! That's it!". Shadowlight is a term I use for a B&W inverted image. Basically, while looking at a monochrome image, press Ctrl-I. It will invert the colors in an image. As a matter of fact, you can do this with a color image as well, and it will give you a strangely colored rendition of your photo that looks slighty other-wordly. To me, though, it works much better in black and white.
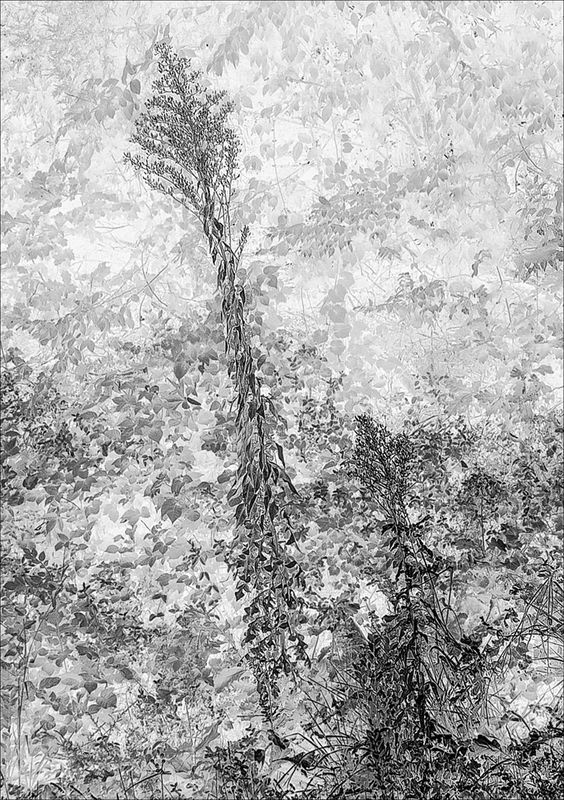
Image 4: Cleaned out some of the distractions, worked on the contrast values, and included a 1 pixel stroke about the periphery to give it a very precise bounding box.
Image 1: I was driving around the countryside and noticed these two weeds standing out from a steep hillside. I liked that they had a nice dark background to set them off. When I first started working on this, my working title was "Big Brother, Little Brother". I knew almost from the start, though, that I did not intend to process this in color.
Image 2: I really wanted to see what this would look like in monochrome. I used NIK Silver Efex for the black and white conversion but was underwhelmed by the results. Basically the tonal values between Big Brother and the lower portions of the background were too similar. If I had wanted to, I could have made a much better image of the monochrome, but I was ready to move on to other things.
Image 3: Before abandoning the image altogether, I tried Shadowlight and thought "Aha! That's it!". Shadowlight is a term I use for a B&W inverted image. Basically, while looking at a monochrome image, press Ctrl-I. It will invert the colors in an image. As a matter of fact, you can do this with a color image as well, and it will give you a strangely colored rendition of your photo that looks slighty other-wordly. To me, though, it works much better in black and white.
Image 4: Cleaned out some of the distractions, worked on the contrast values, and included a 1 pixel stroke about the periphery to give it a very precise bounding box.
Original image
(Download)
Converted to b&w in NIK Silver Efex
(Download)
Inverted Image
(Download)
(Download)
Aug 15, 2016 14:36:36 #
Aug 15, 2016 15:09:25 #
Treepusher wrote:
You're welcome Randy. I suspect you will find a number of subjects that will go well with this process.Thanks for the post, Bob! Have to give it a try!
Aug 15, 2016 15:13:16 #
this is wild! Image one, goes into Piet's garbage bin, wondering why on earth did I even stop. Image two, ok, but still garbage bin, nothing really grabs me, but I see potential in the sharply shaped leaves. Image three, WHAT THE HECK, MAGIC just happened. I LOVE that effect.
Image four - wonderful cleanup and continuation - BUT... explain how you put that 1 pixel border on it? So hard to believe that the single pixel made the image so clean and crisp and complete.
Thank you for sharing how you did this and how your brain cells fired. Three significant things I learned
1) interesting composition and goal, but reality image OOC didn't cut it.
2) the inversion is fascinating. If I see a black and white, I will look at it's inversion from now on too
3) single pixel box for boarder, so clean, delicate, razor sharp -- love it! It really completed the image for me.
THANK YOU sir!!
Aug 15, 2016 15:28:46 #
pfrancke wrote:
To Create a single pixel border in PS or PSE, use Ctrl-A (shortcut for Select>All), then Edit>Stroke: Width - 1px; Color - select Black; Location - inside; Blending - Normal; Opacity - 100%this is wild! Image one, goes into Piet's garbage... (show quote)
Aug 15, 2016 15:31:54 #
Bob Yankle wrote:
To Create a single pixel border in PS or PSE, use Ctrl-A (shortcut for Select>All), then Edit>Stroke: Width - 1px; Color - select Black; Location - inside; Blending - Normal; Opacity - 100%
thank you, I will practice this until it becomes automatic.
Aug 15, 2016 15:32:41 #
pfrancke wrote:
thank you, I will practice this until it becomes automatic.

Aug 15, 2016 21:52:37 #
Aug 15, 2016 22:06:59 #
Cwilson341 wrote:
Thank you Carol. C'mon in ..... the water's fine.Excellent guidance - thank you for opening these doors!
If you want to reply, then register here. Registration is free and your account is created instantly, so you can post right away.