Merging misty shots.
Aug 13, 2016 12:20:20 #

I've been working with quite a few misty shots lately, and I'm in the process of deciding that the best starting point is a two-shot merge of a neutral exposure and the darker -2 exposure. Due to a recent productive trip I'm snowed under with editing just now and I'm not in a position to provide detailed examples of what I'm suggesting, but I thought I'd put it out there for your consideration. If anybody wants to join in and post examples of what you agree/disagree with, feel free (if you do want to contribute, feel free to use any of the posted files below, or any of your own).
The normal merging of bracketed shots would typically include three or five exposures which would typically include a neutral exposure, one or two darker exposures and one or two lighter exposures. My own camera (a D5200) is set to produce three exposures (0,+2 and -2), but I've decided that in the case of misty shots the brighter exposure (+2) takes away more than it adds. One of the main things that determines the mistiness of mist is brightness, and with the +2 exposure it does just that - add to the mistiness - but at the expense of detail and contrast.
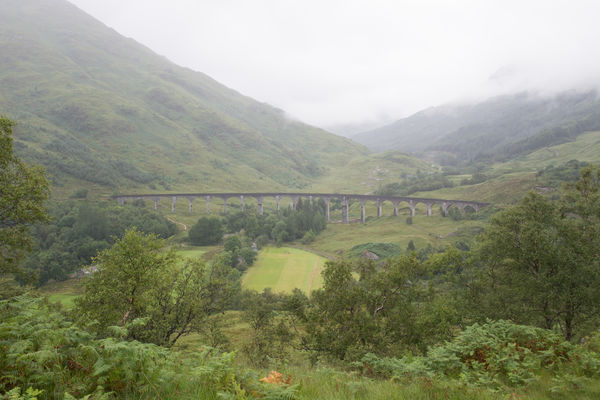
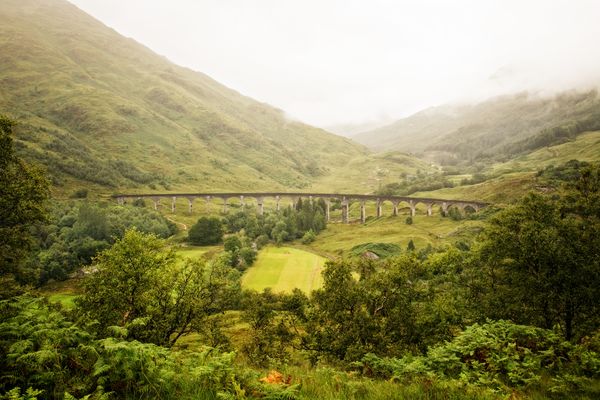
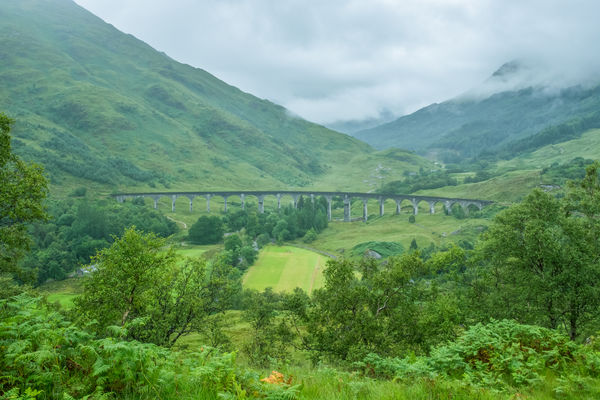
Below is a set of images of Glenfinnan Viaduct which consists of the following:-
1) A single neutral (0 offset) exposure (jpg shown, with a link to a DNG version underneath).
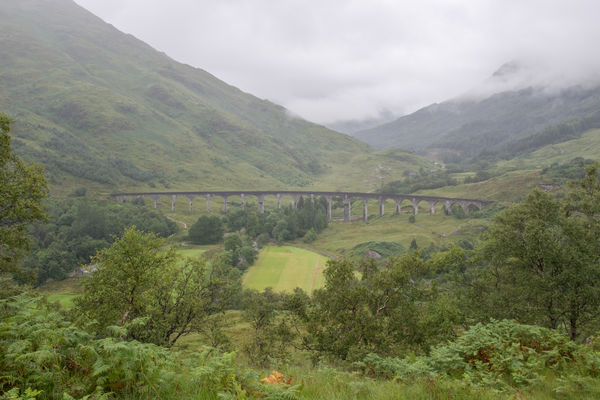
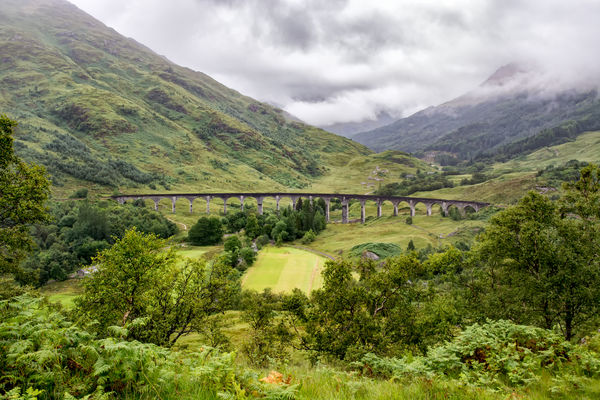
2) A three-shot merge of 0, +2 and -2 exposures (jpg shown, with a link to a DNG version underneath).
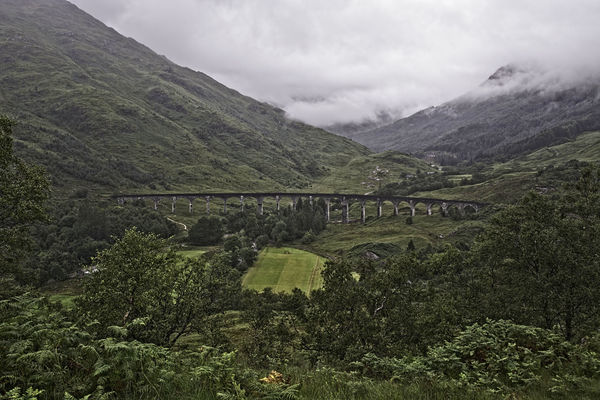
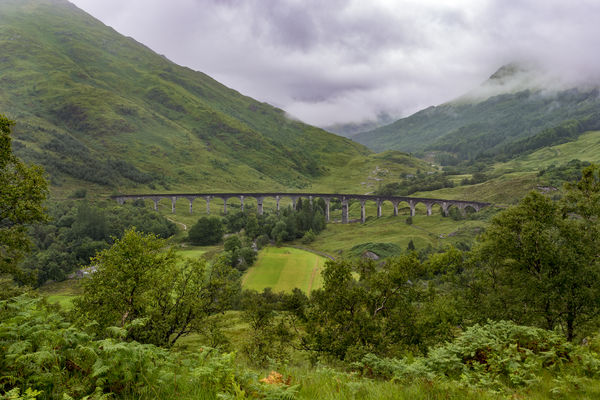
3) A two-shot merge of 0 and -2 exposures (jpg shown, with a link to a DNG version underneath).
I tried to create as level a playing field as possible, but the DNG of the single neutral exposure has a slight advantage because I didn't have to use compression to upload it, whereas the merge files (DNG) are far too big to upload, so the DNG versions for uploading required compression. The jpegs might provide the fairest comparison of all because they are all similarly sized and all sourced at maximum quality from the original uncompressed DNG files.
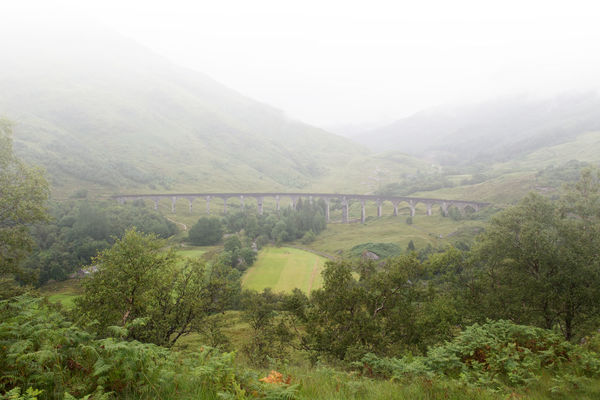
Comparing the three shots in each set, going from 1 to 3 in that order it's obvious that there is a decrease in brightness, and closer examination reveals a slight increase in detail, contrast and colour. I've also noticed that the mistier the shot, the more pronounced this effect becomes.
It was suggested to me recently that the best starting point for editing is the raw version of the neutral exposure on its own, even if you have exposure bracketed shots to merge. If you think that that suggestion applies or doesn't apply to misty shots, feel free to post edits to prove your point.
My own opinion from what I've seen and experienced is that the best starting point for misty shots is a merge of the neutral (0) and the dark (-2) exposures. The only time I would consider a three-shot merge for a misty shot is if the shadows were seriously in need of lifting, but even then it's not obvious whether a three-shot merge would be better than a two-shot merge (as described). Trying to provide conclusive proof of any of these hypotheses is beyond me at the moment (way too busy), but as I said, if anybody wants to join in and prove/disprove any of these ideas, feel free.
-
The normal merging of bracketed shots would typically include three or five exposures which would typically include a neutral exposure, one or two darker exposures and one or two lighter exposures. My own camera (a D5200) is set to produce three exposures (0,+2 and -2), but I've decided that in the case of misty shots the brighter exposure (+2) takes away more than it adds. One of the main things that determines the mistiness of mist is brightness, and with the +2 exposure it does just that - add to the mistiness - but at the expense of detail and contrast.
Below is a set of images of Glenfinnan Viaduct which consists of the following:-
1) A single neutral (0 offset) exposure (jpg shown, with a link to a DNG version underneath).
2) A three-shot merge of 0, +2 and -2 exposures (jpg shown, with a link to a DNG version underneath).
3) A two-shot merge of 0 and -2 exposures (jpg shown, with a link to a DNG version underneath).
I tried to create as level a playing field as possible, but the DNG of the single neutral exposure has a slight advantage because I didn't have to use compression to upload it, whereas the merge files (DNG) are far too big to upload, so the DNG versions for uploading required compression. The jpegs might provide the fairest comparison of all because they are all similarly sized and all sourced at maximum quality from the original uncompressed DNG files.
Comparing the three shots in each set, going from 1 to 3 in that order it's obvious that there is a decrease in brightness, and closer examination reveals a slight increase in detail, contrast and colour. I've also noticed that the mistier the shot, the more pronounced this effect becomes.
It was suggested to me recently that the best starting point for editing is the raw version of the neutral exposure on its own, even if you have exposure bracketed shots to merge. If you think that that suggestion applies or doesn't apply to misty shots, feel free to post edits to prove your point.
My own opinion from what I've seen and experienced is that the best starting point for misty shots is a merge of the neutral (0) and the dark (-2) exposures. The only time I would consider a three-shot merge for a misty shot is if the shadows were seriously in need of lifting, but even then it's not obvious whether a three-shot merge would be better than a two-shot merge (as described). Trying to provide conclusive proof of any of these hypotheses is beyond me at the moment (way too busy), but as I said, if anybody wants to join in and prove/disprove any of these ideas, feel free.
-
1) Single neutral exposure (JPG).
(Download)
1) Single neutral exposure (DNG).
Attached file:
(Download)
2) Three-shot merge (+2, 0, -2) (JPG).
(Download)
2) Three-shot merge (+2, 0, -2) (DNG).
Attached file:
(Download)
3) Two-shot merge (0, -2) (JPG).

(Download)
3) Two-shot merge (0, -2) (DNG.
Attached file:
(Download)
Aug 13, 2016 15:27:58 #

R.G. wrote:
I've been working with quite a few misty shots lat... (show quote)
I know you wanted to show the mistiness however I wanted to see more of the features within the photo. So I'm posting this version with the hope of not being offensive, but did you know you captured a crop circle? Check in the center of the field and there it is. Photo darkened on upload.
Aug 13, 2016 15:39:12 #
SoHillGuy wrote:
I know you wanted to show the mistiness however I wanted to see more of the features within the photo. So I'm posting this version with the hope of not being offensive, but did you know you captured a crop circle? Check in the center of the field and there it is. Photo darkened on upload.
That's OK, SHG - you're not in the least bit offensive (as far as I know
 ). It would be useful if you told us what your starting point was (i.e. which file did you use).
No, I didn't notice the circle. I just kept on thinking "That yellow/green field is going to be murder when I try to edit these shots"
.Aug 13, 2016 16:06:59 #
R.G. wrote:
That's OK, SHG - you're not in the least bit offensive (as far as I know ). It would be useful if you told us what your starting point was (i.e. which file did you use).
No, I didn't notice the circle. I just kept on thinking "That yellow/green field is going to be murder when I try to edit these shots" .
). It would be useful if you told us what your starting point was (i.e. which file did you use).No, I didn't notice the circle. I just kept on thinking "That yellow/green field is going to be murder when I try to edit these shots"
.I started from the neutral shot making some edits in raw and changing to an object layer. In Perfect Effects applied a Subtle HDR layer, a Photo filter layer, and a further clarity adjustment layer.
Aug 13, 2016 16:14:37 #
SoHillGuy wrote:
I started from the neutral shot making some edits in raw and changing to an object layer. In Perfect Effects applied a Subtle HDR layer, a Photo filter layer, and a further clarity adjustment layer.
That's probably the best choice from the available selection (because it's uncompressed). Thanks for the info.
Aug 13, 2016 17:09:48 #
R.G. wrote:
That's probably the best choice from the available selection (because it's uncompressed). Thanks for the info.
Here is a version again working from the neutral image. My pen ran out as I was taking notes, but here is what I was able to jot down. Made a duplicate. Added a layer filled with white, reduce the opacity some. Added a radial of white to black. Reduced opacity. Changed from Normal to Overlay. Pen failed at this point. I believe I Used Perfect Effects 8 brush adjustment to darken the foreground. From this point on there may have been something else, but I have no recall of what. Oh yes, a slight sharpening.
Aug 13, 2016 20:08:59 #
I started with the first image. Again using ON1 software did enhancement adjustments, used many effects filters and didn't keep track of all I used. I did use dynamic contrast, glow, a texture, vignette and my favorite filter, the adjustment brush.
Aug 14, 2016 05:21:05 #
Tatia and SoHillGuy, I appreciate the effort that you put into your edits, but the point that I was trying to make (I realise now it wasn't very clear) is that the best starting point for me would be the two-shot merge (the neutral and the dark exposure). That's the best starting point for me because I have access to the original uncompressed files. The only reason the neutral exposure is (possibly) better here is because I didn't have to compress it to upload it. I'm hoping that that point is more apparent from the jpegs (which should all be of equal quality).
Perhaps I should have made the point that if the jpegs are downloaded you can click through them in sequence and the differences become more obvious. As you click through them in sequence, their contrast, detail and colour gets better, with the two-shot merge giving the best result.
Your edits are fine (and thanks for posting), but they're not helping to clarify the original point that I was trying to make.
Aug 14, 2016 07:41:54 #
R.G. wrote:
Tatia and SoHillGuy, I appreciate the effort that ... (show quote)
I admit I am somewhat baffled as to what you do want, R.G. (I'm putting it down to an age thing.
 )
)I selected your last merged jpg to see if I could increase the mist effect. I tried a number of programs: GIMP, Perfect Effects 9, and Perfect layers. I did not achieve a satisfactory result. Out of sheer desperation I tried PT Photo Editor, a program I rarely use. The brightness and contrast slider did increase the mist somewhat, it was visible but not as much as I wanted. On the principle of in for a penny . . . . . I opted for Windows Photo Library and played with the brightness, contrast, shadows, and highlights sliders. Sigh, here is the result. I could have played with it a little more, but I really needed a cup of coffee. I could have sharpened the image but I feared destroying the mist.

Aug 14, 2016 08:30:34 #
Shakey wrote:
I admit I am somewhat baffled as to what you do want, R.G.......
The point I'm trying to make is that even if you don't want to get rid of the mist completely, there will be at least some areas of the shot where you want to recover as much detail, contrast and colour as possible. The mistier the shot is, the harder it will be to normalise the image (i.e. remove the mist) either in whole or in part. Mist is at its worst as a detail and colour stealer when it's thick (obviously), but not so obvious is the difference that brightness has on mist. When mist has a bright, hazy glow it makes it harder to reveal what's behind the mist, and the same thing applies to haze in general.
I've been trying to point out that when you're merging exposure bracketed shots of misty scenes, if you include the bright exposure it takes away at least as much as it contributes, because it adds to the bright haziness of the shot, so the merge is better without it. On the other hand, a merge consisting of a neutral and a dark exposure gives a better starting point than using just the neutral exposure on its own.
These points are all at their most relevant when the mist or haze wasn't a desired element to the shot, but even if it was, most times there will be areas within the shot which you will want to normalise - i.e. extract as much detail, contrast and colour as possible. For example, in the above shot I would want to make the bridge itself as detailed as possible, but I would be quite happy to leave some background mistiness in the distant glen and hills.
Making misty shots mistier isn't a problem. In fact there's several ways to go about it, and you don't need bracketing to do it.
I'm slowly coming to the conclusion that if there's any kind of bright haze in a scene, a merge of bracketed shots would be better without the bright exposure/s, unless it was really important to brighten and extract details from the shadows.
Aug 14, 2016 10:02:25 #
R.G. wrote:
The point I'm trying to make is that even if you d... (show quote)
I agree with you R.G. The single and triple exposure seems to present you with highlights that draw your eye to the bright spots.
I could not download the DNG files for the bracketed shots so I had to work on the jpgs.
All in Lightroom.
Started off with my usual edits, reduce highlights (-70) increase shadows (+70) and set my black & white points. Increased the clarity (+19) and vibrance (+25) a touch.
Added a graduated filter starting about ½" from the top to the bridge and reduced the exposure (-25) and highlights (-16) and increased the contrast (+19).
Tried loads of things that just didn't work then came up with split toning.
On the highlights I set the hue to 200 and the saturation to 20 to give a bit of coolness to the mist. On the shadows, brought the hue to 150 and the saturation to 11 to bring back a bit of warmth and colour to the foreground.
After a touch of noise reduction and sharpening, brought the overall contrast up a touch (+19).
Personally this is as far as I would take it in Lightroom. Any further adjustments would be local adjustments done with layers in photoshop but time is against me (the wife is growling at me from across the room).
Alan.
Aug 14, 2016 10:29:33 #
AlMac wrote:
I agree with you R.G. The single and triple exposure seems to present you with highlights that draw your eye to the bright spots........
Yay! - this is the sort of feedback that I was hoping for. For most purposes the two-shot merge should give the better starting point.
Your PP sounds very similar to what I'd do myself. I've been including split toning into my workflow for misty shots. My usual settings are a hue of 220 to 230 for Highlights and somewhere between 35 and 80 for the Shadows, depending on how warm (or how green) it needs to be. In both cases I'd keep the saturation low - usually less than 10, often less than 5.
Your results are pretty much how I'd like it, with the exception that there's a bit of a green tint (probably the hue of the Highlights in Split Toning). Thanks for posting
 .
.Aug 14, 2016 12:57:16 #

My attempt at using just the single image with some post processing. Used ACR, Smart Object, and several parts processed with NIK Collection.
Aug 14, 2016 15:30:44 #
R.G. wrote:
I've been working with quite a few misty shots lat... (show quote)
Rob,
I downloaded the dng of the single image you posted. I opened in ACR first, decreased the highlights and increased the shadows a tad. I also played with the white and black sliders holding down the option key on a Mac until I felt all was about maximum reality affect for lightness and darkness and contrast. I also used the dehaze slider to where I felt all was good, but then went back to the shadows slider and made some minor adjustments. I never used the contrast slider!
Then I continued into Photoshop and played with darkening the image in a curves adjustment layer, inverting it, selectively brushing in where I felt it needed darkening on the hillsides, as well as the sky, and also in that centrally located bright yellow field and some minor outlying semi-bright yellowish areas. I used two or three curves adjustment layer, inverting it, selectively brushing in where I felt it needed attention. I actually used the Raw Filter twice when processing and also selectively did a High Pass filter with the Overlay Blend using a brush after I an inverted the filter. In between some of these steps, I did a merge all visible layers, a few times, which is necessary and quite helpful in achieving the effects with various layers. I love doing images like this, so thanks very much for the opportunity!
As usual, look at the download for a much better representation of the results of the PP'ing. Thanks again.
Note: The hillsides and greenery can very easily be processed lighter if you think they are too dark - matter of personal taste for the most part. Not being there, I wasn't sure how dark the greenery/vegetation is, but suspected fairly dark, and it was cloudy and overcast as well, so not too much bright light from the sky is present.
Best Regards,
Tom
Aug 15, 2016 12:30:12 #
Jeep Daddy and Tom, while your edits are very impressive they don't address the issue that I was trying to raise, which is that the two-shot merge gave a better starting point than the three-shot merge which includes the bright exposure (which implies that the merge is better without the bright exposure). And if the quality of the DNGs was more equal I suspect that the two-shot merge would have given a better starting point than the neutral exposure.
In fact even taking the DNGs as they are, I suspect that the two-shot merge would give the best starting point.
If anybody that has posted an edit of the neutral exposure would care to have a go using the two-shot merge file, it would be very interesting to hear your opinions on how they compare. The main difference between the neutral exposure DNG and the two-shot merge DNG is one of resolution. If you can see past that difference and assess how the two-shot file compares as a starting point in terms of detail, contrast and colour strength, it would directly address the main issue of the original post.
I'll be making that comparison myself some time, but I have a pile of new stuff that still needs sorting, so it will have to wait.
Even without doing any editing, if all three jpegs are downloaded they can be clicked through in sequence. I would be interested in hearing your opinion on which looks like the best candidate for recovering detail, contrast and colour (which the mist tends to lose).
If you want to reply, then register here. Registration is free and your account is created instantly, so you can post right away.