Tilt shift lens set up or PP question
Jul 30, 2016 14:59:57 #
jdubu
Loc: San Jose, CA
Yesterday, I shot a simple bathroom for our interior design business portfolio. Simple because it was just one bathroom shot, not so because of the petite size of the room.
I used a 24mm TSE lens and vertically shifted 12mm up and down from center. Due to the angle required to include the details my wife wanted in one shot, the flooring falls away and down to the right. Making it appear to be extremely uneven. I have seen this in others real estate postings and I understand for that application it isn't worth fixing. I used the 24mm because the 45 TSE was not wide enough and the 17mm TSE was way too wide and distorted the vanity, which my wife hates.
I know this is the nature of the beast shooting a wide angle lens on a 2 point perspective and ideally I would have centered a 1 point shot parallel to the back wall. But that would put the swing door on camera right as a large part of the photo and obscured the inset cabinetry just beyond it. I was willing to remove the door for the setup, but the client didn't like that idea. I told my wife if she had specified a pocket door, it would've been easier.
So my question is 2 part... not having a choice but shoot at an angle, is there anything I could have done differently to achieve the view and lessen the floor falloff problem?
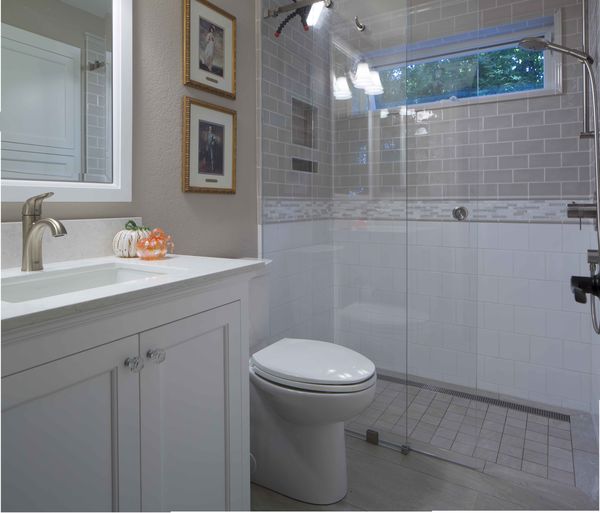
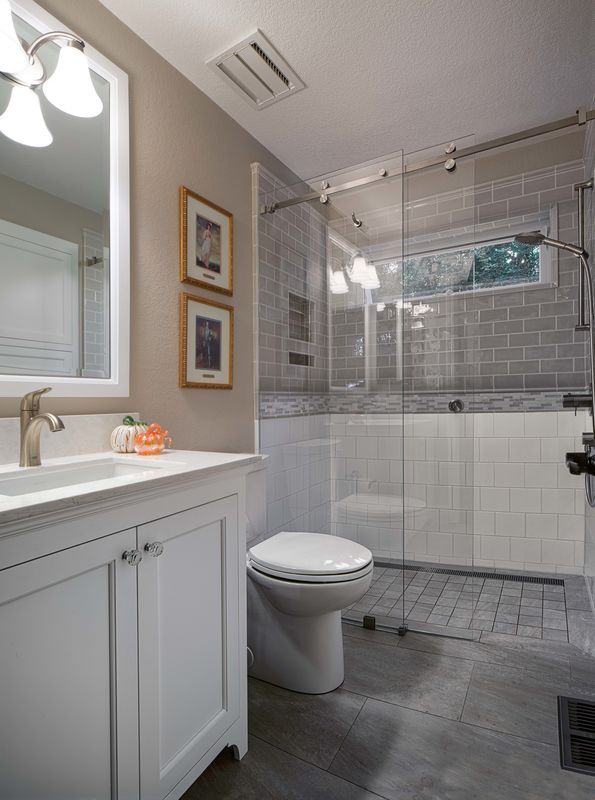
In PP, I assembled the files and then selected the area starting at the vanity right vertical up to the top of the shower. Distortion transformation to pull the floor up altered the left side of the image too much, so I did a warp transformation instead. Any ideas on a better or different approach to bring the level up? First photo is original from the shoot. The second is the finished shot.
I used a 24mm TSE lens and vertically shifted 12mm up and down from center. Due to the angle required to include the details my wife wanted in one shot, the flooring falls away and down to the right. Making it appear to be extremely uneven. I have seen this in others real estate postings and I understand for that application it isn't worth fixing. I used the 24mm because the 45 TSE was not wide enough and the 17mm TSE was way too wide and distorted the vanity, which my wife hates.
I know this is the nature of the beast shooting a wide angle lens on a 2 point perspective and ideally I would have centered a 1 point shot parallel to the back wall. But that would put the swing door on camera right as a large part of the photo and obscured the inset cabinetry just beyond it. I was willing to remove the door for the setup, but the client didn't like that idea. I told my wife if she had specified a pocket door, it would've been easier.
So my question is 2 part... not having a choice but shoot at an angle, is there anything I could have done differently to achieve the view and lessen the floor falloff problem?
In PP, I assembled the files and then selected the area starting at the vanity right vertical up to the top of the shower. Distortion transformation to pull the floor up altered the left side of the image too much, so I did a warp transformation instead. Any ideas on a better or different approach to bring the level up? First photo is original from the shoot. The second is the finished shot.
2 files photomerged as shot on location
color corrected final
Jul 30, 2016 16:19:56 #

Could you have shot holding the camera sideways then corrected the verticals in Lightroom?
SS
SS
Jul 30, 2016 16:59:11 #

Small bathrooms are the biggest challenge for RE photography. I find that it is much easier to fix perspective distortion with software than with the TS lens. I use Paint Shop Pro. It's simple to adjust both the verticals and horizontals for a result closer to the way we perceive the space.
And, beside the point, I never photograph toilets. In a room like your example, I would be hand-holding with the back of the camera in the shower to show only the vanity from ceiling to floor. For interesting or luxury showers, I take a second detail shot that highlights the tile and special fixtures. My idea is that everyone knows what toilets look like, and trying to capture the full small space in one shot is doomed.
And, beside the point, I never photograph toilets. In a room like your example, I would be hand-holding with the back of the camera in the shower to show only the vanity from ceiling to floor. For interesting or luxury showers, I take a second detail shot that highlights the tile and special fixtures. My idea is that everyone knows what toilets look like, and trying to capture the full small space in one shot is doomed.
Jul 30, 2016 18:21:06 #
jdubu
Loc: San Jose, CA
SharpShooter wrote:
Could you have shot holding the camera sideways then corrected the verticals in Lightroom?
SS
SS
The 17mm TSE allows for rotating the shift collar to any position 360 degrees independent from the rotation of the tilt collar. So here, I set up in landscape to match the width of the view I needed and rotated the shift to shoot vertically up and down for a total of 3 vertically stacked horizontal exposures to merge. I checked setting the other way, but portrait view didn't give me the view top to bottom I needed.
I was set up on a tripod with leveler, so being perfectly level for verticals was taken care of. I could not find a position to stay level at the height I needed for the vanity top and keep the floor from dropping off. I was hoping for advise on how to minimize that affect on location.
Jul 30, 2016 18:39:58 #
mallen1330 wrote:
And, beside the point, I never photograph toilets.
I am curious, why?
Jul 30, 2016 18:55:28 #
jdubu
Loc: San Jose, CA
mallen1330 wrote:
Small bathrooms are the biggest challenge for RE p... (show quote)
I don't use Paint Shop Pro, if you are familiar with PSCC, how does that compare in the tools used as you suggest?
Any small room is the biggest challenge for interiors, whether for RE, or in my case, interior design.
I am never handheld when shooting interiors since I spend the bulk of my time prepping the view and lighting (if any) from camera perspective once I have the camera positioned. Because of that, I find a TSE lens much easier to use than the 16-35mm lens I used to use simply because I can lock in absolute vertical or horizontal, shift for different exposure views and not worry about misalignment when photo merging. With the 16-35mm, I always had to contend with barrel distortion and/or misalignment.
You're right about not showing toilets in RE, nobody cares to see them. The assumption is they exist in the bathroom. I tend not to include them unless they are integral to the space plan of the bath. Remember, I am not selling the house like you are, I am showcasing the designer's skills in space planning and design skill. In a small bath, that client wants to know where the toilet would be placed. Besides, if we specify the toilet, we want to show what it looks like and why. In this case, the base of the toilet is not your standard Home Depot utilitarian style. We hate the snakelike plumbing you normally see behind the bowl so that's not what we had installed. we have these photos as examples for clients to see the options actually used.
As designers, I have to answer for distorted furniture and appliances. Fixing verticals and horizons in post is one thing, but the wide distortion at the outer parts of the frame are still there. Neither I nor my designers want to have to say "that cabinet is actually only a standard 30 inches wide, it only looks really wide because of the picture" to their clients. I have to show in one or maybe two accurate shots of the room what the designer wants to convey. The last ASID competition my wife entered, we could only submit 2 photos per room and a floor plan. Like most things, the devil is in the details!
So, when I post process, I want to keep my time to the minimum and still produce well proportioned, color correct (including light color temperature) results. Anything I can learn to move me in that direction is greatly appreciated.
Jul 30, 2016 20:42:18 #
rgrenaderphoto wrote:
I am curious, why?
In small baths like the one in question, the view from the doorway is almost always the same -- showing a corner of the vanity and making the toilet the focal point. As jdubu explained, he is not shooting for real estate, so wanted to show the overall design of the room and fixture to highlight the interior design. I prefer to shoot a space like this from the other side (in this case from inside the shower), to show the complete vanity, with a second shot to show the shower details.
Jul 30, 2016 20:57:43 #
jdubu
Loc: San Jose, CA
mallen1330 wrote:
In small baths like the one in question, the view from the doorway is almost always the same -- showing a corner of the vanity and making the toilet the focal point. As jdubu explained, he is not shooting for real estate, so wanted to show the overall design of the room and fixture to highlight the interior design. I prefer to shoot a space like this from the other side (in this case from inside the shower), to show the complete vanity, with a second shot to show the shower details.
That's a great explanation and reasoning behind your work.
For the details you mentioned of the shower, I thought coverage via this one shot would work also. Easy to point out the barn door hinge of the shower door which glides like butter and no raised shower pan on the floor. This bathroom is for a newly moved in grandmother, so we designed this with her in mind. No raised edging to trip on and a full length drain on the back edge. Clients were still skeptical that it wouldn't leak water into the bath floor, but now can't say enough about it.
Jul 31, 2016 10:42:38 #

I don't think tilting or shifting is necessary in this photograph. However, it's essential that the axis of the lens be horizontal. Just moving the camera vertical position, raising / lowering the tripod will work. More annoying is the blown out lights near the mirror. Exposure technique will help with that.
I've shot similar interiours with a 20mm lens and avoided the usual parallax issues by keeping the axis of the lens horizontal.
--Bob
I've shot similar interiours with a 20mm lens and avoided the usual parallax issues by keeping the axis of the lens horizontal.
--Bob
jdubu wrote:
Yesterday, I shot a simple bathroom for our interi... (show quote)
Jul 31, 2016 13:19:52 #
rlscholl
Loc: California
Keep the camera back ("film plane") vertical and parallel to a wall. Where necessary shift vertically and horizontally to get the scene the way you want it (shifted multiple exposures with stitching of images may be necessary to get the combined image you want.
Jul 31, 2016 13:32:12 #

jdubu wrote:
Yesterday, I shot a simple bathroom for our interi... (show quote)
You did it correctly. Sometimes, even with a TS lens, you will have to make some corrections for a more normal appearance. While you could have used a wider lens, the perspective distortion (elongation) would have been impossible to correct for. You did a great job on the floor and the entire image. A TS lens was the obvious choice here.
Jul 31, 2016 14:08:01 #
jdubu
Loc: San Jose, CA
rmalarz wrote:
I don't think tilting or shifting is necessary in this photograph. However, it's essential that the axis of the lens be horizontal. Just moving the camera vertical position, raising / lowering the tripod will work. More annoying is the blown out lights near the mirror. Exposure technique will help with that.
I've shot similar interiours with a 20mm lens and avoided the usual parallax issues by keeping the axis of the lens horizontal.
--Bob
I've shot similar interiours with a 20mm lens and avoided the usual parallax issues by keeping the axis of the lens horizontal.
--Bob
Bob
Thanks for the comments. Can you expand a little on keeping the axis horizontal? I had set up the camera and leveled it using a Nodal Ninja leveler, based on the 5DMkIII's info, the camera was completely level. I did no adjustment of the verticals in post, only the horizontals. I thought the horizontal falloff was due to the angle of the 24mm lens not being parallel to the horizons, 2 point perspective. But I certainly could be missing something, so let me know.
The lens choice was made after looking through the scene with various lenses, including my 16-35mm, which gave me too much distortion of the vanity and lines set under 24mm. I did shift the lens, but never tilted it. I needed all three individual frames to make the final view, so the TSe, for me, was essential to capture the height from floor to lights. I understand your reasoning about raising and lowering your tripod, but that is what the shift does without accidentally moving the tripod so the frames don't line up. I find the shift is faster and more concise.
I totally agree about blown highlights in a photo... it drives me crazy too. I apologize that it looks like that in the post, but it doesn't in my final tiff file. It was a conscious decision to make the lighting bright as I could push it so the shower would appear to be lit by the one source. As you may note in the first photo, I have a bi-color led light on a gorilla pod set up to light the right side of the shower. I did this because the fixture light falloff was not reaching the plumbing head enough to give it any definition. I looked at my tiff file and the base of the light fixture is all there but very bright and I have shadow contour lines on the lamp shade rims, but not on the shade reflection in the mirror.
For this shoot, I have 4 bracketed manual exposures of each frame, lights on and lights off, led light on and led light removed. And duplicated again for different detail items on the vanity. So yes, I am looking for exposure control and I hope to cover all my bases on location, because once I move the camera, there's no going back easily.
I appreciate your post and thanks for helping me.
Jul 31, 2016 14:12:03 #
jdubu
Loc: San Jose, CA
rlscholl wrote:
Keep the camera back ("film plane") vertical and parallel to a wall. Where necessary shift vertically and horizontally to get the scene the way you want it (shifted multiple exposures with stitching of images may be necessary to get the combined image you want.
Thank you
Jul 31, 2016 14:33:58 #
jdubu
Loc: San Jose, CA
Gene51 wrote:
You did it correctly. Sometimes, even with a TS lens, you will have to make some corrections for a more normal appearance. While you could have used a wider lens, the perspective distortion (elongation) would have been impossible to correct for. You did a great job on the floor and the entire image. A TS lens was the obvious choice here.
Gene thank you for the kind words. I always want to be better today than yesterday, and hope to learn more for tomorrow.
You're right about the perspective distortion... I had early shoots where I just wasted my time because the distortion was beyond saving and I was too inexperienced to know better. Adding the TSe lenses to my kit has really paid for itself in what I can produce for designers and contractors.
Last year I attended a tilt-shift lens Canon learning class in San Francisco with Dave Henry. I was the only participant there. Talk about a 2+ hour one on one discussion about architecture and landscape with this guru! As always tho, I can always come up with questions I wished I had asked.
Jul 31, 2016 17:28:28 #
The only expansion would be that changing the point of view of the room should be accomplished by raising or lowering the camera, not tilting it up or down. If the setup is showing more floor than one would like, simply raise the camera to a higher view point. Don't tilt it.
--Bob
--Bob
jdubu wrote:
Bob br br Thanks for the comments. Can you expand... (show quote)
If you want to reply, then register here. Registration is free and your account is created instantly, so you can post right away.