OTC Flash combined with on-camera flash
Jul 8, 2016 06:53:36 #
I am using a Nikon D-80.Previously I had a Minolta which had metering for an off the camera flash unit, at the same time as using the on camera flash fulfill in. It really was fill-in and it was possible to dial what percentage of the OTC light one wanted as the fill light. Frankly it was great for small objects at close distances where one wanted to maintain texture lighting.
After Minorca went bust, I figured it was just a matter of time before one of the manufacturers offered the same option.
Could you please tell me if an DSLR's cameras have this ability.
After Minorca went bust, I figured it was just a matter of time before one of the manufacturers offered the same option.
Could you please tell me if an DSLR's cameras have this ability.
Jul 8, 2016 08:05:24 #
mmcgavin wrote:
I am using a Nikon D-80.Previously I had a Minolta... (show quote)
Most of Nikon's advanced and professional DSLRs will handle multiple off camera flash/strobes. They use the controls built into the Nikon camera and the "on camera" strobe sends a controlling flash to each of the off camera flashes. The on camera flash may or may NOT participate in the actual exposure but it ALWAYS fires to send the signal to the other strobes. Joe McNally has several online tutorials on Nikon's website explaining the procedure and how to set it up and do it. My D70s would do it but the on camera flash never participated in the exposure on that camera (the way the camera was designed). But I could use my SB800 and my SB910 off camera to get well exposed shots. However, the cheat on this was that I could put the SB800 (or the SB910) on the camera hot shoe and set it for multiple strobes and all (except the popup which was blocked by the on camera sb800) would participate. My D7100 and my D610 all participate completely in all aspects of participation. I learned that the "Off Camera" flash was just being developed with the D70s and everything after that (I am assuming your D80) would fully participate. Here is the link to the manual for your D80 and it should give better info. http://downloadcenter.nikonimglib.com/en/products/8/D80.html
The following link is multiple strobe but Joe has numerous tutorials on strobe photography using both on-camera and off-camera strobes. He is an absolute expert and the links should help.
http://www.nikonusa.com/en/learn-and-explore/article/fy1hs59w/repeating-flash-lighting-technique.html
Jul 8, 2016 10:27:41 #
I think that I have failed to describe the situation with the Minolta system adequately.
It had the usual special synchronizer cable from the camera to the off the camera flash unit. This flash was used as the Main or Key light and then the flash on the camera became the fill light. It was possible to dial in the amount of fill-as a half or a quarter of that of the Main light. The way that the built in flash was activated was to flip it up on the camera.
The advantage of all this was that a very small portable system was able to give a Main light and a controlled fill light over a field of up to approximately 24 x 18". The main light was positioned manually at the top left to cast shadows down and to the right as with routine portrait lighting, and then the flash on the camera put some detail into the shadows.
Alternatively the flash could be mounted on the small bracket to the side of the lens axis and for very small fields of 4 x 6 and less, with the flash on top of the flash bracket and pointing down, it still gave good modeling or texture.
The Nikon D80 was a bit of a disappointment because the so-called "fill" light was so intense it wiped out any modeling or texture and removed any "mood" in ambient lighting.
I do use the off the camera flash unit to the side and above the lens axis but at no more than 30° from the camera's lens axis, otherwise there are big empty shadows.
Perhaps I should explain that this equipment is used for autopsy photography where it is essential to keep equipment compact and relatively simple and away from contamination. There is no question that an OCF and on-camera fill light, the latter with controlled fill, gives excellent results, as my old Minolta did.
I must admit that I thought that this simple arrangement, available 15 years ago would now be incorporated in modern SLR cameras.
Perhaps it is and I don't know. If it is available as a simple system as on the Minolta would you please let me know which models have this.
Jul 8, 2016 12:48:04 #
mmcgavin wrote:
I am using a Nikon D-80.Previously I had a Minolta... (show quote)
As far as I know, they all do, "always" have! As for your example, if you don't like the looks of your fill (too harsh), just dial it down to the right amount or change the distance!
Jul 8, 2016 13:03:37 #
mmcgavin wrote:
br br The Nikon D80 was a bit of a disappointmen... (show quote)
I have had a Nikon D200, which I believe has essentially the same workings as your D80.
If you are using a Nikon flash other than the low end (or Nikon CLS compatible), you should be able to adjust the power to all of your flashes to get the effect you want.
Nikon's CLS (Creative Lighting System) works great, once you get the hang of it.
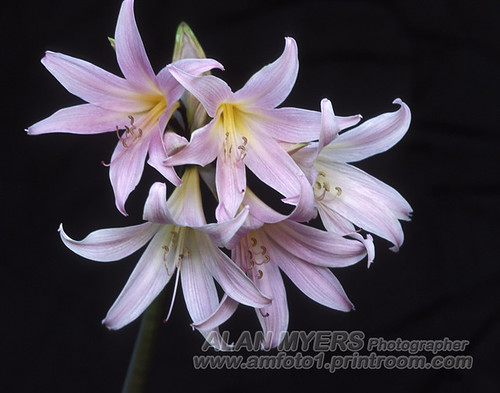
I shot the attached with my D200, using the on-camera flash and 2 Nikon SB-800 units w/o cables and the lights can be controlled from the camera.
Not the same as your Minolta set-up, but it should do the job.
As dcampbell52 said, Joe McNally is a great resource for all things that go flash, day or night.

Jul 9, 2016 06:57:19 #

mmcgavin wrote:
I think that I have failed to describe the situati... (show quote)
I'm not familiar with the D80 model, can't you dial back the Flash Exposure compensation? Other models I believe have -3EV to +1EV on the built in.
Jul 9, 2016 09:27:41 #
zigipha
Loc: north nj
I was going to say, dial back the flash exposure compensation...that seems to be what you are looking for.
What would be really neat is this coudl all work ttl - the camera would sample and then set the power level for the off-camera flash and then have the on camera 1/4 power from that.
almost like you want the on-camera to be one of the flash groups
What would be really neat is this coudl all work ttl - the camera would sample and then set the power level for the off-camera flash and then have the on camera 1/4 power from that.
almost like you want the on-camera to be one of the flash groups
Jul 9, 2016 11:01:26 #
zigipha wrote:
What would be really neat is this coudl all work ttl - the camera would sample and then set the power level for the off-camera flash and then have the on camera 1/4 power from that.
What would be really neat is this coudl all work ttl - the camera would sample and then set the power level for the off-camera flash and then have the on camera 1/4 power from that.
It does... See my post above.
It is more consistent and reliable using manual if the conditions allow it.
Jul 9, 2016 12:02:39 #
ballsafire
Loc: Lafayette, Louisiana
What a great shot! I love your style!
"I shot the attached with my D200, using the on-camera flash and 2 Nikon SB-800 units w/o cables and the lights can be controlled from the camera.
Not the same as your Minolta set-up, but it should do the job."
"I shot the attached with my D200, using the on-camera flash and 2 Nikon SB-800 units w/o cables and the lights can be controlled from the camera.
Not the same as your Minolta set-up, but it should do the job."
Jul 9, 2016 12:04:54 #
The same thing, or similar, is available with the Nikon system. As I have never used a D80, I can't say more, but checking the manual would be a great idea. You can also call Nikon tech support as they should be able to assist you more. Best of luck.
Jul 9, 2016 14:01:37 #
amfoto1
Loc: San Jose, Calif. USA
mmcgavin wrote:
I think that I have failed to describe the situati... (show quote)
First of all, there are many ways to accomplish what you are trying to do.
The simplest way would be to use a Twinlite flash. That's a flash with two heads, that can individually set for their level of output. In most cases that's done utilizing a "flash ratio" setting.... try 8:1 or 4:1 for a main light with light fill. Here is a Canon Twinlite that I use (shown with the on-lens mounting bracket, which I rarely use):

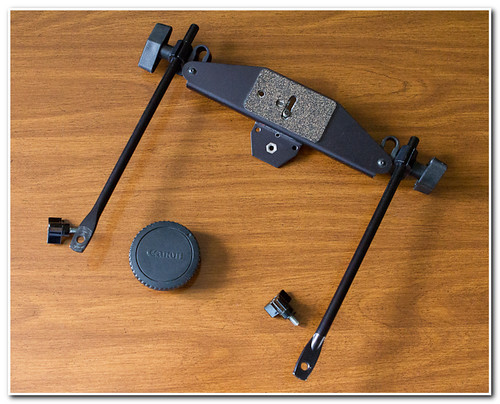
However, I usually use a different means of mounting, a Lepp-Stroboframe bracket that allows more flexibility with flash head placement:
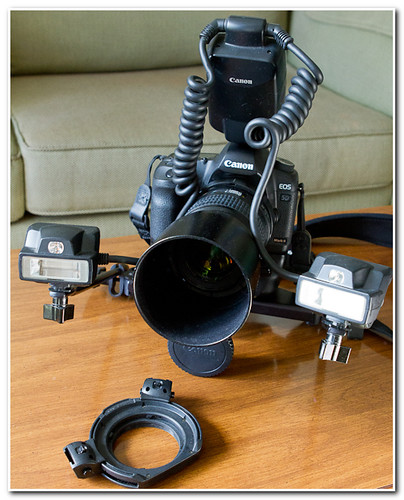
Here is the dual flash bracket alone, which unfortunately is no longer being made (but there are others offered by different manufacturers):
But, a Twinlite is rather expensive and somewhat bulky in size. So a lot of the time I just use a single, larger flash... sometimes on a flash bracket but a lot of the time simply hand held. Now, if used up close a full size flash is too powerful and will overexpose the subject badly. Yes, the flash has a means of reducing it's power level, as well as Flash Exposure Compensation that can be used to reduceor increase the amount of light the camera's metering system calls for. But, up really close it simply cannot be "turned down" enough and the result is seriously over-exposed. So for close-up work I often add two or three layers of white gauze bandage over the flash head, held in place with a rubber band, to diffuse and reduce the flash output:
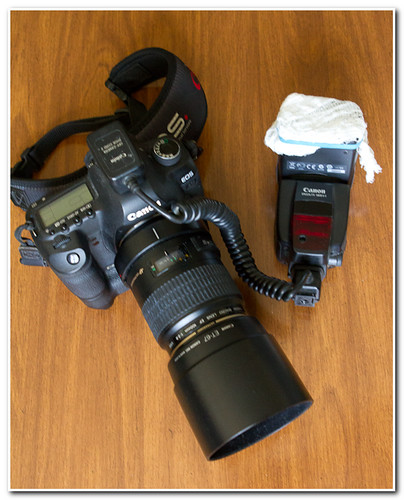
If the gauze bandage solution isn't "elegant" enough, there are accessory diffusion panels and even portable softboxes available for use on many flashes.
Now, for small subjects relatively close-up, the full size flash shown above acts like fairly large softbox, sort of "wrapping" the light around the subject so that there isn't much need for fill. However, if more were needed it would be easy to set up a bounce card or some other type of reflector for fill, if needed. Here are several examples shot with the single, diffused flash... i.e. a single "large, diffused" light source and without any sort of bounce:

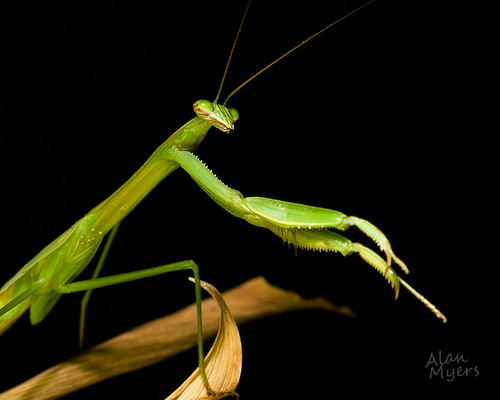
From the two above, you can see how positioning the flash a little differently results in more or less "modeling" of the subject with shadow an light. The left hand shot has the flash fairly far off to one side, making for relatively strong shadows on the subject. The right hand image uses the flash repositioned more directly head on to to the subject, for less strong shadow effects. Below is a third example uses the flash dialed down to as fill only (this time mounted in the camera's hot shoe), with a strongly backlit subject:
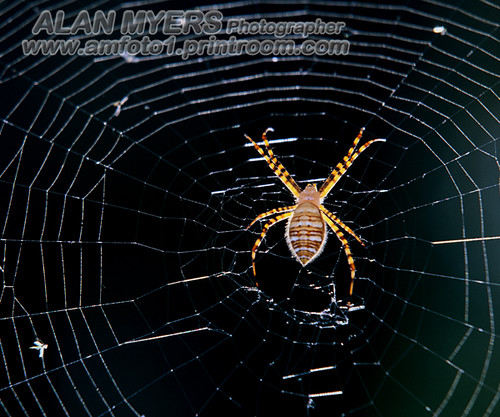
One more shot done using the single, diffused flash (in the hot shoe)... this time the subject in shade and the flash dialed way, way down for very minimal fill only, to the point it's hard to tell a flash was used at all:
Finally, here is an example of lighting for close-up that I did using reflector cards to bounce some light onto the subject as fill. In this case, it's done with a tripod, a longer exposure and available (window) light. But the exact same thing can be done with flash:

I also want to distinguish between the built-in flash and on-camera flash. I'm not sure which you're referring to. Personally, I almost never use any camera's built-in flash because they tend to be terribly under-powered, draw power from the camera itself reducing it's shot capacity a lot, are slow to recycle and are located in the worst possible place for many types of shots (directly above and close to the lens axis). Plus it's harder to "modify" built-in flash with diffusers, snoots, bounce, etc. (though I have seen some creative solutions). I almost always use an accessory flash instead... much more powerful and with it's own power source to make it faster recycling, and able to be located much better places. As shown above, I use some modifiers on my flash, too.
When I refer to "on-camera" flash I mean an accessory flash in the camera's hot shoe... OR, what I do most often, a flash mounted in a bracket that positions it alongside and slightly above the camera, and attached to the camera with a short "off camera shoe cord". I still think of this as "on-camera", any time a flash is connected directly to the camera in this way (in spite of the name of the cord used to connect it).
There are a number of other possibilities, many of which today are done wirelessly. Flash systems use two types of wireless communication: optical (light) and radio. Optical has some limitations both on placement of the off-camera units and in distance, which can be effected by ambient light conditions. Radio is a little more expensive initially, but also gives mostly unlimited placement and a lot greater range. For your purposes, placement of the OC unit will likely be a concern, but distance won't.
I've been looking into wireless radio controllers and receivers for use with my Canon: Pocket Wizard, RadioPopper, Cactus and Yongnuo are some brands that I've been considering, with more or less capability to control flashes and studio strobes off-camera. Canon themselves have for many years only offered optical communication flashes (two models on-camera can control a number of models off-camera... and many newer DSLRs built-in flash also can control off-camera flashes at a short distance). But the last couple years they have gradually been converting to radio communication. But their stuff is fairly pricey! I've discovered Yongnuo is offering radio controlling devices (transmitter head that sits on camera, and remote receivers that the flash attaches to) that are much lower cost. Plus they can convert some of the legacy optically controlled stuff over to radio control. It's tempting!
I'm sure that all these are also possible with Nikon cameras . You just need to research their system specifically (each camera manufacturer has their own, proprietary system of camera to flash communication). For example, I know the Yongnuo wireless controller devices automatically detect Nikon or Canon (...maybe some others too).
Another thing you might want to explore is LED lighting. This is a relatively new form of compact, continuous lighting that might be good for your purposes. There are both small on-camera and larger off-camera LED lights. They can be adjusted by dimming the LEDs or turning off some of the individual LEDs within the array. One advantage of these is that you get a better preview of what effect the various lights are having... you aren't guessing or relying upon pre-visualization (some flashes have lower power "modeling lamps" to help with that).
Continuous lighting used to only be done with various forms of "hot lights". Those were fine for some things, but not practical for others. LED and fluorescent are two forms of "cool lights" that are now widely available. LED are the more compact of the two and probably wouldn't be too expensive in the smaller sizes you're likely to need for relatively close-up work.
With film it was more difficult because you had to match the film to the type of light or use filters to balance the color of light.
With digital, it is much easier. Simply set a custom white balance and you can use almost any form of lighting. The only time this gets a little tricky is if using multiple light sources with different color temperatures. In that case, a gel filter over one or the other light source might be needed, so that they more closely match.
Standard fluorescent lighting also used to be a real problem. That type of light actually cycles on and off at a high rate (120 times per second in the U.S.). This "fools" many cameras into incorrect exposure and ugly color casts. More recently some DSLRs have a "Flicker Free" feature that corrects for this, by timing the shutter release to the peak output of the light. (In addition to fluorescent... sodium vapor, mercury vapor and some other lighting types do this too. Note: fluorescent lighting made specifically for photographic purposes, such as the "cool lights" mentioned above, is stabilized to avoid this problem.)
Aug 1, 2016 09:28:04 #
Thanks to all who responded with suggestions regarding the use of off-the-camera flash in autopsy room photography. There were many suggestions but for this type of photography, the whole camera and flash unit has to be compact and essentially consist of the camera, flash bracket and an off-the-camera flash. It is necessary for the off-the-camera flash unit to be the main or key light, providing the modeling lighting and the bulk of the illumination and that the built in flash on the camera provide the fill light. Lighting does need to produce modeling to reveal the contours and textures of the surface and one that mimics the standard portrait lighting works quite well. For this the main light is from the left and above and the fill light along the cameras axis with a ratio of approximately 1.5: 1 or 2:1.
For close-up photography (up to 2x3 inch field) the flash unit mounted on the flash bracket to the side works very well but as the field of view becomes larger the flash has to be removed from the bracket and hand held in order to cast shadows to record modeling. Ring lights which produce no shadows or modeling are contraindicated except for very small fields e.g. 2x3 inch and smaller for a 35mm camera where the working distance (lens-subject distance) is so small.
Thus the optimal would be a camera which would support off-the-camera flash, use the built in flash of the camera as a fill light and be able to dial in the ratio of the main to fill light into the camera. Was it Pentax that had something like this 20 years ago?
I have looked at the different models of Canon and Nikon and see that some of them, including my Nikon D50, have the flash shoe on top of the cover for the built-in flash and thus it is impossible to use both the off-the-camera flash and the built-in flash simultaneously. The question is-"with which Canon and Nikon cameras is it possible to use both the off the camera flash and the built in camera flash simultaneously.”
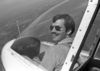
I have enclosed a photograph of an operator using an off-the-camera flash (without any fill flash from the camera’s flash) to photograph and isolated organ and two photographs-cirrhosis and a nasal tumor. This type of photography is done far better under studio type lighting but there are occasions when speed is of the essence or the subject is too large. The photograph of the operator shows why the whole unit must be compact. This arrangement works very well except, when the flash unit is remounted on the flash bracket, excess synchronizer cable which can drop down and be contaminated by a specimen.
I realize that it is unlikely that any of the cameras offer the option for them to control the main to fill light ratio. However if there are some cameras which accept two flashes, it may be possible to control this ratio by altering the power output of the off-the-camera flash. I presume that none of the cameras offer any control over the output of the built-in flash. A major problem seems to be that the output of the off-the-camera flash is not powerful enough to produce a main to fill light ratio of 3:1 when it is held 4-5 feet off the camera and the camera and its flash are only a couple of feet from the specimen.
I would appreciate any suggestions that could help in this matter.
Donald McGavin
PS I could not find the procedure to add the illustrations. Any advice? The message does not make much sense without them.Do I have to go back to New Topic?
For close-up photography (up to 2x3 inch field) the flash unit mounted on the flash bracket to the side works very well but as the field of view becomes larger the flash has to be removed from the bracket and hand held in order to cast shadows to record modeling. Ring lights which produce no shadows or modeling are contraindicated except for very small fields e.g. 2x3 inch and smaller for a 35mm camera where the working distance (lens-subject distance) is so small.
Thus the optimal would be a camera which would support off-the-camera flash, use the built in flash of the camera as a fill light and be able to dial in the ratio of the main to fill light into the camera. Was it Pentax that had something like this 20 years ago?
I have looked at the different models of Canon and Nikon and see that some of them, including my Nikon D50, have the flash shoe on top of the cover for the built-in flash and thus it is impossible to use both the off-the-camera flash and the built-in flash simultaneously. The question is-"with which Canon and Nikon cameras is it possible to use both the off the camera flash and the built in camera flash simultaneously.”
I have enclosed a photograph of an operator using an off-the-camera flash (without any fill flash from the camera’s flash) to photograph and isolated organ and two photographs-cirrhosis and a nasal tumor. This type of photography is done far better under studio type lighting but there are occasions when speed is of the essence or the subject is too large. The photograph of the operator shows why the whole unit must be compact. This arrangement works very well except, when the flash unit is remounted on the flash bracket, excess synchronizer cable which can drop down and be contaminated by a specimen.
I realize that it is unlikely that any of the cameras offer the option for them to control the main to fill light ratio. However if there are some cameras which accept two flashes, it may be possible to control this ratio by altering the power output of the off-the-camera flash. I presume that none of the cameras offer any control over the output of the built-in flash. A major problem seems to be that the output of the off-the-camera flash is not powerful enough to produce a main to fill light ratio of 3:1 when it is held 4-5 feet off the camera and the camera and its flash are only a couple of feet from the specimen.
I would appreciate any suggestions that could help in this matter.
Donald McGavin
PS I could not find the procedure to add the illustrations. Any advice? The message does not make much sense without them.Do I have to go back to New Topic?
If you want to reply, then register here. Registration is free and your account is created instantly, so you can post right away.