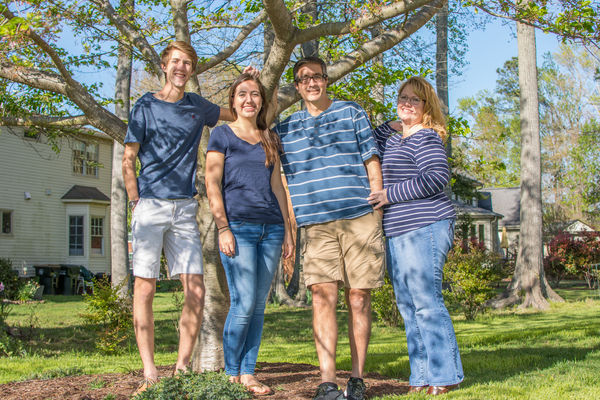
Splotchy Shadows fix?
Apr 17, 2016 13:03:23 #
I took a family picture of some friends yesterday under a tree and, no surprise, the shadows on their faces are awful... I should have insisted that we take it in front of the tree, but oh well... My question is, can anything be done to improve this picture? I used LR to adjust the highlights and shadows; I have PS as well, but have hardly used it... Thanks for any suggestions anyone may have!
Apr 17, 2016 13:05:30 #
Do you have content aware in Adobe Products? If so enlarge the faces on your monitor and you can fix them with content aware.
tomglass wrote:
I took a family picture of some friends yesterday under a tree and, no surprise, the shadows on their faces are awful... I should have insisted that we take it in front of the tree, but oh well... My question is, can anything be done to improve this picture? I used LR to adjust the highlights and shadows; I have PS as well, but have hardly used it... Thanks for any suggestions anyone may have!
Apr 17, 2016 13:27:26 #
Thanks for the suggestion, Stan. It looks like it is in PS... I'll do some reading and video viewing and see what I can do! Thanks again!
Apr 17, 2016 14:06:38 #
In PS, Duplicate the layer, or click Ctrl-J. On the top layer, select Image>Adjustments>Brightness/Contrast. Slide the brightness slider to the right to brighten the shadows on the face to a more acceptable level. On the top layer, create a Mask (click on the icon that is a black rectangle with a white circle in the middle). Now, reverse the mask by clicking Ctrl-I. The mask should now be black and your image should be showing the original, background image. Use the brush tool, resize it smaller, set the opacity level to about 50%. Use the set foreground tool to make sure you have a white brush. Now paint over the shadows ..... the lighter color from the mask layer will brighten the shadows on their face where you paint.
Apr 17, 2016 15:02:09 #
Bob Yankle wrote:
In PS, Duplicate the layer, or click Ctrl-J. On t... (show quote)
Thanks, Bob! I'll give that a try!
Apr 18, 2016 06:59:25 #
Thanks for the post. This is a common problem I have dealt with in the past and Bob Yankle's instructions is the best advice I've seen on how to do this. So thanks Bob, I plan to give this a try myself.
Apr 18, 2016 07:57:14 #
Tom, I tried my hand at this and it looks somewhat better. Would you like to see the results?
Apr 18, 2016 09:15:10 #
sure! I've played a bit with your directions, but I need some more "Photoshop 101" before I really understand all of it... and it is taking some time... Thanks!
Apr 18, 2016 11:24:41 #
PixelStan77 wrote:
Do you have content aware in Adobe Products? If so enlarge the faces on your monitor and you can fix them with content aware.
I agree with concentrating on the faces. Shadows across the bodies are no big deal, but any issues with the faces have the potential to spoil the shot.
Apr 18, 2016 12:15:31 #
Apr 18, 2016 12:15:32 #
tomglass wrote:
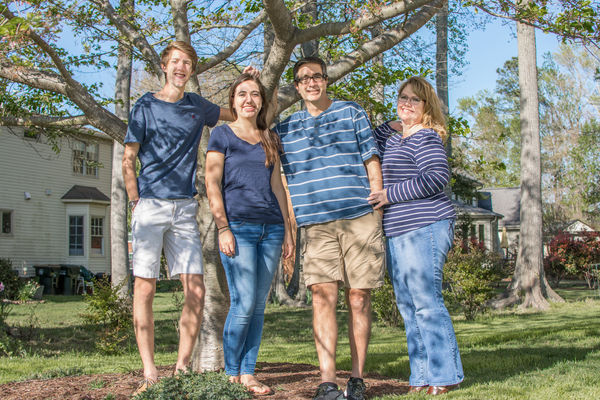
Here is my take. 1st Layer - lightened shadows. 2nd layer - darkened cheeks, foreheads, and noses. 3rd layer used Lasso tool and Content Aware Fill at 60% opacity to blend in some of the remaining shadow lines.sure! I've played a bit with your directions, but I need some more "Photoshop 101" before I really understand all of it... and it is taking some time... Thanks!
Apr 18, 2016 19:43:56 #
Bob Yankle wrote:
Here is my take. 1st Layer - lightened shadows. 2nd layer - darkened cheeks, foreheads, and noses. 3rd layer used Lasso tool and Content Aware Fill at 60% opacity to blend in some of the remaining shadow lines.
Thanks Bob! That looks great! And, after a little bit of internet learning, I think I actually understand what you are talking about! I think I have just taken my first steps of a long, long journey! Thanks again!
Apr 18, 2016 20:01:30 #
tomglass wrote:
Good. I wish you every success.Thanks Bob! That looks great! And, after a little bit of internet learning, I think I actually understand what you are talking about! I think I have just taken my first steps of a long, long journey! Thanks again!
Apr 18, 2016 21:01:22 #
Apr 19, 2016 18:19:43 #
If you want to reply, then register here. Registration is free and your account is created instantly, so you can post right away.


