Can you help me clean the window??
Mar 19, 2016 05:01:59 #

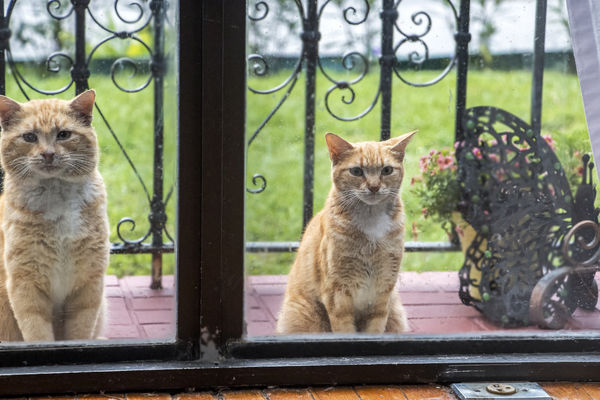
This is a shot of a male and female feral cats sitting at my front glass window, waiting for food...
There are a lot of "white spots" on the glass that I would like to remove. Can someone tell me an EASY and QUICK way to do so? I have Photoshop CC in my Mac. (But not so skilled with it.)
And feel free to play with the image yourself...
There are a lot of "white spots" on the glass that I would like to remove. Can someone tell me an EASY and QUICK way to do so? I have Photoshop CC in my Mac. (But not so skilled with it.)
And feel free to play with the image yourself...

Mar 19, 2016 06:48:13 #

buddah17 wrote:
....There are a lot of "white spots" on the glass that I would like to remove. Can someone tell me an EASY and QUICK way to do so?.....
No such luck. The ones in front of the cats you have no option but to deal with them individually, and the clone tool is probably your best option.
The ones that aren't in front of the cats, I would recommend doing a general background blur and soften (what you can see through the window). You'll probably find that the rain drops blend in without too much fuss - and if any of them prove resilient you can use the clone tool on them too.
I'm off to have a go at doing what I just said. I may be gone some time.....
Mar 19, 2016 06:53:30 #
Thanks.. Can't wait to see it. While I understand why it would take a lot of time, it is done with actions simple enough so that even I can understand.
Although I don't know how one would clone out the spots in front of the cat as some of them cover specific and solo features.. (Or maybe not?)
Although I don't know how one would clone out the spots in front of the cat as some of them cover specific and solo features.. (Or maybe not?)
R.G. wrote:
No such luck. The ones in front of the cats you h... (show quote)
Check out The Dynamics of Photographic Lighting section of our forum.
Mar 19, 2016 06:59:53 #
buddah17 wrote:
.....Although I don't know how one would clone out the spots in front of the cat as some of them cover specific and solo features.. (Or maybe not?)
The ones in front of the eyes might be tricky, but there's usually some work around (for that read "cheating" :-) ). Lightroom's clone tool is more limited than Photoshop's (no flipping etc), but you can always resort to cloning stuff that's similar but not exact (how you go about cheating is entirely up to you. Isn't editing great :-) ).
I'm off to collect my car from the garage. Don't expect an edit from me any time soon.....
Mar 19, 2016 07:17:55 #
You were SO right on!
I tried the techniques you described, (only on the larger cat on the left so that it can be compared to the "before" image of the smaller cat on the right side...)
It wasn't all that difficult to clone out the spots in front of the cats face. (In fact I manage to "fix" the reflected light in his eyes, and clone out a scar he had on his right side of his nose (facing us.)
And the blur tool (which I NEVER use,) was great for softening the total background and bringing out the features of the cat in the foreground even more.
Thank you SO much, now I have another "TOOL" under my belt!!
R.G. wrote:
The ones in front of the eyes might be tricky, but there's usually some work around (for that read "cheating" :-) ). Lightroom's clone tool is more limited than Photoshop's (no flipping etc), but you can always resort to cloning stuff that's similar but not exact (how you go about cheating is entirely up to you. Isn't editing great :-) ).
I'm off to collect my car from the garage. Don't expect an edit from me any time soon.....
I'm off to collect my car from the garage. Don't expect an edit from me any time soon.....

Mar 19, 2016 07:33:56 #
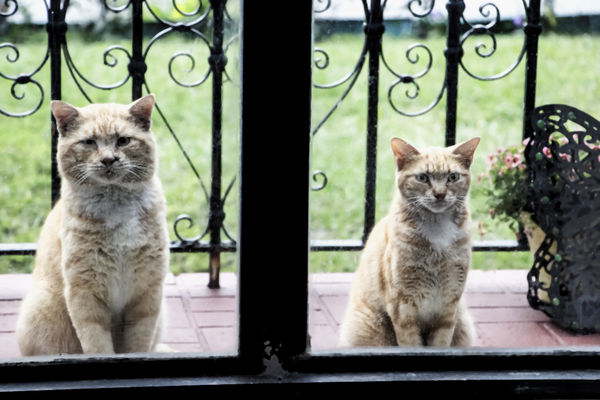
I had some more time so I did the other side of the image as well.
That was COOL... For the first time, I feel as if I "saved" an image.. Thanks again for your suggestions...
That was COOL... For the first time, I feel as if I "saved" an image.. Thanks again for your suggestions...
buddah17 wrote:
You were SO right on! br I tried the techniques yo... (show quote)
Mar 19, 2016 10:07:38 #
Yep, I would have to say "Good save". How much better it can get is going to depend on how long you're willing to clone the drops out drop by drop.
I'm not sure why the cat on the left is now closer to the edge of the frame. If you can you should reclaim that part of the image.
I'm not sure why the cat on the left is now closer to the edge of the frame. If you can you should reclaim that part of the image.
Check out Street Photography section of our forum.
Mar 19, 2016 15:23:43 #
Just looked back at the posting. The reason the cat is cut off is because I had taken 4 exposures of the couple sitting there looking in, and (apparently) when I decided to try your technique, I opened up a different exposure than the original post. (Note that one is #8 and one is #9..)
However the beauty (and simplicity) of your technique STILL stands!
However the beauty (and simplicity) of your technique STILL stands!
R.G. wrote:
Yep, I would have to say "Good save". How much better it can get is going to depend on how long you're willing to clone the drops out drop by drop.
I'm not sure why the cat on the left is now closer to the edge of the frame. If you can you should reclaim that part of the image.
I'm not sure why the cat on the left is now closer to the edge of the frame. If you can you should reclaim that part of the image.
Mar 19, 2016 15:28:43 #
Thanks. I think you're right in deciding to tolerate some rain on the window. If you were to try to get rid of it altogether it probably wouldn't go well (and all the cloning would get a bit boring ) :?
Mar 19, 2016 15:50:56 #
Believe me I am QUITE happy with the results. (And the potential of what I can do with it..)
Not to be repetitive, but THANKS AGAIN..
Not to be repetitive, but THANKS AGAIN..
R.G. wrote:
Thanks. I think you're right in deciding to tolerate some rain on the window. If you were to try to get rid of it altogether it probably wouldn't go well (and all the cloning would get a bit boring ) :?
Mar 19, 2016 16:01:02 #
Check out AI Artistry and Creation section of our forum.
Mar 19, 2016 21:25:07 #
Here is how I did it.
Opened file Made a copy layer - Command J
Made another copy Layer - Command J
On the newest layer I went to:
Filter>Noise>Dust & Scratches Set Radius 2 Pixels then OK
On this same layer I made a mask. This layer is for everything but the cats. You can use a brush set at 100% and paint over the cats letting the sharper cats come through.
Now on Layer 1:
Filter>Noise>Dust & Scratches Set Radius 1 Pixels then OK
Now you will see that the cats have less spots on them but not all gone. You will have a small bit of sharpness but because of fur it is not so noticeable.
Now flatten
Got to spot healing brush and make sure Content-Aware is on Mode is normal. Just go over as many of the remaining spots you want to remove at this time till you are satisfied. Make sure you are zoomed in and you use a small brush.
Process took about 15 min. Jim
Mar 20, 2016 07:42:57 #
Thanks..
Interesting other option. I want to try this, especially as I am VERY weak with some of the tools that you are using. (I don't understand what they do.)
EG: Why do you have to "set radius pixels" with the noise filter?
And I don't understand how to properly use "masks."
Is it my monitor, or is the image slightly softer after your adjustments?
Jim-Pops wrote:
Here is how I did it. br Opened file Made a copy l... (show quote)
Mar 20, 2016 08:44:18 #
buddah17 wrote:
Thanks..
Interesting other option. I want to try this, especially as I am VERY weak with some of the tools that you are using. (I don't understand what they do.)
EG: Why do you have to "set radius pixels" with the noise filter?
And I don't understand how to properly use "masks."
Is it my monitor, or is the image slightly softer after your adjustments?
Interesting other option. I want to try this, especially as I am VERY weak with some of the tools that you are using. (I don't understand what they do.)
EG: Why do you have to "set radius pixels" with the noise filter?
And I don't understand how to properly use "masks."
Is it my monitor, or is the image slightly softer after your adjustments?
I will start with your last question first. Yes it is softer. This process is merging dots or closing them in. The process is making sharp edges now a bit of a blur. In your case there are so many spots it is just about impossible to remove them all unless you were to take hours and hours of time cloning them out and if you did you would have, in the process, still softened the image especially in the cats.
In Photoshop when you make a mask it lets you reveal or hide areas of a layer. Please watch this YouTube video to understand a bit better:
https://www.youtube.com/watch?v=mqqVmGxvHaY
After you make a duplicate layer Command J
While on this layer go to top bar menu Filter then click Noise then you will see Dust & Scratches click it. You can see the adjustments as you move the slider over from 2 Pixels to 10. The more you move it the less spots show up. I think what is happening is software is looking for light/white pixels the size of 2 pixels and shrinking them with surrounding color pixels to reduce the white spots. I decided to do this in 2 steps because the background could afford to be less sharp so set the removal stronger. On the cats layer not so much because it would soften to much. I am not to good on writing I hope this helps. Once you watch the basic YouTub then type in and ask for another basic Photoshop layers and masks. When I first started I keep both my Photoshop program and YouTube going. I would see a part of the YouTube and then stop and go to an image in PS and do it. When done back to YouTube learn a step, stop and try on PS. Keep going back and forth.
Mar 20, 2016 09:28:28 #
Thank you SO much for taking the time to offer your expertise. I will check it out.
Jim-Pops wrote:
I will start with your last question first. Yes it... (show quote)
If you want to reply, then register here. Registration is free and your account is created instantly, so you can post right away.
Check out Travel Photography - Tips and More section of our forum.