Check out Wedding Photography section of our forum.
Photographing a Solar Eclipse
Mar 1, 2016 11:32:00 #

Does anyone have any suggestions as to how best photograph the upcoming solar eclipse on March 9th?
Mar 1, 2016 11:53:58 #
jsmangis wrote:
Does anyone have any suggestions as to how best photograph the upcoming solar eclipse on March 9th?
Lenses and Image Sizes
A solar eclipse may be safely photographed provided that certain precautions are followed. Almost any kind of camera can be used to capture this rare event; however, a lens with a fairly long focal length is recommended to produce as large an image of the Sun as possible. A standard 50mm lens on a 35mm film camera yields a minuscule 0.5mm image, while a 200mm telephoto or zoom produces a 1.9mm image (see: Field of View & Image Size Table). A better choice would be one of the small, compact catadioptic or mirror lenses that have become widely available in the past 20 years. The focal length of 500mm is most common among such mirror lenses and yields a solar image of 4.6mm.
With one solar radius of corona on either side, an eclipse view during totality will cover 9.2mm. Adding a 2x teleconverter will produce a 1000mm focal length, which doubles the Suns size to 9.2mm. Focal lengths in excess of 1000mm usually fall within the realm of amateur telescopes.
Most recommendations for 35mm SLRs apply to digital DSLRs as well. The primary difference is that the imaging chip in most DSLRs is only about 2/3 the area of a 35mm film frame. This means that the relative size of the Suns image appears 1.5 times larger in a DSLR so a shorter focal length lens can be used to achieve the same angular coverage compared to a SLR. For example, a 500mm lens on a DSLR produces the same relative image size as a 750mm lens on a SLR ( Solar Eclipse Image Scale). Another issue to consider is the lag time between digital frames required to write images to a DSLR's memory card. It is also advisable to turn off autofocus because it is not reliable under these conditions; focus the camera manually instead. Preparations must be made for adequate battery power and space on the memory card.
If full disk photography of partial phases of the eclipse is planned, the focal length of the optics must not exceed 2500mm on 35mm format (1700mm on digital). Longer focal lengths permit photography of only a magnified portion of the Suns disk. In order to photograph the Suns corona during totality, the focal length should be no longer than about 1500mm (1000mm on digital); however, a focal length of 1000mm (700mm digital) requires less critical framing and can capture some of the longer coronal streamers. Figure 19 shows the apparent size of the Sun (or Moon) and the outer corona in both 35mm film and digital formats for a range of lens focal lengths. For any particular focal length, the diameter of the Suns image (on 35mm film) is approximately equal to the focal length divided by 109 ( Field of View & Image Size Table).
A solar filter must be used on the lens throughout the partial phases for both photography and safe viewing. Such filters are most easily obtained through manufacturers and dealers listed in Sky & Telescope and Astronomy magazines. These filters typically attenuate the Suns visible and infrared energy by a factor of 100,000. The actual filter factor and choice of ISO speed, however, will play critical roles in determining the correct photographic exposure. Almost any ISO can be used because the Sun gives off abundant light. The easiest method for determining the correct exposure is accomplished by running a calibration test on the uneclipsed Sun. Shoot a roll of film of the mid-day Sun at a fixed aperture (f/8 to f/16) using every shutter speed from 1/1000s to 1/4s. After the film is developed, note the best exposures and use them to photograph all the partial phases. With a digital camera, the process is even easier. Just shoot a range of different exposures and use the camera's histogram display to evaluate the best exposure. The Suns surface brightness remains constant throughout the eclipse, so no exposure compensation is needed except for the narrow crescent phases, which require two more stops due to solar limb darkening. Bracketing by several stops is also necessary if haze or clouds interfere on eclipse day.
Certainly the most spectacular and awe-inspiring phase of the eclipse is totality. For a few brief minutes or seconds, the Suns pearly white corona, red prominences, and chromosphere are visible ( The Experience of Totality). The great challenge is to obtain a set of photographs that captures these fleeting phenomena. The most important point to remember is that during the total phase, all solar filters must be removed. The corona has a surface brightness a million times fainter than the photosphere, so photographs of the corona are made without a filter. Furthermore, it is completely safe to view the totally eclipsed Sun directly with the naked eye. No filters are needed, and in fact, they would only hinder the view. The average brightness of the corona varies inversely with the distance from the Suns limb. The inner corona is far brighter than the outer corona; thus, no single exposure can capture its full dynamic range. The best strategy is to choose one aperture or f/number and bracket the exposures over a range of shutter speeds (i.e., 1/1000s to 1s). Rehearsing this sequence is highly recommended because great excitement accompanies totality and there is little time to think.
Exposure times for various combinations of ISO speeds, apertures (f/number) and solar features (chromosphere, prominences, inner, middle, and outer corona) are summarized in the Solar Eclipse Exposure Guide above. This guide was developed from eclipse photographs made by the author, as well as from photographs published in Sky and Telescope. To use the guide, first select the ISO speed in the upper left column. Next, move to the right to the desired aperture or f/number for the chosen ISO. The shutter speeds in that column may be used as starting points for photographing various features and phenomena tabulated in the Subject column at the far left. For example, to photograph prominences using ISO 400 at f/16, the table recommends an exposure of 1/1000. Alternatively, the recommended shutter speed can be calculated using the Q factors tabulated along with the exposure formula at the bottom of the table. Keep in mind that these exposures are based on a clear sky and a corona of average brightness. The exposures should be bracketed one or more stops to take into account the actual sky conditions and the variable nature of these phenomena.
Point and Shoot Cameras
Point-and-shoot cameras with wide angle lenses are excellent for capturing the quickly changing light in the seconds before and during totality. Use a tripod or brace the camera on a wall or fence since slow shutter speeds will be needed. You should also disable or turn off your camera's electronic flash so that it does not interfere with anyone else's view of the eclipse.
Another eclipse effect that is easily captured with point-and-shoot cameras should not be overlooked. Use a straw hat or a kitchen sieve and allow its shadow to fall on a piece of white cardboard placed several feet away. The small holes act like pinhole cameras and each one projects its own image of the eclipsed Sun. The effect can also be duplicated by forming a small aperture with the fingers of ones hands and watching the ground below. The pinhole camera effect becomes more prominent with increasing eclipse magnitude. Virtually any camera can be used to photograph the phenomenon, but automatic cameras must have their flashes turned off because this would otherwise obliterate the pinhole images.
Mar 1, 2016 13:04:58 #

I hope you expect to be a long way from home next week.
There was a very recent thread on the subject of photographing a solar eclipse.
http://www.uglyhedgehog.com/t-371026-1.html
Here is a link to a number of write ups, starting with what is posted above.
http://www.google.com/search?q=A+solar+eclipse+may+be+safely+photographed+provided+that+certain+precautions+are+followed.&rls=com.microsoft:en-US:IE-Address&ie=UTF-8&oe=UTF-8&sourceid=ie7&rlz=1I7ADFA_enUS433&gws_rd=ssl
---
Check out Travel Photography - Tips and More section of our forum.
Mar 2, 2016 07:54:02 #

jsmangis wrote:
Does anyone have any suggestions as to how best photograph the upcoming solar eclipse on March 9th?
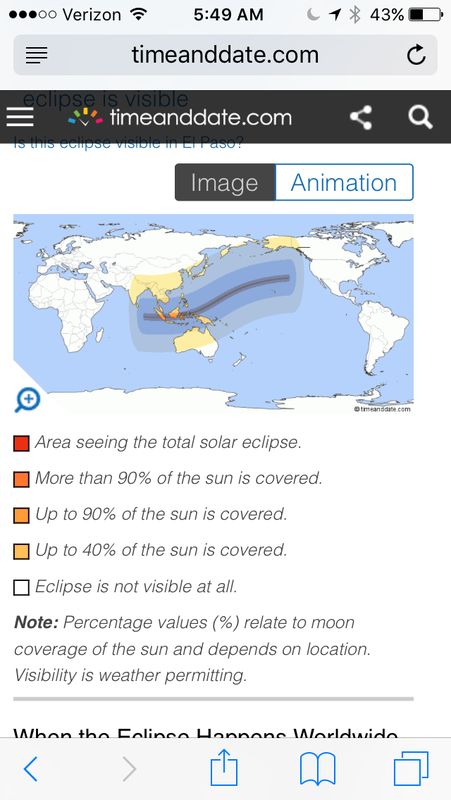
This is a map of the area of visibility for the upcoming eclipse. Maybe North America will have better luck viewing it for the next one in August, 2017 👍🏻
Mar 2, 2016 08:48:50 #

jsmangis wrote:
Does anyone have any suggestions as to how best photograph the upcoming solar eclipse on March 9th?
Start with travel to Indonesia....
Sorry, but this one will not be visible in North America except for Alaska, and from Alaska only a partial eclipse will be visible.
Mar 2, 2016 13:57:02 #
Hilly
Loc: Lincolnshire.UK
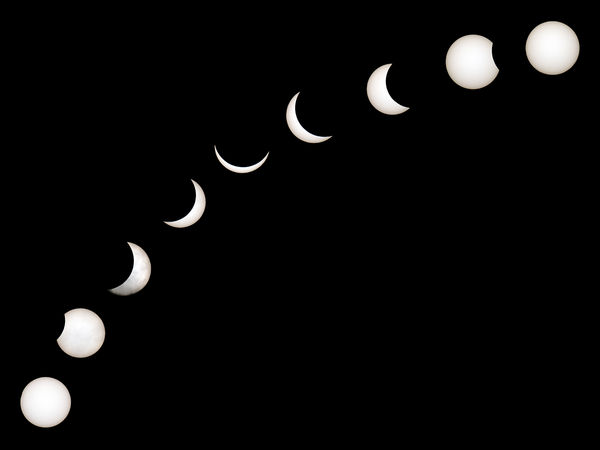
I took this photo in the UK last year with a PowerShot SX60 HS and a solar filter took the photos in stages then put them together in photo software
If you want to reply, then register here. Registration is free and your account is created instantly, so you can post right away.