Tutorial - Enhance an Admiral very easily
Feb 21, 2016 04:38:48 #
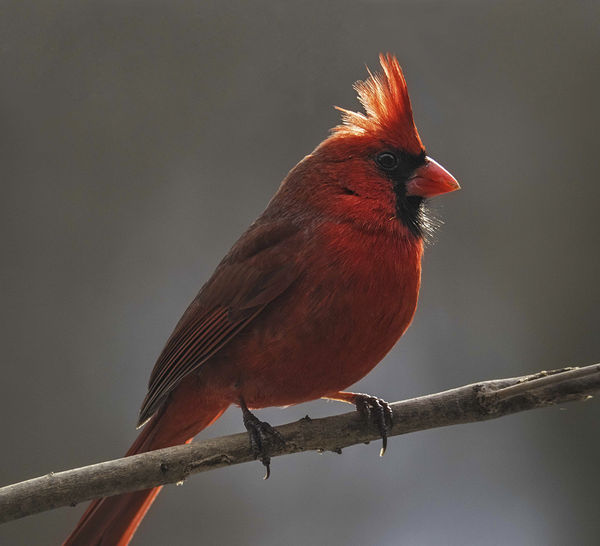
This tutorial came about because of a rather fine picture posted by one of our members pfranke and can be found here -
http://www.uglyhedgehog.com/t-368636-1.html
Whilst I thought it was a great shot I was surprised and indeed questioned others comments on it. Of course peoples opinions of what is right and eyes and monitors all differ. The end result was I did a little work in Photoshop on it and posted it for Piets opinion. His response was -
OMG, I like what you did very much. The bird has greater presence. I feel like I can touch him. I would very much like to know how you did this! No... Let me say it a different way. I MUST know how to do this. It has to be more than structure..
So hence a tutorial. As usual all done on Photoshop but Im sure will work in Elements Gimp or Paint Shop Pro. There are two finished versions one using a variety of Nik filters and for those without Nik, a purely Photoshop version.
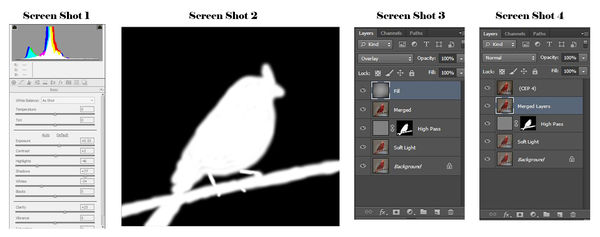
1) Both start with downloading and opening the original image in Camera Raw. For those who were not aware all images can be opened in Camera Raw making the editing tools fully available. To open a Jpeg in Camera Raw go File>Open As and select Camera Raw from the drop down box. Use the settings shown in Screen Shot 1 and click Open Image and it will open in Photoshop.
2) Now go Ctrl/J to duplicate it and from the drop down menu of Blend Modes select Soft light. This is the box at the top of the layers palette marked Normal by default. Set the opacity of this Soft Light layer to 50%. This gives the bird some of the light found lacking in back lit subjects very often. Your camera has taken a reading from the light leaving the subject matter dark.
3) Now go Ctrl/J to duplicate the layer. Then in the top tool bar go Filter>Other>High Pass and set the radius to 8 pixels. Click OK. You should notice the bird is sharper with more feather detail. I changed the blend mode on this layer to Overlay which increase the sharpness further but this is your choice. Now we have sharpened the whole picture including the background which can introduce visible noise. To make sure this does not occur with Alt key held down click on the Add a Layer Mask icon. This is the square with a circle in it at the bottom of the layers palette.
4) Because you held the Alt key down the mask is black, called a hide all mask, and you will notice your image is no longer looking sharp. We have effectively hidden what the High Pass layer achieved. To bring the sharpness back select your brush tool making sure white is your foreground colour. The rounded arrow by the black and white boxes at the bottom of the side tool bar allows you to swap foreground and background colours. White reveals and black hides with masks so with a soft brush set to around 100 pixels paint back the detail as per Screen Shot 2. Change the size of your brush if needed for the legs etc by pressing the [ and ] keys. Anything you wish to change is easily done by swapping your foreground and background colours and painting detail back in black.
5) When you feel your mask is complete select your Move tool in the side tool bar and then press the following keys at the same time Shift/Ctrl/Alt/E this does the same job as flattening your image but instead produces a new layer on top of the stack with includes all your edits. This I have named Merged. This is where you can continue in one of two ways.
To continue in Photoshop
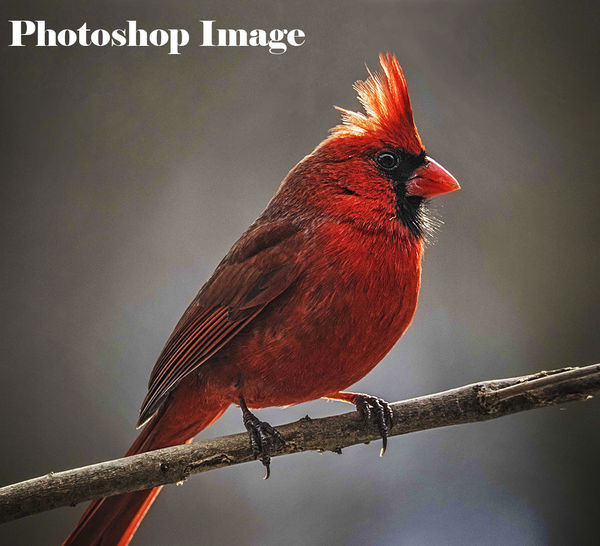
Put a new blank layer on top of the stack ie click on the icon at the bottom of the layers palette that looks like a piece of paper with the bottom corner folded over. Now go Edit>Fill and choose 50% Grey from the top drop down box. This obscures your image completely but when you change the Blend Mode of this image to Overlay you picture appears again. This layer will act like a Dodge and Burn layer but is easier than using those tools. Black painted on Fill layer will darken and white will lighten. Set your brush to 100% soft 20% Opacity in the top tool bar and with size set to 900 pixels paint a gentle vignette as per Screen Shot 3 shows on the Fill layer. Lastly change the brush to white and click once in the center of the picture. The slight vignette and lightening the center enhances the back lit effect.
To continue if you have Nik filters available
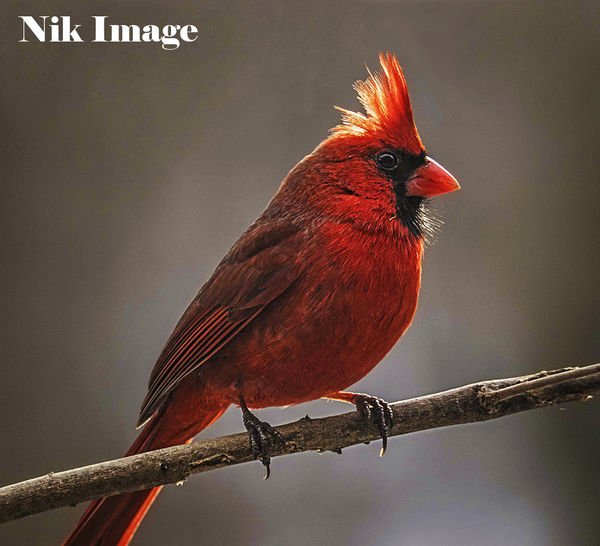
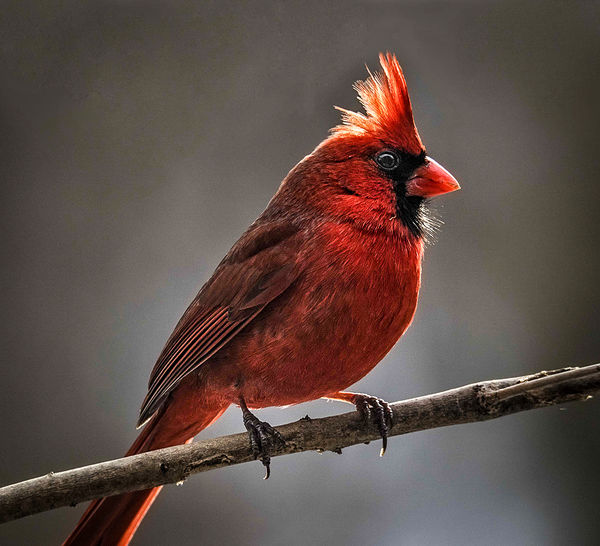
With the merged layer selected open Nik and select Color Efex add The skylight filter then High key and then Darken and Lighten centre at the settings I have illustrated under Nik Settings. Click OK and you have thrown some light at the bird and enhanced the backlighting by darkening the edges. See Screen Shot 4.
The changes are subtle but if you start with a good image only small but often vital changes are needed to bring out the very best in it
http://www.uglyhedgehog.com/t-368636-1.html
Whilst I thought it was a great shot I was surprised and indeed questioned others comments on it. Of course peoples opinions of what is right and eyes and monitors all differ. The end result was I did a little work in Photoshop on it and posted it for Piets opinion. His response was -
OMG, I like what you did very much. The bird has greater presence. I feel like I can touch him. I would very much like to know how you did this! No... Let me say it a different way. I MUST know how to do this. It has to be more than structure..
So hence a tutorial. As usual all done on Photoshop but Im sure will work in Elements Gimp or Paint Shop Pro. There are two finished versions one using a variety of Nik filters and for those without Nik, a purely Photoshop version.
1) Both start with downloading and opening the original image in Camera Raw. For those who were not aware all images can be opened in Camera Raw making the editing tools fully available. To open a Jpeg in Camera Raw go File>Open As and select Camera Raw from the drop down box. Use the settings shown in Screen Shot 1 and click Open Image and it will open in Photoshop.
2) Now go Ctrl/J to duplicate it and from the drop down menu of Blend Modes select Soft light. This is the box at the top of the layers palette marked Normal by default. Set the opacity of this Soft Light layer to 50%. This gives the bird some of the light found lacking in back lit subjects very often. Your camera has taken a reading from the light leaving the subject matter dark.
3) Now go Ctrl/J to duplicate the layer. Then in the top tool bar go Filter>Other>High Pass and set the radius to 8 pixels. Click OK. You should notice the bird is sharper with more feather detail. I changed the blend mode on this layer to Overlay which increase the sharpness further but this is your choice. Now we have sharpened the whole picture including the background which can introduce visible noise. To make sure this does not occur with Alt key held down click on the Add a Layer Mask icon. This is the square with a circle in it at the bottom of the layers palette.
4) Because you held the Alt key down the mask is black, called a hide all mask, and you will notice your image is no longer looking sharp. We have effectively hidden what the High Pass layer achieved. To bring the sharpness back select your brush tool making sure white is your foreground colour. The rounded arrow by the black and white boxes at the bottom of the side tool bar allows you to swap foreground and background colours. White reveals and black hides with masks so with a soft brush set to around 100 pixels paint back the detail as per Screen Shot 2. Change the size of your brush if needed for the legs etc by pressing the [ and ] keys. Anything you wish to change is easily done by swapping your foreground and background colours and painting detail back in black.
5) When you feel your mask is complete select your Move tool in the side tool bar and then press the following keys at the same time Shift/Ctrl/Alt/E this does the same job as flattening your image but instead produces a new layer on top of the stack with includes all your edits. This I have named Merged. This is where you can continue in one of two ways.
To continue in Photoshop
Put a new blank layer on top of the stack ie click on the icon at the bottom of the layers palette that looks like a piece of paper with the bottom corner folded over. Now go Edit>Fill and choose 50% Grey from the top drop down box. This obscures your image completely but when you change the Blend Mode of this image to Overlay you picture appears again. This layer will act like a Dodge and Burn layer but is easier than using those tools. Black painted on Fill layer will darken and white will lighten. Set your brush to 100% soft 20% Opacity in the top tool bar and with size set to 900 pixels paint a gentle vignette as per Screen Shot 3 shows on the Fill layer. Lastly change the brush to white and click once in the center of the picture. The slight vignette and lightening the center enhances the back lit effect.
To continue if you have Nik filters available
With the merged layer selected open Nik and select Color Efex add The skylight filter then High key and then Darken and Lighten centre at the settings I have illustrated under Nik Settings. Click OK and you have thrown some light at the bird and enhanced the backlighting by darkening the edges. See Screen Shot 4.
The changes are subtle but if you start with a good image only small but often vital changes are needed to bring out the very best in it
Original image
(Download)
Screen Shots
(Download)
Nik Settings

(Download)
Photoshop Image
(Download)
Nik Image
(Download)
Feb 21, 2016 06:17:44 #
Billyspad wrote:
This tutorial came about because of a rather fine ... (show quote)
Billy, I will have to give this a try. Looks to be very interesting and useful. Thanks for the info. Learning new and different ways to achieve ones goal is the key. Oh, and I will say your end results is quite impressive with the cardinal.
Dave
Feb 21, 2016 10:45:34 #
Frank2013
Loc: San Antonio, TX. & Milwaukee, WI.
Well explained Mr. Spad. The hide mask is very useful knowledge as is everything else you explained.
Feb 21, 2016 11:19:27 #
Thank you Billy! I went thru the steps and they worked well. I like what they do very much and am learning bundles. Came just in time for me, my wife wanted some bird prints and for printing in particular, this helped a bunch.
Feb 21, 2016 11:43:10 #
Thanks Billy. We can always learn something in Photoshop. I have never used the High Pass filter although knew about it but didn't know when I might use it or why. I will now be using in future edits. :thumbup: :thumbup:
Feb 21, 2016 18:50:12 #
Dave Chinn wrote:
Billy, I will have to give this a try. Looks to be very interesting and useful. Thanks for the info. Learning new and different ways to achieve ones goal is the key. Oh, and I will say your end results is quite impressive with the cardinal.
Dave
Dave
I think the original capture was pretty impressive Dave just needed that extra bit to make it something very special. This technique is very basic and can be used on many images Dave.
Good day to you and hope all is well
Feb 22, 2016 06:37:04 #
Billy, this is an excellent tutorial and exactly what I have been trying to figure out how to do. Thanks for the post.
Feb 22, 2016 07:06:25 #

Another excellent tutorial and again, one that incorporates tools we can use in many ways.
I use the Hide Masks in most images that I take into Photoshop. One of the most common ways I use them is to direct where and how much I want to reveal of a layer that I've applied a plugin to.
I love the effects of the various plugins but what I want applied to the sky may be different from what I want applied to the lake beneath it. Topaz for instance has some very strong effects that can overpower an image if you don't harness them. The mask layers let me control what the plugins do and where/ how much, like the sharpening PS filter here. The same principle applies to any effect you want to control precisely.
For those of you who have the Nik suite and PS, if you haven't already done it, experiment with applying your Nik filters, Nik noise removal and sharpening with the PS brush tools on their own layer. Gives you a similar approach.
Thanks again Billy for a great tutorial that opens many doors to learning.
Feb 22, 2016 07:33:42 #
Billy, I was so interested in this tutorial I could not leave for work without giving it a try. The results were really nice. Thanks again for this detailed and easy to follow tutorial. Much appreciated.
Feb 22, 2016 07:48:31 #

I am always amazed that so many people hold the excrement of the camera as being untouchable sacred. They think that seeing fine structure is not what they saw photographing a bird from 50' away and thus should not be seen... unrealistic?!.
I use Topaz to bring out the details and true it is the lazy no learning curve way out but indeed the feather structure is shown. To me all photos need Post Processing to enhance the details that are really there in the info given by the camera. (especially with raw files)
Kudos BillySpad, helping fellow UHH people like this tutorial goes to prove what I often say "BillySpad ain't all bad."
One of these days I will write a poem with that title!!
Feb 22, 2016 09:09:09 #
Jim-Pops wrote:
Thanks Billy. We can always learn something in Photoshop. I have never used the High Pass filter although knew about it but didn't know when I might use it or why. I will now be using in future edits. :thumbup: :thumbup:
Easiest way of sharpening pics Jim. Set radius anywhere from 2 to probably 15 as highest setting and use Overlay or Soft Light as your blend mode and a mask to just sharpen where you need it. Im vary sparing with sharpening my self.
Feb 22, 2016 09:10:08 #
waltchilds wrote:
Billy, I was so interested in this tutorial I could not leave for work without giving it a try. The results were really nice. Thanks again for this detailed and easy to follow tutorial. Much appreciated.
Not my fault if you get your pay docked for being late Walt.
Feb 22, 2016 09:15:06 #
minniev wrote:
Another excellent tutorial and again, one that inc... (show quote)
Hopefully min each tutorial introduces something new and our membership will be able to utilize the techniques in their work. I do hope they realize Im not an expert or a guru and do not pretend to be. Just trying to help expand peoples repertoire and get the best out of what they do.
Feb 22, 2016 09:15:51 #

In addition to his well-written tutorial, Billy also showed that if you know your way around PS, then Nik and probably most of those similar programs are not needed. That led me to wonder if I could duplicate Billy's PS edit in LR. I did so in under five minutes. While not identical to his edit, LR came pretty close. Download the two pictures to compare closely.
Feb 22, 2016 09:26:52 #
dpullum wrote:
I am always amazed that so many people hold the ex... (show quote)
No billyspad aint all bad my man. Just not the most polite guy around when faced with dumb. Like folks who can be honest with themselves and others. Do not tell me your an artist when in fact you earn your living as a plumber lol. And they wonder why I larf at em..............
I have no problem with folks using Topaz if it gets the result you want and enhances your picture. I use Nik an awful lot.
So keep on preaching to the unbelievers that Billy is a good guy and if I can help anyone I always do.
Just do not ruin a photo with doodling or Topaz Simplify and expect me to believe its art huh.
Now that poem idea I could take to. I await with baited breath Sir.
If you want to reply, then register here. Registration is free and your account is created instantly, so you can post right away.