How to crop for print properly in PS CC
Feb 13, 2016 16:22:10 #

This is a simple tutorial on how to create a proper selection based on your center of interest*.
Select your crop ratio option.
Create a smaller crop, not the full version.
If you want a rotated crop use the crop rotate handles first. (Capture 999)
Compose your crop by sliding the image up/down sideways until you get the area that is center of attention where it should be. This can be off center or dead on, it does not matter.
Select the crop center dot and move it to the center of attention.
Press Alt down. With Alt down use any part of the external crop frame to extend/contract in order to create the final crop. Notice that the crop orientation will flip automatically from Vertical to horizon if you get out of bound.
This is simple way to crop quickly and accurately any printed image using a commercial ratio.
You can of course use this in 'free-form' crop.
Tip: this also work when transforming a selection.
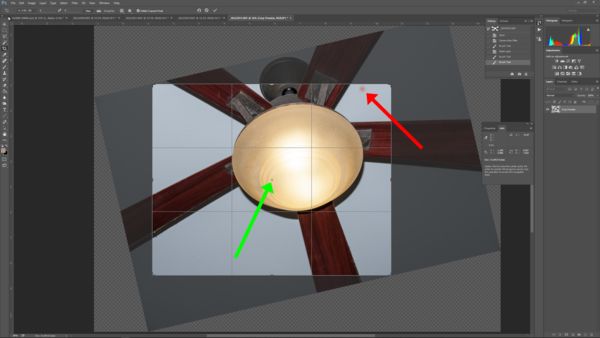
Demo using a ceiling fan in my office
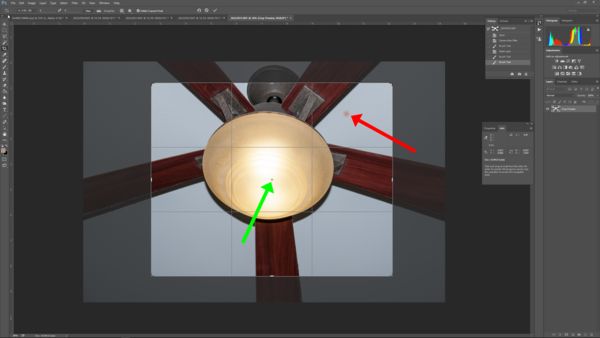
1) Created a red dot to mark an are that I want as the base for my crop
2) selected the ratio and created the initial crop area (Capture 001). Notice that I have the ruler and guidelines turned on.
3) I re-positioned the crop so that the H-2/3 and H-1/2 guideline cross-line coincide with the red dot (Capture 002)
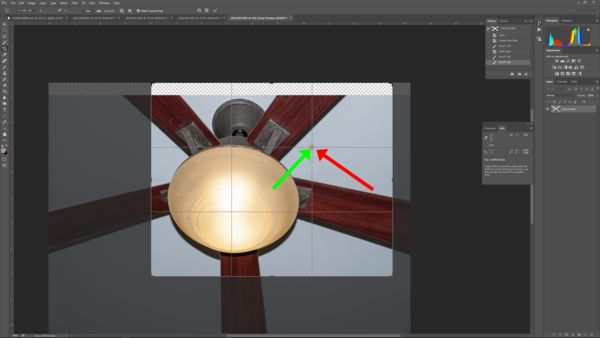
4) I set the crop 'center of interest so that is over the H-2/3 and H-1/2 guideline cross-line (Capture 003)
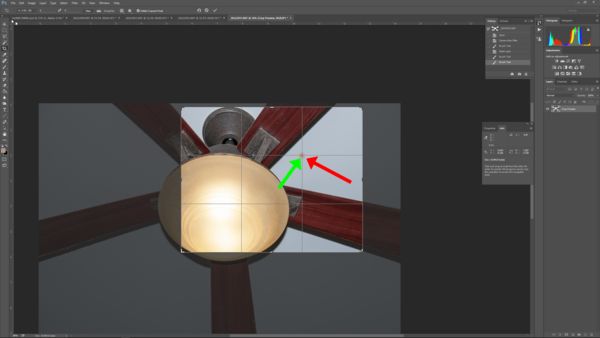
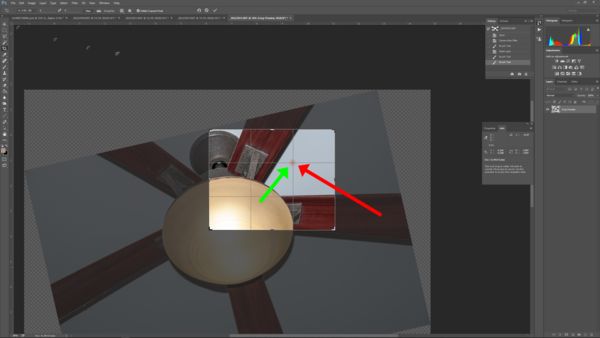
5) Alt-Click-Drag anywhere on the crop frame to adjust the size (capture 004)
6) Rotated crop using this method (Capture 998)
-----
* If you find my description awkwardly presented as a whole feel free to correct it.
Select your crop ratio option.
Create a smaller crop, not the full version.
If you want a rotated crop use the crop rotate handles first. (Capture 999)
Compose your crop by sliding the image up/down sideways until you get the area that is center of attention where it should be. This can be off center or dead on, it does not matter.
Select the crop center dot and move it to the center of attention.
Press Alt down. With Alt down use any part of the external crop frame to extend/contract in order to create the final crop. Notice that the crop orientation will flip automatically from Vertical to horizon if you get out of bound.
This is simple way to crop quickly and accurately any printed image using a commercial ratio.
You can of course use this in 'free-form' crop.
Tip: this also work when transforming a selection.
Demo using a ceiling fan in my office
1) Created a red dot to mark an are that I want as the base for my crop
2) selected the ratio and created the initial crop area (Capture 001). Notice that I have the ruler and guidelines turned on.
3) I re-positioned the crop so that the H-2/3 and H-1/2 guideline cross-line coincide with the red dot (Capture 002)
4) I set the crop 'center of interest so that is over the H-2/3 and H-1/2 guideline cross-line (Capture 003)
5) Alt-Click-Drag anywhere on the crop frame to adjust the size (capture 004)
6) Rotated crop using this method (Capture 998)
-----
* If you find my description awkwardly presented as a whole feel free to correct it.
001 - Initial crop
(Download)
002 - Moved the crop area H-2/3 V-1/3 to overlap the marker (Click-Drag)

(Download)
003 - Moved the 'crop center' to overlap the red dot
(Download)
004 - Adjusted crop using sides (Alt-Click-Drag)
(Download)
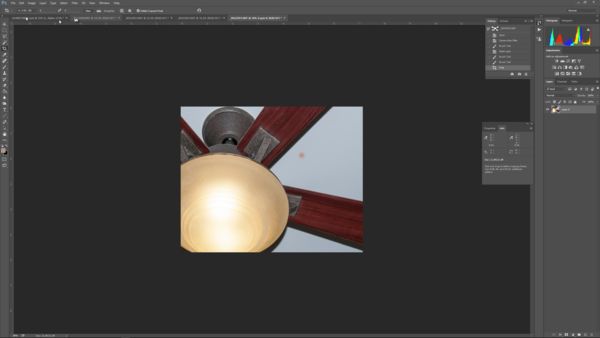
005 - Final crop
(Download)
999 - Rotate the crop first
(Download)
998 - Adjustement done as per above description
(Download)
Feb 14, 2016 12:46:56 #
Thank you. I'm sure there are many ways to do this. Mine is a little more "seat of the pants" that, I find, gives me the most creative options: Most of my images are 8x10, 11x14 or 16x20. 1) I set the crop tool but do not tell it what size. This allows me the most freedom.. 2) crop closest to my liking. 3) copy the image & then give it a name & close it. 4)Go to "file" new" & make it 11x4 white. 5) paste the copied image onto the white rectangle. 6) reduce the opacity so you can see the white rectangle underneath. 7) fine-tune the crop by 8) Edit>free transform OR instead of free transform use "content aware scale". This will keep all of the "picture" in the 11x14 rectangle underneath the image layer. 9) Double click. 10) layer>flatten. I then use Genuine Fractals to resize "high detail" . Sounds much more complicated than it is . Gives you the maximum "perfect 11x14" that contains as much of the original image as you like in the format & size you want.
Feb 15, 2016 07:56:27 #

Rongnongno, I do not know what cropping problem you are trying to solve here. Most of my cropping has always been free. Images have a way of not caring about standard aspect ratios. I do use them for proof prints or when too lazy to make a custom mount when framing.
Feb 15, 2016 08:00:01 #
abc1234 wrote:
Rongnongno, I do not know what cropping problem you are trying to solve here. Most of my cropping has always been free. Images have a way of not caring about standard aspect ratios. I do use them for proof prints or when too lazy to make a custom mount when framing.
What problem?
The idea is to be capable to constrain a crop AROUND a (sometime ex-centric) point of interest and eliminate the guess work.
Feb 15, 2016 08:06:12 #
dnathan wrote:
...I then use Genuine Fractals to resize "high detail" . Sounds much more complicated than it is ....
Again, not sure what problem you are trying to solve and what you gain. Have you ever compared prints made with and without your method? Having sold digital printing for many years, my experience is that you do not and should not resize the file to the final printing size. The printing software will take of that nicely and the smaller files move faster. All you have to do is crop to whatever "size" you want and then print. No reason to complicate matters.
Feb 15, 2016 13:30:04 #
Thanks. I have not compared the same printed image straight or upsized. If you prove to be correct, what is the point of genuine fractals or their equals?
Feb 15, 2016 18:36:06 #
dnathan wrote:
Thanks. I have not compared the same printed image straight or upsized. If you prove to be correct, what is the point of genuine fractals or their equals?
They always struck me as solutions in search of problems. Another method was to resize by ten percent until you reached the final size. That was not really any better than going all the way at once. The important thing is how does the picture look at normal viewing distance. If you see no difference, then save your time and money.
If you want to reply, then register here. Registration is free and your account is created instantly, so you can post right away.