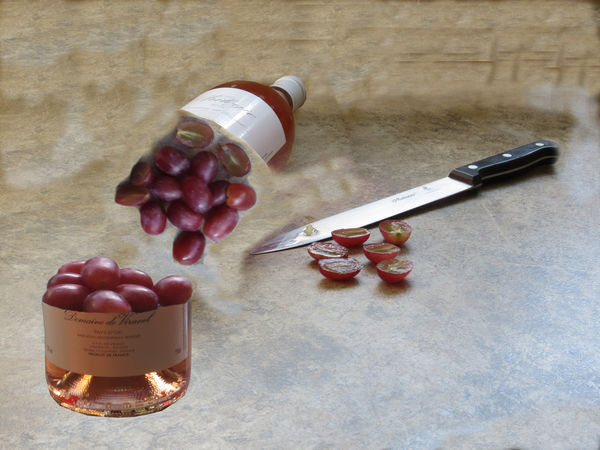
How was this done?
Feb 9, 2016 15:07:40 #
Apart from the obvious of cutting the bottle any thoughts on how this shot was achieved?7http://images.wookmark.com/112510_karl_taylor_photography_6.jpg
Feb 9, 2016 15:59:40 #
Looks like a composite. My guess, two images of the bottle - on standing up and one on its side; and two separate images of the apple. Then, everything combined and fitted together in editing.
Feb 9, 2016 17:08:46 #
rook2c4 wrote:
Looks like a composite. My guess, two images of the bottle - on standing up and one on its side; and two separate images of the apple. Then, everything combined and fitted together in editing.
OK but how was the 3D effect obtained?
Feb 9, 2016 21:16:56 #

A great advertising accomplishment however it was done. First thought was that the apple was grown in the bottle. The liquid could have been added with an editing program. The cut; just as a thought could be done with a laser.
Hope you have an answer for how it was done.
Hope you have an answer for how it was done.
Feb 9, 2016 21:18:43 #
Feb 9, 2016 22:41:51 #
amersfoort wrote:
OK but how was the 3D effect obtained?
What 3D effect? Will I need to wear special 3D glasses to see it?
Feb 10, 2016 07:29:00 #

My guess is that the bottle was actually cut and polished. Use a carborundum or diamond wheel with water, then polish the cut edge. lots of discussion here:
http://www.talkglass.com/forum/showthread.php?23758-Cutting-and-polishing-wine-bottles
Actually, the polishing to a shine may be tricked; one might be able to get by with a good cut, rough polish and then clear nail polish on the cut edge carefully applied.
The photo would be different if the hot wire cut were simply left with jagged edges which would shine because of cleavage at grain lines.
Here are instructions using fuel soaked twine. I would add a step using a diamond tile marking pencil ... circle the bottle with a scratch where you want the break.
http://www.instructables.com/id/How-to-cut-a-bottle-with-string-and-nail-polish-re/?ALLSTEPS
Feb 10, 2016 08:05:34 #
I'm not at home at the moment so I did not have my camera or tripod with me. Using my wife's point and shoot I made the attached very crude attempt.
Suggestion of rook2c4 followed. I'll try to produce a better version when I am reunited with my photographic equipment. Much playing around with placement and lighting required.
Many thanks rook2c4.
Suggestion of rook2c4 followed. I'll try to produce a better version when I am reunited with my photographic equipment. Much playing around with placement and lighting required.
Many thanks rook2c4.
Feb 10, 2016 08:10:11 #
rook2c4 wrote:
What 3D effect? Will I need to wear special 3D glasses to see it?
No glasses needed
:D
I meant the way the bottles have thickness to the glass.
Feb 10, 2016 10:48:10 #
amersfoort wrote:
No glasses needed
:D
I meant the way the bottles have thickness to the glass.
:D
I meant the way the bottles have thickness to the glass.
Ah, I think I now understand what you meant by "3D".
It has to do with the use of lighting, and incorporating sections of the table surface in the bottle image composites, to capture the shadows and reflections the bottle projects on it, not just the bottle itself. Much skill and effort seems to have been put into creating the composite to make it appear believable and not like the copy-and-paste project it actually is. A very effective illusion, in my opinion.
Feb 10, 2016 13:41:10 #
Apple appears cut in half yet base of bottle is not big enough to contain it. Ergo 2 photos of bottle and apple and some editing.
Feb 10, 2016 14:25:16 #
dpullum wrote:
My guess is that the bottle was actually cut and p... (show quote)
That sounds too expensive and too difficult for me but thanks for the information.
Feb 10, 2016 22:22:01 #
amersfoort wrote:
That sounds too expensive and too difficult for me but thanks for the information.
Where did you expect to get the bottle already cut for nothing? The carborundum pencil (often called diamond ) is only $7!!! is that too expensive... did you just open your mouth and not bother to check on the cost of the marking pencil?? Did you think that that photo was effortless. To use someone's base photo and put your own fruit in it is unethical.
Aside from cutting the bottle there is noting that a grad-school photographer could not do. The bottle is the core of the photo, and at times one has to make effort to not be among the mundane.
Feb 11, 2016 19:27:52 #
I used to have a bottle cutter, which would of course allow you to cut the bottle in half. I think it was two pictures combined together. Maybe the apple was placed in the bottle or maybe it was photoshopped in, one thing for sure there is a lot of editing done. I may give that a try tomorrow if so I'll post my results....
Feb 12, 2016 14:31:14 #
My daughter found a tutorial on how to cut bottles on youtube. It took her several attempts, no special tools needed, but she finally got some pretty neat results. Then they just used sandpaper to smooth the edges.
If you want to reply, then register here. Registration is free and your account is created instantly, so you can post right away.