My Two Cents on "Photo Analysis Area"
Feb 9, 2016 11:12:13 #
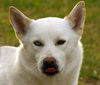
Hello, I'm a "newbie" to the site. I recently posted a photo and a question about getting a better result on Raw files. I was having a problem with photo'ing a white dog against a darker background outside. The white dog would have spots or highlights that were burned out or close to it and had no detail. I read the rules for posting on the "PhotoAnalysis" section and Sent all the Exif data and tried to explain the problem I was having in detail. I posted a photo with the dog exposed about right, since he was the focus of the photo, and the background underexposed. I wanted help with getting the background better while preserving as much detail of the dog as possible. I ask several specific questions. Tried to keep the post lite hearted and humble. Well, I received several replies. None of them answered my questions I asked directly. Most said simply "The photo is Underexposed". One person reposted my photo after he exposed it more and the same problem was there. The back area in the middle of the dog was overexposed and had very little if any detail. It showed exactly the problem that I'm having. I'm an old guy that started out in photography with a hand me down Press Camera shooting 4x5 black and white and developing my own. Moved on to 120 & 35mm for years. I've moved into digital probably 10~15 yrs. ago. I'm no pro but I have spent quite a bit of time working with photo's. Also I use several software programs. I also have the new Photoshop 2015. And it will automatically load a raw file for adjustment. I also use Fuji's raw software since I use a Fuji camera. I really wanted some specific help. For anyone interested, the best results I've had at trying to get detail for really white subjects that have "hot spots" is to expose the raw file for the backgrouns and use PS and use the Burn tool on the specific areas of the focus subject and any other "hot spots" and that leaves the other areas exposed correctly. It works OK until you go to larger enlargements, but still I think there can be a more "natural" way. Anyway if you've taken the time to read this, "Thanks". "No Harm - No Foul" ,,,,, Just wanted to post my experience to maybe help the next Newbie.
Feb 9, 2016 11:32:45 #

xs650greg2 wrote:
Hello, I'm a "newbie" to the site. I re... (show quote)
Greg,
Admittedly, some of the answers were of little or no use. That occurs in forums. However, those addressing the exposure issue were quite valid, or at least pointed you in the right direction.
It would be of immense value to you to completely understand exposure, how meters determine exposure, and the workings of your particular camera.
I would suggest that you acquaint yourself with the concepts of Expose to the Right and Expose Beyond the Right. They will help in situations such as the photograph of the dog.
Additionally, I'd suggest a complete familiarity with your post processing software. If you use either Lightroom or Photoshop, become very familiar with Adobe Camera Raw.
I hope this helps.
--Bob
Feb 9, 2016 11:35:08 #

The problem you are having now is the same we had with film, not enough latitude.
One way to solve it is using HDR. Shoot three shots with bracketed exposure then merge them using HDR. If the dog moves during exposure, you may have to do some masking/selection/cut, or whatever it takes to leave the dog on only one properly exposed image.
Another method is to use the history brush. Use levels and adjust the dog the way you want him. Take a snapshot that will show in the history palette and name it Dog. Then take a step back in history. Use levels again, this time ignoring the dog and getting the background correct. Take another snapshot, and another step back. Now select the "History Brush" and using the appropriate snapshot, paint in the dog and the background. Depending how many stops difference the background is from the dog, you may have to start with a slightly over exposed dog (no totally blown highlights, so neither 'history' is too far off.
In shooting, if the background is close, you could light the background with remote flash set behind the dog.
Hope this gives you some ideas.
---
Check out Digital Artistry section of our forum.
Feb 9, 2016 11:36:48 #
rmalarz wrote:
Greg, br Admittedly, some of the answers were of l... (show quote)
Thanks Bob for the straight up and specific answer. That's all I'm after. To me you never quit learning in Photography. Thanks again, Greg.
Feb 9, 2016 11:40:15 #
xs650greg2 wrote:
Hello, I'm a "newbie" to the site. I re... (show quote)
For processing you might have better luck with the post processing forum.
If you really want wider dynamic range you need to bracket and then either HDR or use layers in Photoshop.
If you had a Nikon you might try their two-shot HDR or use ADL on high, but they aren't as good as the above with RAW images. I don't know if Fuji has counterparts.
If you want to avoid blowing out the highlights you need to use spot metering with manual exposure setting the meter to EV +2 for the brightest spot.
Feb 9, 2016 11:42:16 #

This post illustrates one of the central problems with un-edited and un-moderated open forums. I have noted poorly written queries and poorly written reolies. I have akso experienced poorly read posts and poorly read answers. All this shows is that translating one's thoughts into intelligible words is no easy task- sometimes even English majors stumble. Cutting you the reader and reserving for me some generous slack seems to be a good rule.
Feb 9, 2016 11:43:47 #
Bill_de wrote:
The problem you are having now is the same we had ... (show quote)
Hooray!,,, Thank you so much. This gives me a course of action to try and experiment with. Very specific and detailed. I really do appreciate the step by step in PS. I have not tried the method with the "History Brush". Very Cool! ,, And I was starting to think that maybe I was going to have to take out some of my larger stand Flash to do the background, this just makes me think it might be a viable solution to get a better result on the raw file initially. Thanks again. Greg.
Check out Wedding Photography section of our forum.
Feb 9, 2016 11:46:12 #
John_F wrote:
Cutting you the reader and reserving for me some generous slack seems to be a good rule.
Does that apply to bad spelling/typos? :)
--
Feb 9, 2016 11:51:56 #
MtnMan wrote:
For processing you might have better luck with the... (show quote)
Thanks for thoughts on HDR. Works great on still stuff. My Fuji has it and it takes I think 3 bracketed shots. The problem is that I work with Animals and moveing subject shots a lot and you have to use a pretty fast shutter speed to "freeze" them and the HDR is not always sharp at 100% for enlargements. I really appreciate the thought out response. Greg.
Feb 9, 2016 12:10:55 #

I agree with Bob that some answers probably were not as helpful as they could have been. Some people have trouble expressing their thoughts clearly at the keyboard.
I will also agree that proper exposure was an issue.
Your camera's reflective metering system wants to make whatever area it analyzes average out to the equivalent of a nice middle grey during the exposure.
So, if you spot meter on a white dog it will do it's best to recommend an exposure for the dog that is too dark. If you had a black dog and spot metered on it, the camera's meter would want to make the image too bright. If your dog was middle grey and you spot metered on the dog the camera would recommend the perfect exposure for it.
You have to allow for errors in judgement that the camera will make, and either use exposure compensation or adjust exposure manually to compensate.
Some people use grey cards or other devices, some incident light meters, and some just personal experience to make the needed adjustments.
If you get close enough to the proper exposure in the beginning, there will be less to worry about with any form of post processing.
Feb 9, 2016 13:57:02 #

xs650greg2 wrote:
.../...
Also posted in the original thread:
1) you are impatient and expect an all-in-one answer that solves everything - You will never get it.
2) you have some experience in photography but none when it comes to get help in forums
3) you did not pay any attention to all that pointed to the exposure issue
4) cool it
Check out Photo Critique Section section of our forum.
Feb 9, 2016 16:04:46 #
I responded in the analysis section and mentioned a grey card. The pr.oblemis not the photographer here but it is the meter. Meters were designed to read skin tones, the tone quality is 18% neutral grey. If you were to take photos of stark white or solid black they would both be grey. That's why snow often looks a little grey. When shooting a white dog against a dark background, you have 3 choices. Meter the dog (and to hell with the background)- Meter the background (the hell with the dog) or artifically light the background in some way.
Feb 9, 2016 16:17:56 #

xs650greg2 wrote:
Hello, I'm a "newbie" to the site. I re... (show quote)
You have posted in a forum where there are a lot of experts. I have posted there and they have analyzed my problem, but there are sometimes responses that are not warm and friendly.
Check out the Critique forum section, and the FYC forum section, and sections about the type of photography you are having the question about, and you may get different kinds of answers.
Feb 9, 2016 16:22:08 #

I think the OP had some trouble understanding the jargon thrown at him, confusion over ACR. Having been a corporate trainer I noted it's rare for people teaching others to put themselves in the mindset of the complete beginner, which the OP is in terms of Photoshop, and a relative newbie to digital photography.
If the OP is still reading these replies I offer two simple suggestions for processing his pics in PS.
1. When you open a raw file in PS (ie. select the photo in your explorer and pick open in photshop) you are in ACR. There's nothing to do or know. Play with the sliders to see if you can improve the exposure, temp, saturation, black and white levels, etc. When you are done, there's a button on the bottom that lets you open the tweaked raw file in standard Photoshop. The raw window will close and the tweaked pic will be in the main photoshop window.
2. From there go to the Image/ Adjustments / Shadows and Highlights and use the sliders to tweak shadows and highlights. Can also try the Image/ Ajustments/ choices for Brightness/Contrast and others, and the Image selectctions for Auto tone, Auto Color, etc. Save your completed work as a high quality jpg.
P.S.
I copied the OP's original pic posted in the other section and opened it in PS as a jpg. I went to the Image tab and just clicked on Auto Tone, Auto Color and Auto Contrast. I saved it as a high quality jpg. Took about 30 seconds total (less time than it took to write about it). In my experience raw and jpg files are nearly identical except that the raw files need more tweaking. The original and 30 second tweaked files are below.


Feb 9, 2016 16:47:15 #

Have you tried manually setting the white balance in you camera? In low light this helps considerably. In the heat of the day here in West Texas the sun can be brutal for picture taking. I carry a polarized filter in bag for these occasions. I have filters with several degrees of tint.
If you want to reply, then register here. Registration is free and your account is created instantly, so you can post right away.
Check out Professional and Advanced Portraiture section of our forum.