Tutorial - Repairing a blown sky in your images
Feb 1, 2016 04:00:54 #
This tutorial is about covering up sections of a picture by using a section cut from another part of the same picture. It does what the Clone tool does but much more quickly and simply. As usual its written for a PC so Mac users will need to use different keys and its written for Photoshop but should work with Elements Paint Shop Pro or Gimp.
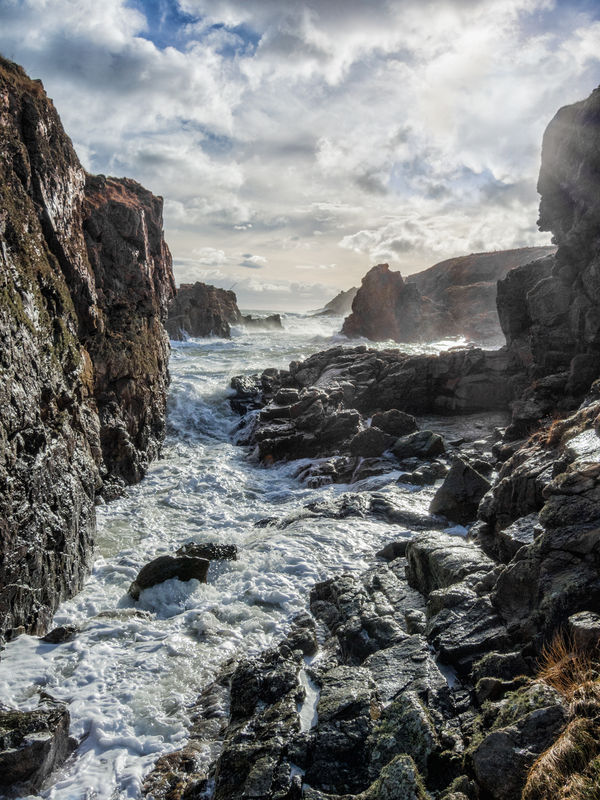
The photograph we are going to use is with the kind permission of R.G. who first posted it in the PP forum.
http://www.uglyhedgehog.com/t-361281-1.html
The full size Jpeg or the RAW file can be downloaded from there or you can download the smaller size file directly from this tutorial.
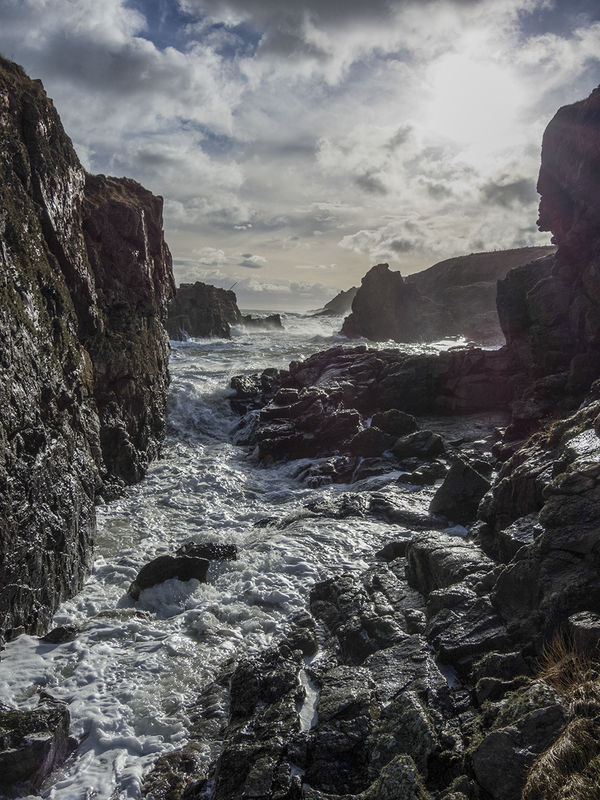
1) Download and open the original photo. As you can see as good as the picture is the camera has underexposed a section of the sky leaving a large blown are. Now this can be cloned out in the traditional method with the clone stamp buts its tedious time consuming and harder than it seems to make the repair invisible.
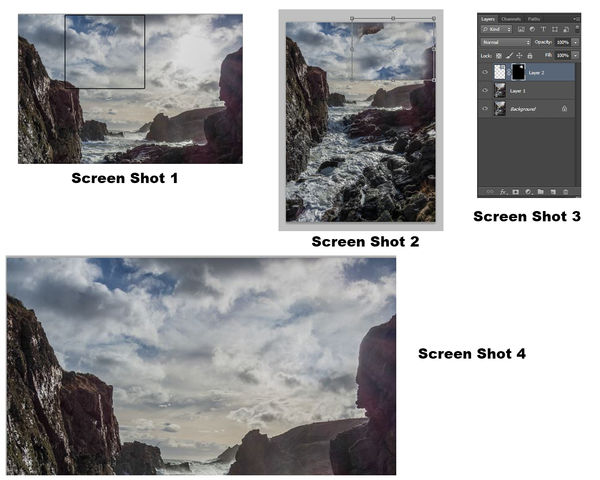
2) Using the rectangular selection tool, second icon down in the side tool bar, make a selection as per Screen Shot 1. Now go Ctrl/J to put your selection on its own layer. Then go Edit>Transform>Flip Horizontal followed by Edit>Transform>Flip Vertical. The reason we do this is so our new piece of sky is not an exact mirrored copy of the other side of the picture. Do not worry if your selection includes a piece of cliff, it will not show in the finished picture.
3) With the new layer selected use the Move tool and drag your selection so it covers the blown hole in the sky. If you feel your selection is not quite covering the whole damaged area then Ctrl/J will open the Free Transform option and put a box with bounding handles around the selection so you can drag out the sides and corners to make it bigger. See Screen shot 2. Click on the large tick on the top tool bar to accept your changes.
4) Still with this layer active go Layer>Layer Mask>Hide All. This will put a black mask next to your selection and you will see the original photo once again. In masking black hides and white shows so the black mask is simply hiding the selection you made, moved and transformed in steps 2 and 3. See Screen Shot 3.
5) Select the brush tool now and make sure your foreground color is white and with your MASK selected simply paint over the damaged and blown area. (you make the mask active or selected by simply clicking on it. When active you will see a white box around it in your layers palette). If you paint over something like the cliffs by mistake simply change to black brush and tidy up that area. You can also use the clone stamp on small areas if you feel its needed. Also do not forget you can adjust the opacity of the selection layer should it need it to look more natural. Any further PP can be done now. See Screen shot 4.
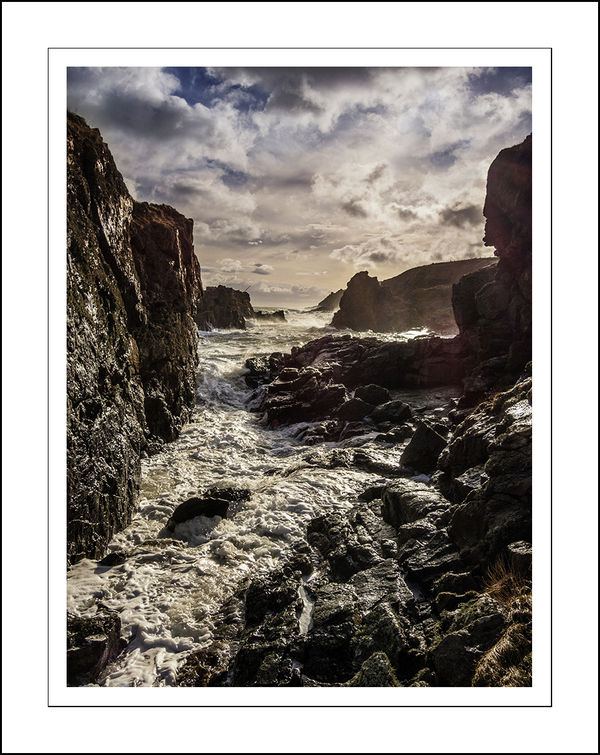
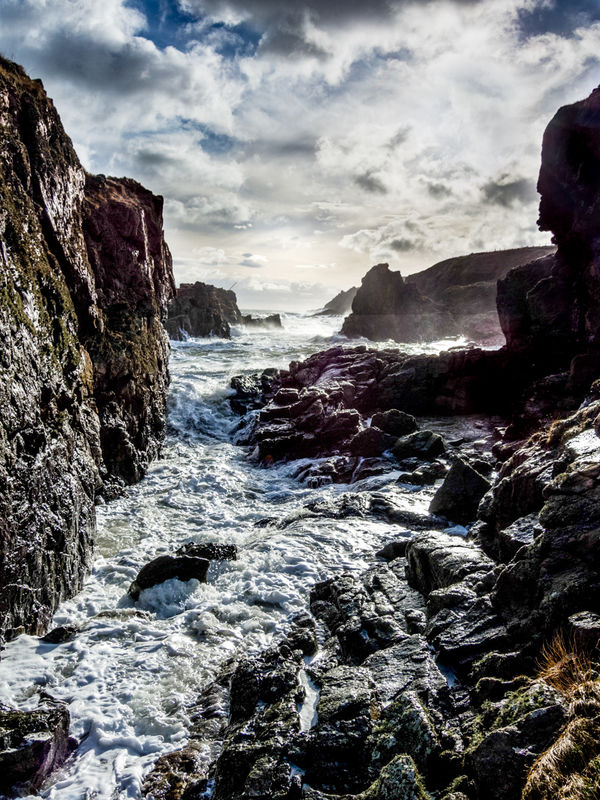
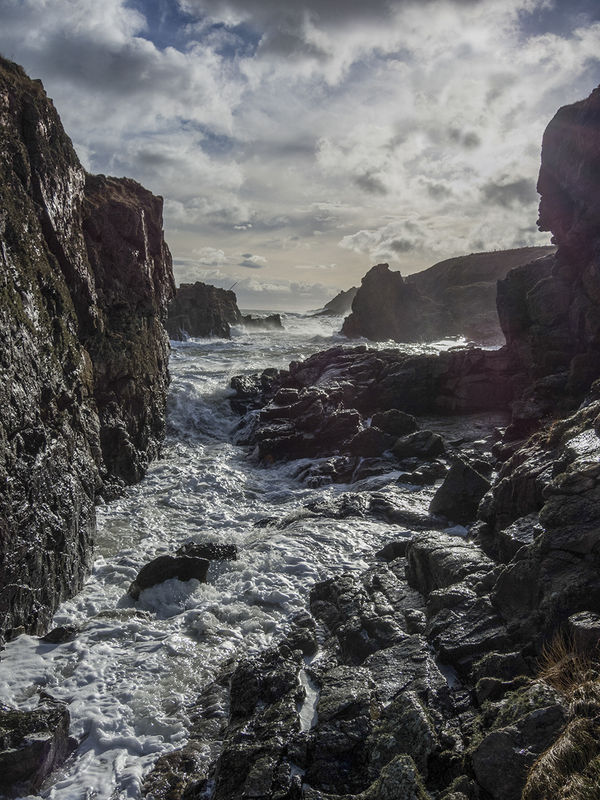
My finished result is shown here with a frame added as per a previous tutorial
I hope everybody can follow these instruction and please feel free to PM me billyspad if there is something youre not sure of. What is second nature to some maybe needs further explanation for you so please feel free to ask. We were all beginners at some stage.
The photograph we are going to use is with the kind permission of R.G. who first posted it in the PP forum.
http://www.uglyhedgehog.com/t-361281-1.html
The full size Jpeg or the RAW file can be downloaded from there or you can download the smaller size file directly from this tutorial.
1) Download and open the original photo. As you can see as good as the picture is the camera has underexposed a section of the sky leaving a large blown are. Now this can be cloned out in the traditional method with the clone stamp buts its tedious time consuming and harder than it seems to make the repair invisible.
2) Using the rectangular selection tool, second icon down in the side tool bar, make a selection as per Screen Shot 1. Now go Ctrl/J to put your selection on its own layer. Then go Edit>Transform>Flip Horizontal followed by Edit>Transform>Flip Vertical. The reason we do this is so our new piece of sky is not an exact mirrored copy of the other side of the picture. Do not worry if your selection includes a piece of cliff, it will not show in the finished picture.
3) With the new layer selected use the Move tool and drag your selection so it covers the blown hole in the sky. If you feel your selection is not quite covering the whole damaged area then Ctrl/J will open the Free Transform option and put a box with bounding handles around the selection so you can drag out the sides and corners to make it bigger. See Screen shot 2. Click on the large tick on the top tool bar to accept your changes.
4) Still with this layer active go Layer>Layer Mask>Hide All. This will put a black mask next to your selection and you will see the original photo once again. In masking black hides and white shows so the black mask is simply hiding the selection you made, moved and transformed in steps 2 and 3. See Screen Shot 3.
5) Select the brush tool now and make sure your foreground color is white and with your MASK selected simply paint over the damaged and blown area. (you make the mask active or selected by simply clicking on it. When active you will see a white box around it in your layers palette). If you paint over something like the cliffs by mistake simply change to black brush and tidy up that area. You can also use the clone stamp on small areas if you feel its needed. Also do not forget you can adjust the opacity of the selection layer should it need it to look more natural. Any further PP can be done now. See Screen shot 4.
My finished result is shown here with a frame added as per a previous tutorial
I hope everybody can follow these instruction and please feel free to PM me billyspad if there is something youre not sure of. What is second nature to some maybe needs further explanation for you so please feel free to ask. We were all beginners at some stage.
Feb 1, 2016 08:19:04 #

Thanks for another great tutorial, Billy, and something I will definitely use, especially with travel shots where often I cannot come back and reshoot at a more opportune time of day. I hate blown spots/hot spots in the sky and typically crop them out if an underexposed version blended in doesn't fix it - now I have a better alternative!
Feb 1, 2016 08:32:32 #
Frank2013
Loc: San Antonio, TX. & Milwaukee, WI.
Good tutorial. Helps for larger areas. I also learned something about masking I was unaware of so I found the exercise two-fold.
Feb 2, 2016 07:29:58 #

Thanks Billy. So there is some hope for my shots. Definitely will have to give this a go when I get home
Feb 2, 2016 10:51:49 #

Feb 2, 2016 11:38:50 #

Feb 2, 2016 18:57:16 #
Very good tutorial and instructions. You are pushing me toward the Adobe CC subscription for the new version of Lightroom and Photoshop.
Don
Don
Feb 2, 2016 21:11:33 #
Feb 3, 2016 06:11:32 #
Pixelpixie88 wrote:
Thanks for this tutorial, Billy! I can't wait to try it out!
Just shout if you run into problems,
Feb 3, 2016 06:12:13 #
RichardTaylor wrote:
Thamks, Billy, for this tutorial.
You are welcome young man!!!
Feb 3, 2016 06:13:59 #
PAR4DCR wrote:
Very good tutorial and instructions. You are pushing me toward the Adobe CC subscription for the new version of Lightroom and Photoshop.
Don
Don
I'm not a Lightroom user and never will be but come on my man you know you need Photoshop!!!!!!!!
Feb 3, 2016 06:15:02 #
NJFrank wrote:
Here goes my first attempt. Thanks Billy for the tutorial
Very tidy work! I have a star pupil
Mar 30, 2016 09:38:57 #
If you want to reply, then register here. Registration is free and your account is created instantly, so you can post right away.