The Albatross - Pinhole Experiment #3
Jan 18, 2016 19:52:37 #

Following dansmith's Tutorial - Simple approach to Pinhole photography and encouraged by the success of rmalarz in Another Pinhole Camera Photograph I tried again. It was a good day shooting, but I'm still working to find the proper pinhole size to gain focus. A step-by-step follows below.
Starting over, I used a small bottle top and a pair of kitchen scissors to cut a 2.5" circular piece of metal out of a juice can. With a piece of paper cut to match, I folded it twice on itself to find the center. Placing the paper on top of the metal I used a pushpin to make a hole. Removing the paper I used the pin to make a small circle around the center until I could punch out a slightly larger hole and finally flattened the rough points.
From there I cut a piece of aluminum foil several times larger than the center circle and placed it on a hard surface. With a new pushpin I made a hole as small as possible. I wasn't even sure the pin had punctured the foil and used a flashlight facing me with the foil in between looking for light. I used cellophane tape to secure the foil as close to center over the hole in the metal as I could.
To finish I used electrical tape to secure the metal over the camera body and finalized it to avoid light leaks. If you follow these steps, flatten the metal circle as much as you can otherwise the metal will want to retain its shape and makes it harder to tape it to the camera body.
With the camera on a tripod, and a 10 second timer, I started with a 5 second exposure in Shutter Priority and worked up and down from there. It wasn't long after the weather turned and I had to get out of there, but I'll make a smaller hole and work on it again.
Another day, another adventure! S-
--
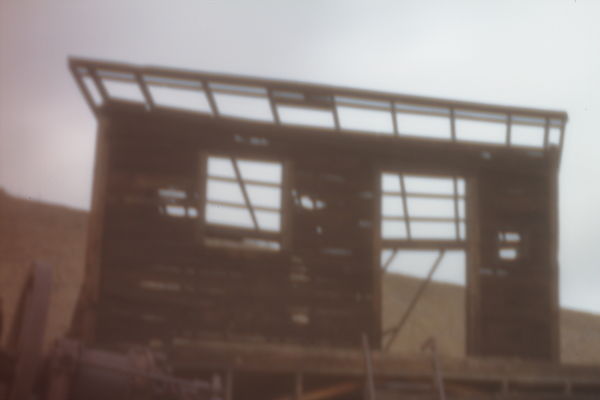
Short backstory - The Mentryville Shack is my albatross as I know something is there, but can never quite capture it.
- as a reference here's another view http://www.uglyhedgehog.com/t-177883-1.html
Starting over, I used a small bottle top and a pair of kitchen scissors to cut a 2.5" circular piece of metal out of a juice can. With a piece of paper cut to match, I folded it twice on itself to find the center. Placing the paper on top of the metal I used a pushpin to make a hole. Removing the paper I used the pin to make a small circle around the center until I could punch out a slightly larger hole and finally flattened the rough points.
From there I cut a piece of aluminum foil several times larger than the center circle and placed it on a hard surface. With a new pushpin I made a hole as small as possible. I wasn't even sure the pin had punctured the foil and used a flashlight facing me with the foil in between looking for light. I used cellophane tape to secure the foil as close to center over the hole in the metal as I could.
To finish I used electrical tape to secure the metal over the camera body and finalized it to avoid light leaks. If you follow these steps, flatten the metal circle as much as you can otherwise the metal will want to retain its shape and makes it harder to tape it to the camera body.
With the camera on a tripod, and a 10 second timer, I started with a 5 second exposure in Shutter Priority and worked up and down from there. It wasn't long after the weather turned and I had to get out of there, but I'll make a smaller hole and work on it again.
Another day, another adventure! S-
--
Short backstory - The Mentryville Shack is my albatross as I know something is there, but can never quite capture it.
- as a reference here's another view http://www.uglyhedgehog.com/t-177883-1.html
Jan 18, 2016 20:23:46 #
Thanks, S- for the elaborate instructions. The experimentation with pinhole gives the subject of the abandoned shack a 'ghostly appearance' .
Jan 18, 2016 20:27:48 #
debbie wrazen wrote:
Thanks, S- for the elaborate instructions. The experimentation with pinhole gives the subject of the abandoned shack a 'ghostly appearance' .
Thank you! I went with the intention of working a historical document, but was sad when I saw the result. Post helped some, but I want more out of it and know it's possible, so I'll keep at it. Oddly it helps me think about photography more too so there's a bonus there! Thanks again! S-
Jan 18, 2016 21:23:59 #
Keep working on the pinhole Steve.
If you want the detail and even lighting shown in rmalarz's post a purchased ready made one is the way to go.
My beer can ones take an hour or so of delicate handwork to get close to right. Photo stores sell ones for around $10 that can be cut and mounted on body caps or cardboard discs or for around $40 ready mounted on brand specific body caps.
Jan 18, 2016 21:38:42 #
dansmith wrote:
Keep working on the pinhole Steve.
If you want the detail and even lighting shown in rmalarz's post a purchased ready made one is the way to go.
My beer can ones take an hour or so of delicate handwork to get close to right. Photo stores sell ones for around $10 that can be cut and mounted on body caps or cardboard discs or for around $40 ready mounted on brand specific body caps.
If you want the detail and even lighting shown in rmalarz's post a purchased ready made one is the way to go.
My beer can ones take an hour or so of delicate handwork to get close to right. Photo stores sell ones for around $10 that can be cut and mounted on body caps or cardboard discs or for around $40 ready mounted on brand specific body caps.
Thanks Dan! I'm going to keep at this, but will buy a body cap to make it easier in the future. I'm having fun though so it's all about learning! S-
Jan 18, 2016 21:53:22 #
St3v3M wrote:
Thanks Dan! I'm going to keep at this, but will buy a body cap to make it easier in the future. I'm having fun though so it's all about learning! S-
Exactly Steve, it's a hobby for most of us here after all. Latest ongoing project is refitting a Brownie Holiday to take 35mm film.
Jan 18, 2016 22:47:23 #

St3v3M wrote:
Following dansmith's url=http://www.uglyhedgehog.... (show quote)
First let me say how impressed I am that you did this experiment, which sounded like way more than I could ever do. A store-bought solution would be better for me, i can see the mess I'd make otherwise.
You have definitely brought the creepy factor into this image. The one you linked, full of interesting detail, has no creepiness factor but this unfocused tilted version feels like Norman Bates' storage facility. Plenty of creativity, plenty of atmosphere.
I do believe I'd let it go monochrome, increase the contrast and toss some filters on it to see what would happen. It would be a fun image to play with.
Question to you or anyone who knows: why is there a little magenta tint on the left?
Jan 18, 2016 22:54:12 #
minniev wrote:
... It would be a fun image to play with.
Question to you or anyone who knows: why is there a little magenta tint on the left?
Question to you or anyone who knows: why is there a little magenta tint on the left?
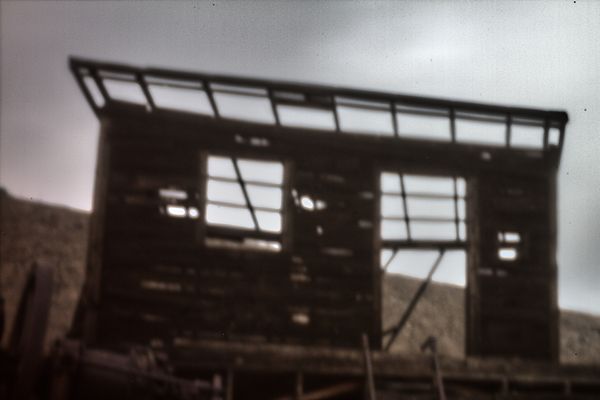
The setup is pretty easy, except for the size of the hole of course, but I'll post another tomorrow and see if I can do better!
I have no idea about the coloration, but notice it on all the shots from that angle. Also notice too the two spots on the right of the processed version. S-
Jan 19, 2016 18:50:55 #
jim hill
Loc: Springfield, IL
St3v3M wrote:
Following dansmith's url=http://www.uglyhedgehog.... (show quote)
Steve, I am biased towards #1. Great job on making the exposure as far as I'm concerned.
Jan 19, 2016 18:56:54 #
jim hill wrote:
Steve, I am biased towards #1. Great job on making the exposure as far as I'm concerned.
Interesting and thank you! S-
Jan 19, 2016 21:03:11 #

St3v3M wrote:
Following dansmith's url=http://www.uglyhedgehog.... (show quote)
St3v3, it's a good start. Are you sure the hole is perfectly, or at least machine shop round? That is really important. The other is the edge of the hole has to be as deformation free as possible.
You might want to try some heavy duty aluminum foil.
--Bob
Jan 19, 2016 21:10:19 #
rmalarz wrote:
St3v3, it's a good start. Are you sure the hole is perfectly, or at least machine shop round? That is really important. The other is the edge of the hole has to be as deformation free as possible.
You might want to try some heavy duty aluminum foil.
--Bob
You might want to try some heavy duty aluminum foil.
--Bob
I'll post a follow-up, but I don't know. I'm poking a hole I can barely see with a pin so I assume it's round, but it's a great question! S-
If you want to reply, then register here. Registration is free and your account is created instantly, so you can post right away.