Try to remove chromatic abberation.
Jan 14, 2016 14:35:14 #

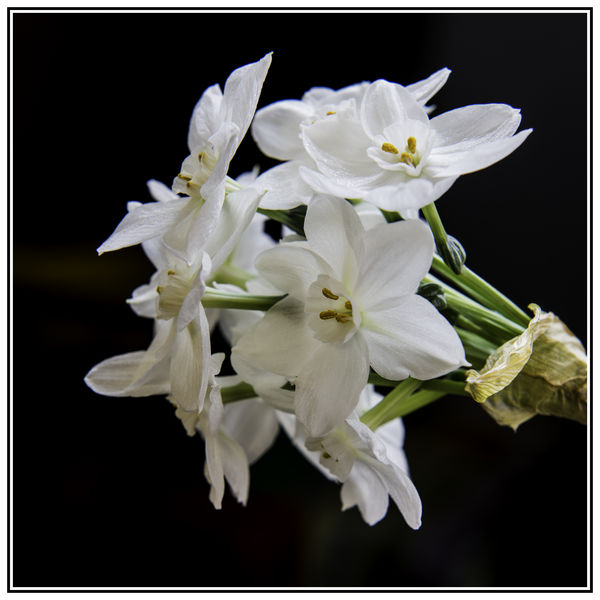
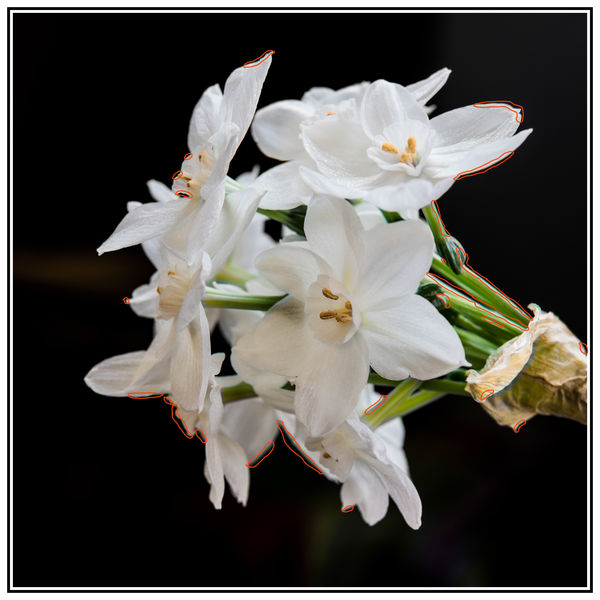
Yesterday I saw discussion about removing Chromatic aberration from pictures. I saw different opinions. I am posting my picture with chromatic aberration. I already fixed this picture /this is not fixed one/, I spent less then 10 minutes. I would like to give everybody chance to try to fix it and know how long did it take, what method was used and see your result.
Jan 14, 2016 15:57:45 #

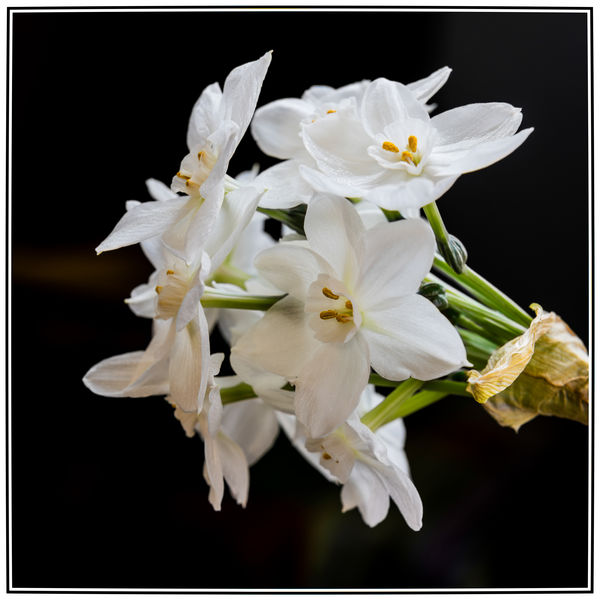
It took me maybe 2 minutes in PhotoShop. The CA in this case is blue so I used Image, Adjustments, Hue/Saturation. After choosing the "Blue" color, I put the Saturation and Lightness sliders all the way left (minimum). Done.

Jan 14, 2016 16:08:01 #
Thank you for your attempt but you did not fix yellow and somewhere blue.
SonyA580 wrote:
It took me maybe 2 minutes in PhotoShop. The CA in this case is blue so I used Image, Adjustments, Hue/Saturation. After choosing the "Blue" color, I put the Saturation and Lightness sliders all the way left (minimum). Done.
Jan 15, 2016 08:38:20 #
K7DJJ
Loc: Spring Hill, FL
I used lightroom, lens correction, color, and moved the purple and green sliders. About 1 minute.
Jan 15, 2016 14:32:07 #

I read the posts yesterday with some interest. I've seen discussions on the web with quick, clean approaches to controlling CA in post. Other approaches require considerable effort, down to exquisitely painstaking. No matter, the presupposition seems to be that all CA from any lens is created equal.
So why so many methods to fix CA in post processing? Could it be that different lenses edit the light differently so that numerous fix methods are needed? Well, we know that lenses handle light differently. There is reason to be wary here.
An analogy from the software world would be sorting data into alphabetic order. Depending on how your data ends up before you sort it, any one of half a dozen algorithms could deliver the most efficient sort. So for software excellence, you had better have an inkling of the state of your data and know which method to use.
So I am wondering if CA in lens output and its correction in post are different depending on the lens and on the scene.
Am I to believe that the path of light for various frequencies in glass is the same for long telephoto primes with 5 or 6 lens elements and for short zooms, all regardless of lens design and focal length? No way. For example, CA gets worse around 180mm and beyond in primes.
You used a 24-70 here, can't see which one. Could be pertinent to how CA is overcome in post. The recent Nikon 24-70 lens designs are very very different, and even more different in their uses of their three low-dispersion glass elements.
Still, if your lens is either of the most recent Nikon 24-70 lenses, the CA in your post arose along one of two different paths and in spite of three extra-low dispersion lens elements designed to manage CA.
Jan 15, 2016 17:04:33 #

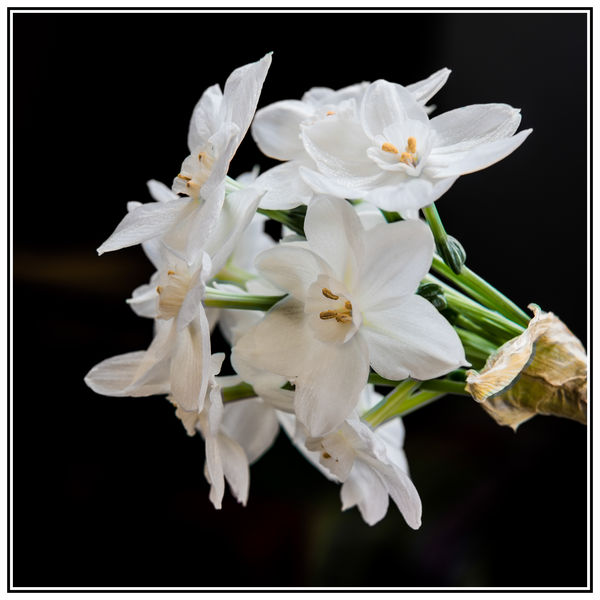
I thought about trying what SonyA580 did but then thought I'd give the de-fringe manual tool in LR a go. I noticed that there were two colours of CA to deal with, but no problem - LR can deal with that. And as an after-thought, using the HSL tool wouldn't have worked with the orange CA because there's orange in the rest of the shot.
However, I found myself going round in circles with it because the settings that work for one part aggravate the CA in other parts. Even the Amount sliders had to be set optimally because just turning them up fully had counter effects in some parts of the image. Because of this effect the image had to be viewed as a whole, and every adjustment was a compromise.
After admitting defeat I resorted to using a brush to desaturate the obstinate parts. That was made easy by the fact that the petals were white.
Now that I know it was a Nikon camera and lens I realise I should have tried LR's lens profile fixes first, although that's probably not the purpose of the thread. The photo does indeed respond to profile corrections, but I don't know if they would have removed CA on their own.
-
Jan 15, 2016 20:38:56 #
Tonytee
Loc: Beaverton, Oregon
Greetings,
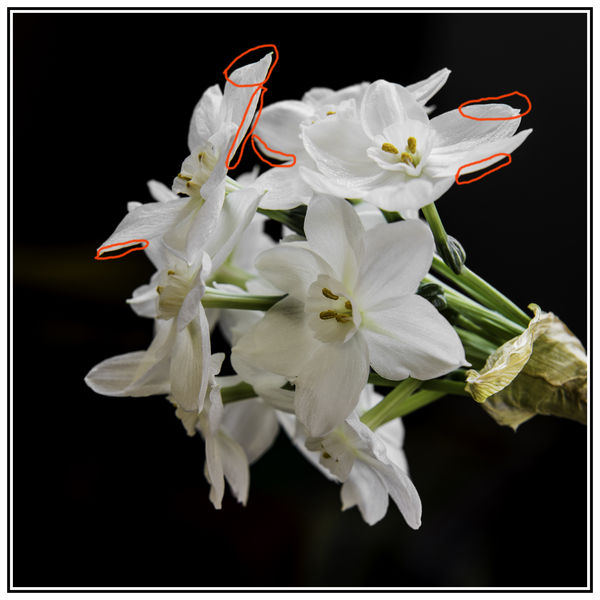
My name is Tony and this subject is very timely for me. First of all, I cannot spot the colors you indicated with the circled areas. What I do see is a tiny amount of magenta near the lower petals.
I would like to post a photo I took of a gentleman in Seaside, Oregon last October. The photo was taken from behind the gentleman. He is wearing a very bright red shirt on a day that had extremely harsh sunlight. Here is my problem. I can see a line of white piping that begins on his left side hairline and travels all the way down to the edge of his shirt sleeve. My equipment used this day is a Nikon D70 and a Nikon AF Nikkor 28~105D mm lens. I will certainly appreciate any assistance offered. Thanks, Tony.
I understand the D70 has limited Dynamic Range and does not handle red very well.

Jan 15, 2016 20:57:58 #
Tony, you need to check the "store original" box when you upload your picture then it can be viewed much larger. As is I can't see the white line in your picture, and that's probably why you don't see the fringing in the other picture. Click on "download" under the picture and you should see it.
Jan 15, 2016 23:05:38 #
Perfect job.
K7DJJ wrote:
I used lightroom, lens correction, color, and moved the purple and green sliders. About 1 minute.
Jan 15, 2016 23:09:37 #
Tonytee
Loc: Beaverton, Oregon
OddJobber wrote:
Tony, you need to check the "store original" box when you upload your picture then it can be viewed much larger. As is I can't see the white line in your picture, and that's probably why you don't see the fringing in the other picture. Click on "download" under the picture and you should see it.
Okay, I did as you had instructed and I can see the colors within the circled areas. There is one petal that has orange running down the right side and blue on the left side. On my photo I can see the white piping on the subject's head and shoulders. However, I will re-upload the photo. Thanks for your assistance.
Tony
Jan 15, 2016 23:12:10 #

Jan 16, 2016 04:52:23 #
Tonytee wrote:
Here is the same photo after clicking on store original.
Thanks,
TT
Thanks,
TT
That looks more like a sharpening artefact. Jpegs seem to be more prone to it than other formats. Was it a jpg straight out of camera? Did you give it further sharpening in post processing? I've noticed that it's most likely to occur when you sharpen a jpg in PP.
Jan 16, 2016 11:43:19 #
Thank you for your attempt. You could find info about my camera and lens from EXIF data. You did not remove all CA from my picture. It is not easy but I think it is good to know how to do it.
R.G. wrote:
I thought about trying what SonyA580 did but then ... (show quote)
Jan 16, 2016 19:44:40 #
Tonytee
Loc: Beaverton, Oregon
R.G. wrote:
That looks more like a sharpening artefact. Jpegs seem to be more prone to it than other formats. Was it a jpg straight out of camera? Did you give it further sharpening in post processing? I've noticed that it's most likely to occur when you sharpen a jpg in PP.
Actually, that is what someone on another forum had mentioned. This shot was taken as far back as 10/2015. The only PP adjustment I can recall making was to eliminate a couple walking on the beach. Well, I went ahead and attempted to reduce sharpness in Windows Live Photo Gallery, but no luck. Then I tried to use FastStones Image Viewer and again, no success. That piping is there to stay. My thinking now is that with the D70's limited Dynamic Range, it just could not cover dark or very loud colors in harsh sunlight. I thought about using a ND Filter but it would have to be with a high number. A CPL would not help, since it would only enhance colors and not reduce their brightness. Anyway, thank you very much for your valued input. Regards,
Tony
Jan 17, 2016 06:56:54 #
Tonytee wrote:
....My thinking now is that with the D70's limited Dynamic Range, it just could not cover dark or very loud colors in harsh sunlight.......
It's similar to CA in that it seems to be high contrast edges that are prone to the piping. My guess is that cameras from that time had the in-camera sharpening turned up quite high to compensate for a lack of resolution, and most of the time it wouldn't produce that sort of tight halo but in the wrong circumstances it would.
I see the D70 has a CCD sensor - I don't think that would cause the piping, and I don't think it's an optical effect either.
If you want to reply, then register here. Registration is free and your account is created instantly, so you can post right away.