Check out Street Photography section of our forum.
Highlights Effect in the photo
Dec 6, 2015 02:57:40 #

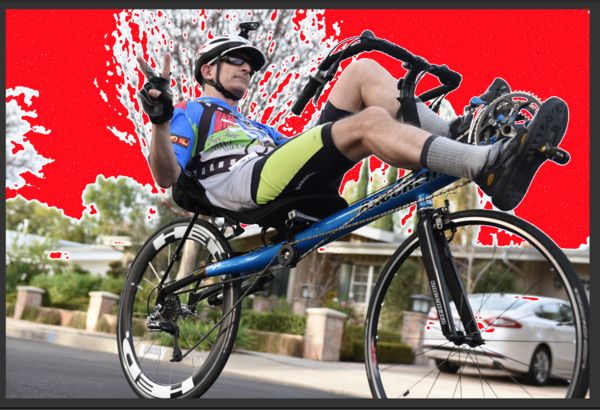
I was reviewing images using LightRoom, I ran across some images with an overexposed sky. I had highlights turned on and I liked the surreal look of the highlights in the viewer. Now I want to create that effect in the actual image. I suspect I can do it using Photoshop but I'm not sure how. Can somebody suggest a method?
Screenshot of LR viewer with Highlights
Dec 6, 2015 08:18:49 #
Dec 6, 2015 08:47:02 #
JD750 wrote:
I was reviewing images using LightRoom, I ran across some images with an overexposed sky. I had highlights turned on and I liked the surreal look of the highlights in the viewer. Now I want to create that effect in the actual image. I suspect I can do it using Photoshop but I'm not sure how. Can somebody suggest a method?
The "highlights" in the photo are probably blown out areas of overexposure. You can try to select them by using Select>Color Range. That brings up a dialog window that allows you to select a color from the original image. You can point to an area in the thumbnail in the dialog window or use the cursor (which becomes an eyedropper outside the dialog window) that will allow you to select on a larger image (therefore more accurately).
Once you have the selection you can do the following:
Make the image into a layer. If you loaded it as a layer, you're all set, but if you loaded it from a jpg, there will be a little lock symbol on the layer panel. Click that lock and the image becomes a layer. Once it's a layer you can just delete the selection. That will leave you with a transparent area.
Then you create a new layer and move it below the image layer. Just fill that layer with the color you want and you're done.
Check out Software and Computer Support for Photographers section of our forum.
Dec 6, 2015 10:35:58 #

The red won't export, but you could get it exactly as seen using Print Screen or perhaps the snipping tool. You'd lose some resolution and the resulting file wouldn't be very big, but maybe precision isn't a concern.
Dec 6, 2015 11:03:42 #
DirtFarmer wrote:
The "highlights" in the photo are probab... (show quote)
Thanks DirtFarmer. I will give that a try. The tricky part is the
white "stars" in the red background, guess they don't show up in the UHH compressed version.
If you want to reply, then register here. Registration is free and your account is created instantly, so you can post right away.
Check out Sports Photography section of our forum.