Tickeled Pink! The Vail Nebula...
Nov 28, 2015 00:58:54 #
Finally!
Using my Baader H-alpha filter I kept marching up the clock and shooting a RAW and an RGB at the steps.
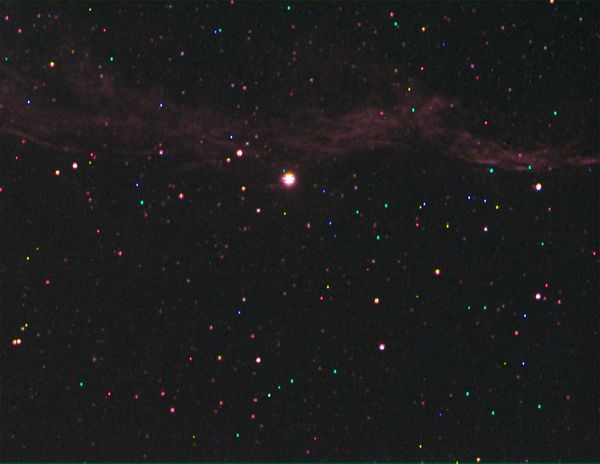
At 1000s RGB I exported the below jpg from the result.
Right now I'm running a 1200 second set.
But soon the nebula will rotate out of view.
Edit:
That worked, pushing out to a 2000 second shot.
Using my Baader H-alpha filter I kept marching up the clock and shooting a RAW and an RGB at the steps.
At 1000s RGB I exported the below jpg from the result.
Right now I'm running a 1200 second set.
But soon the nebula will rotate out of view.
Edit:
That worked, pushing out to a 2000 second shot.
Nov 28, 2015 01:16:30 #

SonnyE wrote:
Finally!
Using my Baader H-alpha filter I kept marching up the clock and shooting a RAW and an RGB at the steps.
At 1000s RGB I exported the below jpg from the result.
Right now I'm running a 1200 second set.
But soon the nebula will rotate out of view.
Using my Baader H-alpha filter I kept marching up the clock and shooting a RAW and an RGB at the steps.
At 1000s RGB I exported the below jpg from the result.
Right now I'm running a 1200 second set.
But soon the nebula will rotate out of view.
I can certainly see your Vail Nebula. Good work. What do mean RAW? And was this 1000s of red, and 1000s of blue and 1000s of green?
Just trying to follow your efforts.
Thanks
Nov 28, 2015 01:32:53 #
Thanks Jim!
I have the scope in the Vail, and the Baader H-alpha in the picture.
I can't stack, so I shoot long singles with the G3.
It gives me 3 choices:
RAW
YcbRc (? may have that screwed up)
RGB
I was so disappointed until I stumbled onto being able to have the camera shoot in those three modes.
Since RGB is a more web friendly format, and it shows the color, I use it a lot.
I don't know yet how it actually collects the image. Maybe it does Red, Green, and Blue at the same time?
It stores the RAW or the RGB as a .fit file format.
But tonight, after reading up a bit about the H-alpha filters, I wanted to try for one of the nebulae with the H-alpha. And picked the Vail because it was high and in a clear path for a long time.
I'm gathering the RAW formats in the hope one day I will actually be able to process one. :lol:
I'm trying for a 2000s single in RGB. Don't know how much time before it sets, but it is working well, so I'm going for it. :)
Nov 28, 2015 01:40:00 #
SonnyE wrote:
Thanks Jim! br br I have the scope in the Vail, a... (show quote)
Since you are auto tracking, what is your sense as to how far off you alignment can be for the auto tracker to maintain the tracking?
I haven't purchased an auto tracker package yet, and I go to great lengths to get a perfect alignment so I can track as long as possible before it starts to wander off course which it always will if given sufficient time. But I would think that you might only need to be reasonably close in the polar alignment, and auto tracker would overcome that alignment short coming.
Nov 28, 2015 02:12:00 #
SonnyE wrote:
Finally!
Using my Baader H-alpha filter I kept marching up the clock and shooting a RAW and an RGB at the steps.
At 1000s RGB I exported the below jpg from the result.
Right now I'm running a 1200 second set.
But soon the nebula will rotate out of view.
Edit:
That worked, pushing out to a 2000 second shot.
Using my Baader H-alpha filter I kept marching up the clock and shooting a RAW and an RGB at the steps.
At 1000s RGB I exported the below jpg from the result.
Right now I'm running a 1200 second set.
But soon the nebula will rotate out of view.
Edit:
That worked, pushing out to a 2000 second shot.
Yes, I can see a distinct difference in the nebula in that it is becoming more dense as more light is gathered.
one question: Do you need one laptop for the auto guider, and another for the CCD, or does one laptop do the entire job?
Nov 28, 2015 03:36:46 #
Hi again, Jim.
I had one heck of a time at first. And really, I think each situation is going to be different.
I couldn't get PHD to work worth beans for the longest, longest time. I was even feeling like it was a mistake trying to Autoguide. But then, once in a while I'd get great tracking using the SSAG and it shown it could.
So as is usual for me I kept looking at the loose nut behind the telescope. I always try and eliminate the human error factor.
Finally I ran across the Youtube videos by Matthew Dixon. I watched them, then I opened PHD2.5 in a different screen, and when he would refer to something, I would pause it, or back it up, and try and work the setting into my own PHD.
Eventually I felt confident to run it at night and fiddle with my own settings and let PHD2.5 run the mount.
I think I might have mine where it works it's best for now.
It certainly was not simple enough for this dummy.
I have always tried to set my mounts tripod up with my digital level to 0.0 degrees on the X and Y axis. Or as level as I possibly can, in other words. (More human error elimination)
And as close to North pointing as I could. Aimed at Polaris.
When the night comes, I check my polar alignment with the CG-5 Celestron Polar scope. I just set Polaris at ~8 O'clock on the sight ring inside the Polar alignment scope.
I fine tune the mounts pointing with the elevation and azimuth adjustments. And I double check in the eyepiece now for an 8 O'clock orientation of Polaris in the telescope, as well.
Once all the mechanical end of the mount is as close as I have the patience to get it, I begin my alignment.
Vega seems to always lead this time of year. So when I align on it, I will also put the Bahtinov Mask to use and adjust the focus while I'm there as well.
As the first star, it is quite often W-A-Y off. But not to dispare, the next star comes in closer, and I do all four calibration stars as well.
Overkill? Maybe, but as I go along I see the targets landing closer and closer to the center of the eyepiece. A sure sign that the alignment is coming along good.
It doesn't take that much longer to add them, and I think six stars are better than two when you are teaching the mount where it is aimed.
Then I choose a target, tonight was the Vail Nebula. I tried it the other night but couldn't see anything for my efforts.
After reading up about filters, I decided to give the H-alpha I bought a while back a shot at it.
I'm no stranger to pushing the exposure envelope. Sometimes I win, but I've lost a lot more and just chalk it up to experience.
Tonight I seemed to be locked on to the Vail Nebula like a nail.
So I kept shooting, and raising the bar, and marveling at the tracking. I'm learning as I go.
But I've always felt that having a guide scope act as an eye for the mount was a better idea. Perfecting it was the nightmare.
I use to try and see the Universe in one night. I've stopped that now. I want to take one faint DSO and work with it until I loose it to the trees of walls obstructing my view. Like most of us, I live in a hole of sorts, too.
Tonight I zoomed in in Stellarium on 52 Cyg (the bright star in the Vail). My guide scope and PHD chose 52 Cyg as it's target star. And maybe that is why it held on so tight through this last image I have to share.
I couldn't have ask for a more rock solid guiding. But my fence stopped me. It was a tight squeeze, but I lucked out.
And tomorrow night I know where to start. Earlier, longer, sooner.
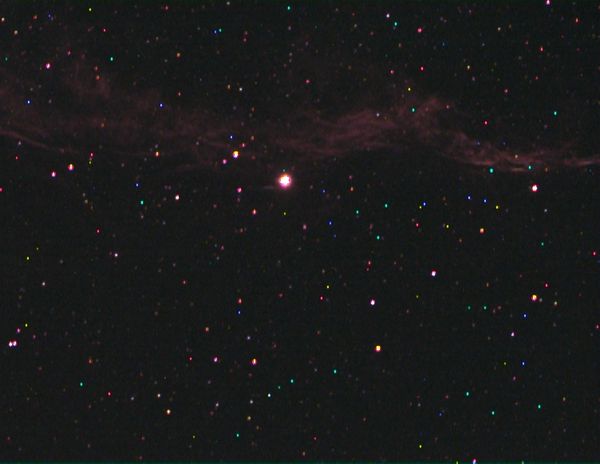
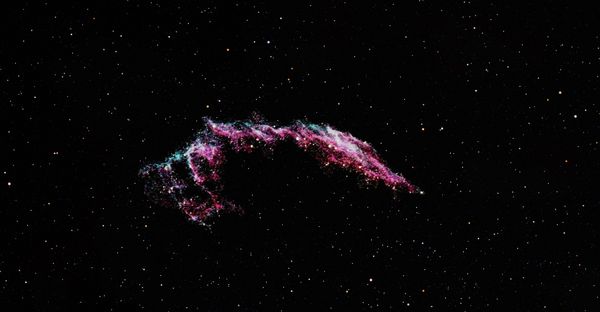
Here is the 33.33 minute exposure. From an RGB file, directly to a jpg.
2000 seconds, Orion G3 camera, Orion ED80T CF telescope, Celestron AVX mount, Orion Autoguider package.
I had one heck of a time at first. And really, I think each situation is going to be different.
I couldn't get PHD to work worth beans for the longest, longest time. I was even feeling like it was a mistake trying to Autoguide. But then, once in a while I'd get great tracking using the SSAG and it shown it could.
So as is usual for me I kept looking at the loose nut behind the telescope. I always try and eliminate the human error factor.
Finally I ran across the Youtube videos by Matthew Dixon. I watched them, then I opened PHD2.5 in a different screen, and when he would refer to something, I would pause it, or back it up, and try and work the setting into my own PHD.
Eventually I felt confident to run it at night and fiddle with my own settings and let PHD2.5 run the mount.
I think I might have mine where it works it's best for now.
It certainly was not simple enough for this dummy.
I have always tried to set my mounts tripod up with my digital level to 0.0 degrees on the X and Y axis. Or as level as I possibly can, in other words. (More human error elimination)
And as close to North pointing as I could. Aimed at Polaris.
When the night comes, I check my polar alignment with the CG-5 Celestron Polar scope. I just set Polaris at ~8 O'clock on the sight ring inside the Polar alignment scope.
I fine tune the mounts pointing with the elevation and azimuth adjustments. And I double check in the eyepiece now for an 8 O'clock orientation of Polaris in the telescope, as well.
Once all the mechanical end of the mount is as close as I have the patience to get it, I begin my alignment.
Vega seems to always lead this time of year. So when I align on it, I will also put the Bahtinov Mask to use and adjust the focus while I'm there as well.
As the first star, it is quite often W-A-Y off. But not to dispare, the next star comes in closer, and I do all four calibration stars as well.
Overkill? Maybe, but as I go along I see the targets landing closer and closer to the center of the eyepiece. A sure sign that the alignment is coming along good.
It doesn't take that much longer to add them, and I think six stars are better than two when you are teaching the mount where it is aimed.
Then I choose a target, tonight was the Vail Nebula. I tried it the other night but couldn't see anything for my efforts.
After reading up about filters, I decided to give the H-alpha I bought a while back a shot at it.
I'm no stranger to pushing the exposure envelope. Sometimes I win, but I've lost a lot more and just chalk it up to experience.
Tonight I seemed to be locked on to the Vail Nebula like a nail.
So I kept shooting, and raising the bar, and marveling at the tracking. I'm learning as I go.
But I've always felt that having a guide scope act as an eye for the mount was a better idea. Perfecting it was the nightmare.
I use to try and see the Universe in one night. I've stopped that now. I want to take one faint DSO and work with it until I loose it to the trees of walls obstructing my view. Like most of us, I live in a hole of sorts, too.
Tonight I zoomed in in Stellarium on 52 Cyg (the bright star in the Vail). My guide scope and PHD chose 52 Cyg as it's target star. And maybe that is why it held on so tight through this last image I have to share.
I couldn't have ask for a more rock solid guiding. But my fence stopped me. It was a tight squeeze, but I lucked out.
And tomorrow night I know where to start. Earlier, longer, sooner.
Here is the 33.33 minute exposure. From an RGB file, directly to a jpg.
2000 seconds, Orion G3 camera, Orion ED80T CF telescope, Celestron AVX mount, Orion Autoguider package.
Nov 28, 2015 04:27:33 #
JimH123 wrote:
Yes, I can see a distinct difference in the nebula in that it is becoming more dense as more light is gathered.
one question: Do you need one laptop for the auto guider, and another for the CCD, or does one laptop do the entire job?
one question: Do you need one laptop for the auto guider, and another for the CCD, or does one laptop do the entire job?
Yes. I made that turn before I pulled the trigger on my wish list.
I watched all of Forrest Tanaka's videos. Very good. I recommend them.
And somewhere along the way, he said he only uses his laptop. :shock: :idea: ;-)
So I made the conscious decision to go the way of computer.
My laptop only has two USB2 ports. Big problem when you have 3 cameras and a mouse dongle to plug in. But it gets worse when I learned the value of Stellarium and the NexRemote. My solution was one of these USB port extenders.
Stellarium can send a signal via the NexRemote software to the hand controller and the mount. Computer control and steering. Here is a good <11 minute explanation from Youtube.
Stepping Beyond (Ronnie) told me he uses Stellarium. I had the program, but never looked into it.
And he told me about another thing he uses to connect his cave computer to his control laptop called TeamViewer10.
BINGO! No more huddling over a laptop in the cold night air. Once I get my alignment done and get on a target, I can retire inside to image. And lately I've been back to watching TV with the wife if she has something worth watching on.
I just set the camera control to do the exposure and go sit with her while waiting.
Did you know you can perty near see all of the commercials in 33.33 minutes of waiting? Well you can.
So if you have two computers, or can abscond with somebodies, you can now remotely control your telescope via WiFi on your home network.
When you get everything working it's a beautiful thing.
Well, except for the commercials I guess. But that's why God made DVR's right?
Nov 28, 2015 10:46:49 #
Hi Sonny
I still have a question. Are you stacking your filters? Hyrogen-Alpha + red, then later Hyrogen-Alpha + blue and later Hyrogen-Alpha + green and later Hyrogen-Alpha by itself for luminance. And then you combine in SW.
With a 2000 sec exposure, I doubt you could achieve this without the Hyrogen-Alpha filter. Otherwise the sky becomes too bright. The Hyrogen-Alpha filter is only letting a tiny bit of the light spectrum thru and fortunately, the bulk of general light pollution doesn't yet know about that portion of the spectrum, otherwise they would be filling it up too.
Nov 28, 2015 11:11:25 #
Nov 28, 2015 11:45:42 #
Nov 28, 2015 11:52:53 #
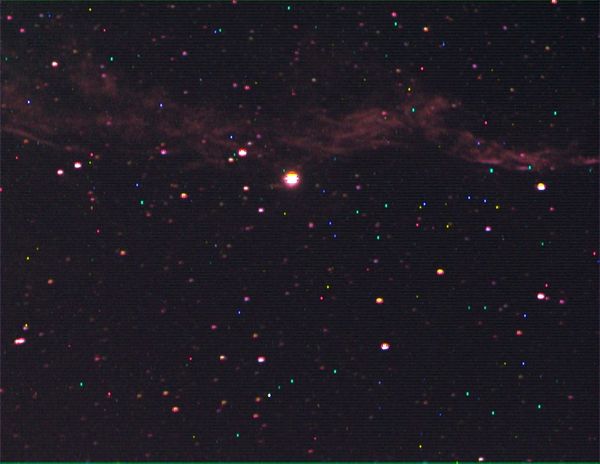
Just for fun, here is a blowup of the Veil Nebula taken from the SW package StarryNight. The very dimmest stars that this image is showing are in the neighborhood of 17th magnitude. Trying to match your stars to this is a bit tough since it appears you are not seeing all of the Veil Nebula since it is quite large. The nebula is more than 1 degree in width from side to side.
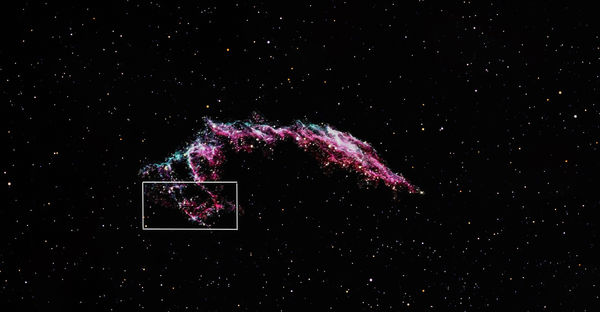
I have figured out exactly where you are shooting. I have marked the image showing the bottom portion of the Nebula and show approximately the portion of the nebula you actually were imaging. There is a lot more to go back for. I have match the bright star near the bottom as well as the diagon shot of 4 stars to the left and up a bit. Sort of looks like your field of view is approximately 1/3 of a degree horizontally.
I have figured out exactly where you are shooting. I have marked the image showing the bottom portion of the Nebula and show approximately the portion of the nebula you actually were imaging. There is a lot more to go back for. I have match the bright star near the bottom as well as the diagon shot of 4 stars to the left and up a bit. Sort of looks like your field of view is approximately 1/3 of a degree horizontally.
Nov 28, 2015 12:59:30 #
JimH123 wrote:
Hi Sonny br br I still have a question. Are you ... (show quote)
LOL! Yep, when they find out we can still see the sky, they'll decide H-alpha causes stupidity and will outlaw it. :lol:
All I know is I've read where the H-alpha is needed to bring out most of these nebulae.
I usually forget all about my single-filter, 9 position, filter wheel. Then I wonder what I'm doing wrong. :roll:
(Like the other night when I left my focusing mask on. :shock: :-o )
Position 1 is a Baader Moon and Skyglow filter, and is my usual filter. Then a UHC, OIII, H-alpha, R,G,B,Y, and a 13% Moon.
In order to stack I would have to dismantle my assembly. I have it all screwed together on the Imaging box for rigidity.
Since almost all of my filters live in that mounted filter wheel, I can't stack filters, merely turn one or another into the FOV.
So these were all taken with that one Baader H-alpha in the FOV.
Craig mentioned a while back how this filter was needed to help bring out particular nebulae. So I read up on it, and here is the result of my efforts.
As I mentioned, I can't stack. Frustrating.
The camera program does have a looping exposure choice, and a series choice of exposures. I wish I could use them, one day I surely will.
But for now I have to watch you guys run while I'm still crawling.
And I tried looking through it with my 20mm eyepiece. It was like I put my eye on an inkwell. Couldn't see anything at all.
To the naked eye, it appeared the telescope was aimed at a void. But I do have a lot of light pollution where I am. Mostly HPS, and MH, low wattage flouresent, and probably some LED, and who knows what.
So just because I couldn't see anything, I trusted there was something out there and began ramping up my exposure times.
In Stellarium, I zoom in (mouse scroll wheel) and find a star within the nebula I'm after, click it, and target it with the MOT. Then let PHD and the guide scope pick a target star and lock on. PHD stabilizes after a little while, but I'm often imaging in shorter test images (throw aways) by the time I'm getting a nice graph.
And I keep climbing up the time line hunting for better and better exposures.
Right, wrong, or otherwise, it seems to work for me and my simple man's approach. :lol: ;)
Something I'm curious about is the rainbow stars. I guess that is a by product of the long exposure. Maybe hot pixels? The temperature control holds the sensor at 1 degree C. Once stable, it is usually holding within .1 degree or less.
I could go below 0, but haven't tried that yet.
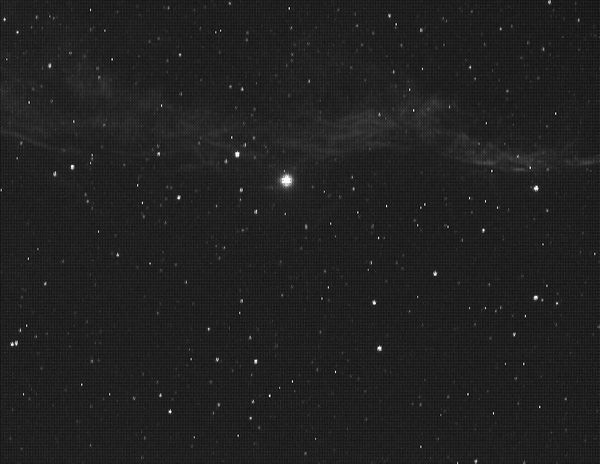
I made a direct RAW to jpg export (conversion) to share. It's a kind of B&W. 1000 seconds.
Sorry, I did not pull any RAW files at longer time frames last night.
I hope to continue my quest tonight though.
I've been leaving my mount set up and covered. Unless I have an eminent threat of rain, I prefer to not disturb it's position. I do bring in my telescope and laptop.
Saves me immense amounts of time the next night.
It's my 32 gallon observatory. :lol: ;-)
Nov 28, 2015 13:31:42 #
JimH123 wrote:
Just for fun, here is a blowup of the Veil Nebula ... (show quote)
Yes. About what I know is I get a pinhole view. :roll: :lol:
I brought it up in Stellarium and zoomed in. I can identify 52 Cyg as the big star, and HIP 102468.
Interestingly enough (to me), 52 Cyg appears to be a pivot point for the Veil Nebula in Stellarium, as today it is almost upside down to last nights representation.
In your opinion, do you think a focal reducer would benefit me?
Orion has one for my camera that is a 0.5x, and:
"0.5x focal reducer for StarShoot G3 imaging cameras increases imaging area by a factor of 4."
I think that means the camera could see 4x what it does now.
If I'm going to be changing things a lot, I will need to reconfigure for easy disassembly. Or just leave it in the cameras nose.
A wider FOV of the G3 might be welcome. ;)
Sorry, forgot the LINK.
What burns my butt is Orion wants $9.95 for shipping. B.S.
That whorehouse shipping is a deal breaker for me.
Nov 28, 2015 18:44:05 #
You are making such nice progress with your shots.
This is outstanding Craig.
Very well done.
This is outstanding Craig.
Very well done.
Nov 28, 2015 18:49:06 #
SonnyE wrote:
Yes. About what I know is I get a pinhole view. :... (show quote)
Yes, focal reducers work real good. They can certainly give you more area to see. Consider them a wide angle lens for your CCD. And they don't degrade the image. Some focal reducers also do some coma correction too. Although I didn't see coma distortion in your image. But when going wider, it could happen and if the reducer is designed to prevent that, you would never see it.
Here is an alternative at a lower price -- looks like they supply Orion:
https://www.astronomics.com/antares-0-5x-focal-reducer-for-celestron-meade-and-orion-ccd-imaging-cameras_p13326.aspx
Price: $24.95 Ground shipping for this item is $8.95
This Antares 1.25 0.5x focal reducer lens (tele-compressor) is used under the Orion brand name to thread into the nosepiece of Orion StarShoot Solar System cameras and StarShoot Deep Space Color Imaging Camera. It can also be used with any other small chip CCD camera having a 1.25" nosepiece, such as the Celestron NexImage, Meade DSI, etc. It is an inexpensive way to more than double the field of view and halve the photographic magnification of such cameras.
This allows you to image more of the lunar surface in a single exposure for more dramatic views of our nearest solar system neighbor and gives you four times the sky area in your deep space Images. The reducer is not recommended for planetary imaging, as it will make the disc of the planet smaller, which is usually the reverse of what you are trying to accomplish when imaging a small and distant planet.
The Antares reducer will also work with any CCD camera using a 1.25 nosepiece that is threaded for 1.25 filters. It will work with both solar system (lunar/planetary) imagers and deep space imagers. It effectively reduces the focal length of the telescope by half with all CCD cameras. This increases the area imaged by your camera by a factor of 4.
The larger imaging area allows you to capture larger star fields and deep-sky objects that may not normally fit entirely onto your deep space cameras imaging CCD. With the StarShoot II Solar System camera (and other lunar/planetary imagers), it effectively changes the image size recorded by the camera from the equivalent of that seen through a 6mm eyepiece to that of a 12mm eyepiece. This permits wider field imaging of the Moon (as well as imaging the sun, if you use the proper solar filter over the objective of your scope).
The Antares reducer uses a two-element achromatic lens, with antireflection coatings on all air-to-glass lens surfaces for maximum light transmission. The lenses are set in an anodized aluminum cell that is threaded to accept 1.25 filters. The Antares reducer requires 43mm of additional inward focus travel when used with the Orion StarShoot II Solar System Camera and 52mm of inward focus travel when used with the Orion StarShoot Deep Space Color Imaging Camera II.
If you want to reply, then register here. Registration is free and your account is created instantly, so you can post right away.