Mask or selection... An interesting exercise
Nov 5, 2015 18:40:21 #

Well, Black hides and white reveals...
NOT SO FAST!!!
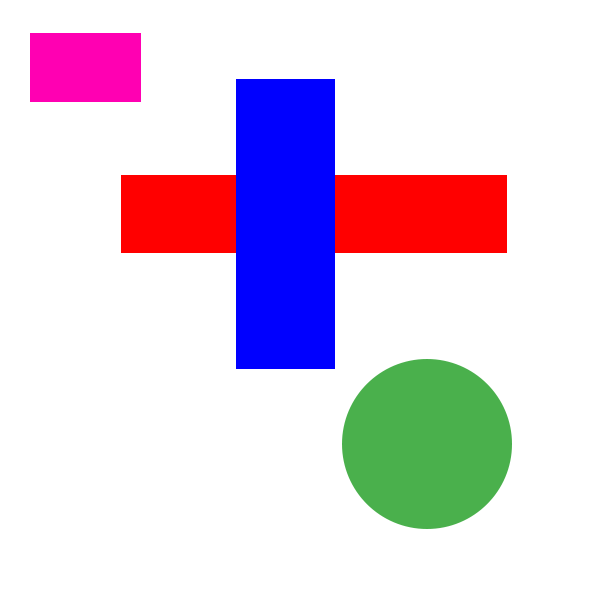
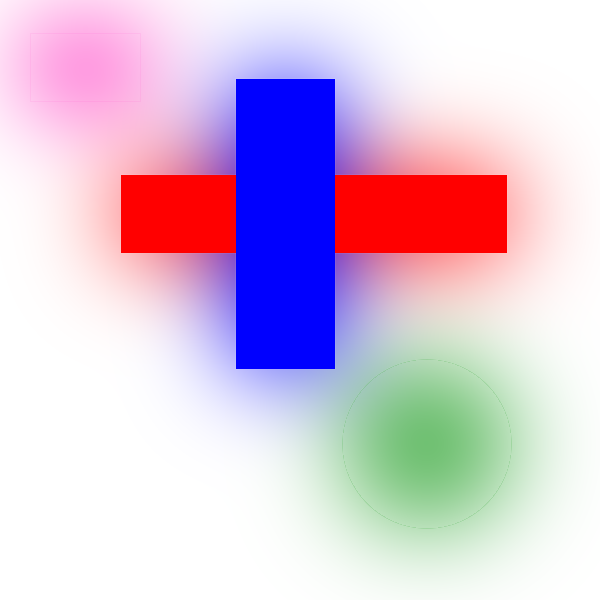
Try to use a wide 16 pixel Gaussian blur on this image and keep the blue/red cross from being blurred and surrounding area clean from red and blue influence (bleeding) using a mask or a selection...
After all masking/selection should limit/control the effect right?
Good luck.
NOT SO FAST!!!
Try to use a wide 16 pixel Gaussian blur on this image and keep the blue/red cross from being blurred and surrounding area clean from red and blue influence (bleeding) using a mask or a selection...
After all masking/selection should limit/control the effect right?
Good luck.
Test image
Nov 5, 2015 18:46:16 #
To anyone trying, please said you tried even if you failed.
There is a solution but it involves other means than masking/ selection.
Why this exercise?
To show you that you should never trust a mask or selection to behave the way you expect it (hide/show for a mask and limit effect)
There is a solution but it involves other means than masking/ selection.
Why this exercise?
To show you that you should never trust a mask or selection to behave the way you expect it (hide/show for a mask and limit effect)
Nov 5, 2015 21:46:46 #

This one was done with a 100% Gaussian blur.
If this is what you were looking for it only required one selection.
Couldn't do it with 16%.
If this is what you were looking for it only required one selection.
Couldn't do it with 16%.

Nov 5, 2015 22:01:16 #

Nov 5, 2015 22:18:00 #
Finally made some headway, but am tired out for this round.
After the 16% blur. Made adjustment with levels. Then made a Huge adjustment. and then a blending alignment.
Not color perfect. Maybe I'll play with again tomorrow.
After the 16% blur. Made adjustment with levels. Then made a Huge adjustment. and then a blending alignment.
Not color perfect. Maybe I'll play with again tomorrow.

Nov 5, 2015 22:29:45 #
It is not possible to do it with a straight mask and or selection.
There are work-around. At least two that I identified.
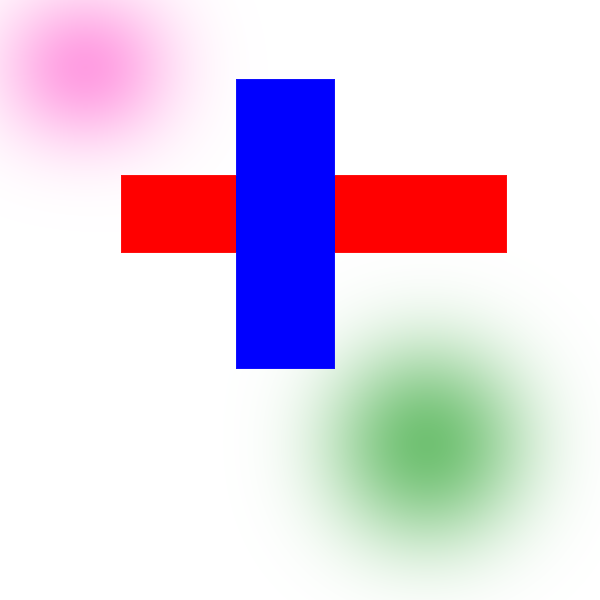
Masking result:
http://static.uglyhedgehog.com/upload/2015/11/5/1446769596209-mask_test_mask_bleed.png
Selection result:
http://static.uglyhedgehog.com/upload/2015/11/5/1446769630145-mask_test_selection_bleed.png
Note the thin lines around the object edges. I have no clue what this is about.
Result after using a work-around:
http://static.uglyhedgehog.com/upload/2015/11/5/1446769666279-mask_test_ideal.png
Gaussian blur, no mask or selection:
http://static.uglyhedgehog.com/upload/2015/11/5/1446781042004-mask_test_blur.png
There are work-around. At least two that I identified.
Masking result:
http://static.uglyhedgehog.com/upload/2015/11/5/1446769596209-mask_test_mask_bleed.png
Selection result:
http://static.uglyhedgehog.com/upload/2015/11/5/1446769630145-mask_test_selection_bleed.png
Note the thin lines around the object edges. I have no clue what this is about.
Result after using a work-around:
http://static.uglyhedgehog.com/upload/2015/11/5/1446769666279-mask_test_ideal.png
Gaussian blur, no mask or selection:
http://static.uglyhedgehog.com/upload/2015/11/5/1446781042004-mask_test_blur.png
Nov 5, 2015 22:49:36 #
Rick36203 wrote:
OK
You did not use the Gaussian blur as indicated and you used a work around..
Nov 5, 2015 22:51:03 #
This exercise will always result in failure as this is about the way pixel layers , masks and selections are prioritized.
Basically the software does the following:
1 - process the layer as instructed (Gaussian blur in this instance)
2 - apply the selection or layer or both
Is this important? I think so. This applies to all pixel layers regardless of what is being done to them. Using a Gaussian layer was the fastest way to demonstrate the potential trouble.
Nov 5, 2015 23:37:52 #
Rongnongno wrote:
You did not use the Gaussian blur as indicated and you used a work around..
Sorry. I did not confine my work to a single layer.
>I duplicated the background.
>I used a 'selection' to define an area slightly larger than the red/blue cross.
>I filled the 'selection' with content-aware fill.
>I then applied the '16 pixel blur' to the top layer as specified.
>Finally, I used blend-if options on the red & blue channels of the top layer (layer effects) to bring back the red/blue cross visibility from the background layer.
If that qualifies as a work-around, then guilty as charged. 8-)
Nov 5, 2015 23:47:45 #
Rick36203 wrote:
Penalty?
Death by flogging with a wet noodle.
Seriously, why are you so complicate in your work around?
1) Duplicate layer so that you are not working with the background (not really necessary but heck) Layer 2
2) Use magick wand, red twice, blue once (additive mode)
3) save selection
4) Copy / paste (ctl-c Ctrl-v) you get a new layer with only the cross)
5) Select copied layer, recall the saved selection (Layer 2)
6) fill selection with white
7) unselect (ctrl-D)
8) Apply Gaussian blur
Done.
No fiddling with anything just straight forward.
Nov 6, 2015 00:28:50 #
Rongnongno wrote:
Death by flogging with a wet noodle. br br Seriou... (show quote)
Why so complicated? It's not complicated (to me). Everyone develops their own editing style.
I use a method only slightly different than the one you describe above whenever I want to isolate a subject, and add a realistic blur to the background. Your item 6 for me is almost always content-aware-fill or clone stamp fill. I may even add a gradient mask to the blur layer to give it depth.
For your sample challenge image with its pure color divisions, the blend-if layer effects was a tool I knew could do the job effectively and quickly. As you well know, there is seldom only 1 way to accomplish a task in Photoshop.
I like simple, but I also like to explore new methods that might come in handy later. :)
Edit: Actually the task can be completed on your image with no tools, no selections, no layer masks... just layer copies, blend-if layer effects, and gaussian blur.
Nov 6, 2015 01:11:07 #
Rick36203 wrote:
.../...Edit: Actually the task can be completed on your image with no tools, no selections, no layer masks... just layer copies, blend-if layer effects, and gaussian blur.
Go for it.
Just remember that this is about showing the weakness of masking and selecting.
Nov 6, 2015 05:54:42 #
Different approach with CS6:
CTRL-J for a copy layer to work with.
Use magic wand to select red/blue cross.
Invert the selection (CTRL-SHIFT-I).
CTRL-J to make a copy layer of only the selection. CTRL only that layer to show the selection again.
Apply Blur.
NOTE: I did see the bleed if I did not create the third layer selection but just applied the blur to the original second layer inverted selection. I learned something. Thanks.
Nov 6, 2015 10:41:05 #
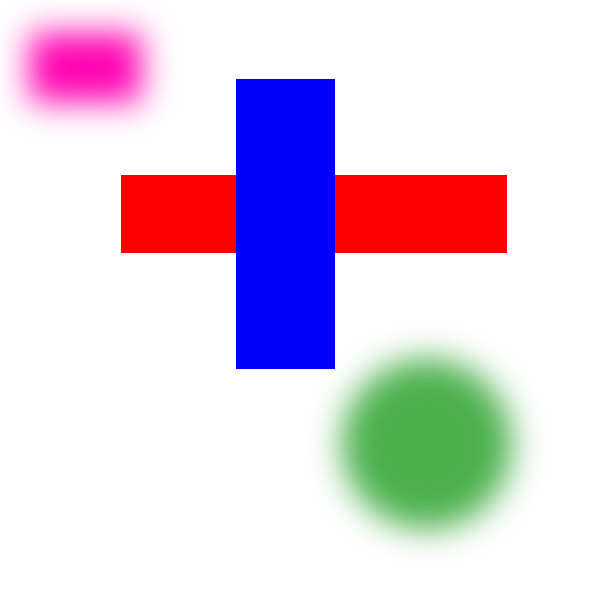
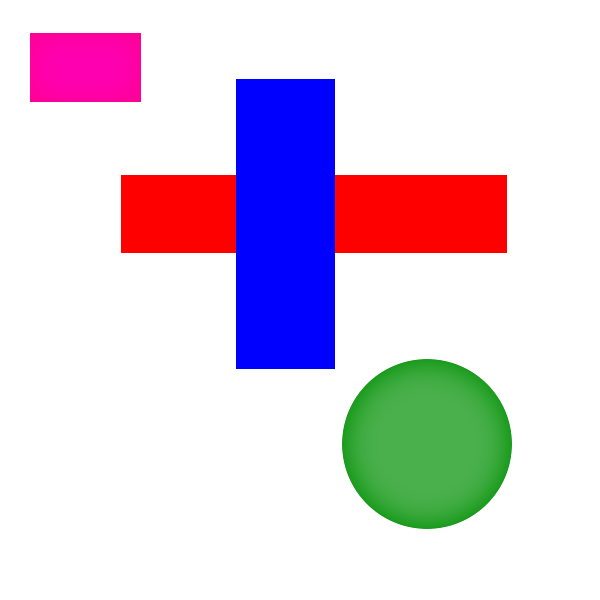
Well, Rongnongno, I did this with GIMP.
1. Magic Wand, multi color selection mode, and selected the red and blue cross only.
2. Inverted selection.
3. Applied Gaussian Blur at 16 pixels. (Technical note for GIMP users: If you need to totally prevent color distortion while sharpening, Decompose your image to HSV and work only on Value. Then Compose the image to HSV. Go to Colors → Components → Decompose.... Make sure the Decompose to Layers box is checked. Choose HSV and click OK. You will get a new grey-level image with three layers, one for Hue, one for Saturation, and one for Value. (Close the original image so you won't get confused). Select the Value layer and apply your sharpening to it. When you are done, with that same layer selected, reverse the process. Go to Colors → Components → Compose.... Again choose HSV and click OK. You will get back your original image except that it will have been sharpened in the Value component. The above tech method was not used for this exercise.)
4. Remove selection.
5. Save in preferred format.
The only obvious effect is the slightly darker edge of green on the green circle, which may have been prevented had I used the above technical method. (See image attached.)
Nov 6, 2015 10:47:21 #
Shakey wrote:
Well, Rongnongno, I did this with GIMP.
Err the idea was to use the instructions given in the first post.
I have to assume that GIMP works the same way as PS CC on that aspect.
Check the results with PS CC here.
If you want to reply, then register here. Registration is free and your account is created instantly, so you can post right away.