JPG color noise correction - PS CC 2015
Nov 4, 2015 03:35:26 #

Foreword
Visible noise is preventable to a certain extent. Noise will always be present in any and all captures thought.
[color]This addresses ONLY the JPG pesky color noise[/color] that appears when a capture is under-exposed for any reason. This noise is not related to compression artifacts that are not correctable without introducing a softness in the final product.
History
Anyway on with the tutorial, step by step.
You are done.
With a little training this should not take you more than a minute.
Why is this better than any plug-in?
There is no loss of detail, no blur, no loss of luminosity.
---
* My initial test had a lost of luminosity.
** You can also use Ctrl-M to bring a more flexible curve adjustment.
*** Tip: when adjusting clipping keep the ALT key down before selecting and moving the extreme sliders. This will give you a visual clue as to when you start killing either the light or the dark.
Visible noise is preventable to a certain extent. Noise will always be present in any and all captures thought.
[color]This addresses ONLY the JPG pesky color noise[/color] that appears when a capture is under-exposed for any reason. This noise is not related to compression artifacts that are not correctable without introducing a softness in the final product.
History
Quote:
Back in 2013 yes, that long, I started a research ... (show quote)
Anyway on with the tutorial, step by step.
Quote:
- Open the capture you need to correct. br - Dupli... (show quote)
Quote:
Four things to remember:
- Duplicate layer
- Blend mode
- Blend if
- Adjust layer luminosity
If you remember these four steps you will be able to recreate everything in a jiffy
- Duplicate layer
- Blend mode
- Blend if
- Adjust layer luminosity
If you remember these four steps you will be able to recreate everything in a jiffy
You are done.
With a little training this should not take you more than a minute.
Why is this better than any plug-in?
There is no loss of detail, no blur, no loss of luminosity.
---
* My initial test had a lost of luminosity.
** You can also use Ctrl-M to bring a more flexible curve adjustment.
*** Tip: when adjusting clipping keep the ALT key down before selecting and moving the extreme sliders. This will give you a visual clue as to when you start killing either the light or the dark.
Nov 5, 2015 14:10:01 #
Comparisons side by side that demonstrate the color noise removal...
Example 1 -
http://static.uglyhedgehog.com/upload/2015/11/3/1446558681235-003_1.png">http://static.uglyhedgehog.com/upload/2015/11/3/1446558699501-004_1.pnghttp://static.uglyhedgehog.com/upload/2015/11/3/1446558681235-003_1.png
Example 2 - Note the red sky: This That was a two step process. While the color noise in the sky was removed the compression noise became too evident.
http://static.uglyhedgehog.com/upload/2015/11/3/1446584291513-rgg_103.png">http://static.uglyhedgehog.com/upload/2015/11/3/1446584291420-rgg_102_ground.pnghttp://static.uglyhedgehog.com/upload/2015/11/3/1446584291513-rgg_103.png">http://static.uglyhedgehog.com/upload/2015/11/3/1446584291289-rgg_101.pnghttp://static.uglyhedgehog.com/upload/2015/11/3/1446584291513-rgg_103.png">http://static.uglyhedgehog.com/upload/2015/11/3/1446584291420-rgg_102_ground.pnghttp://static.uglyhedgehog.com/upload/2015/11/3/1446584291513-rgg_103.png
Example 3 - The JPG color noise is gone.
http://static.uglyhedgehog.com/upload/2015/11/3/1446608014199-cntry_002.png">http://static.uglyhedgehog.com/upload/2015/11/3/1446607989851-cntry_001.pnghttp://static.uglyhedgehog.com/upload/2015/11/3/1446608014199-cntry_002.png
Nov 5, 2015 14:29:11 #
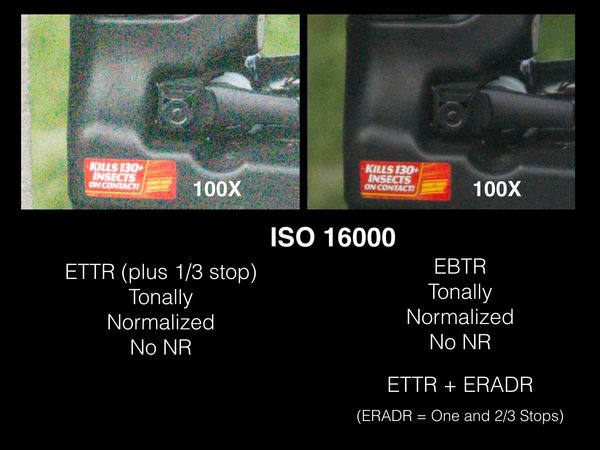
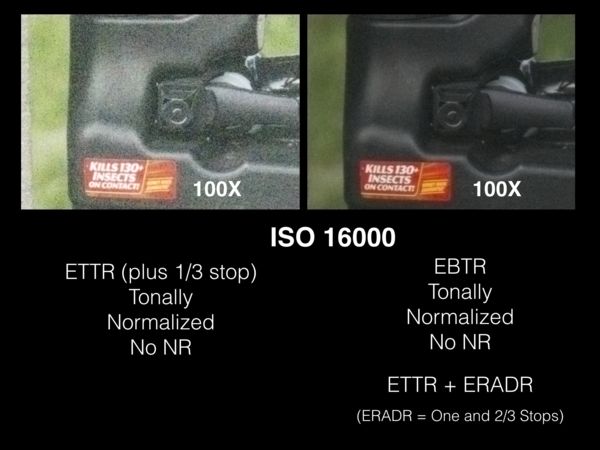
What follow is not JPG color noise yet if has been corrected.
This led to one caveat in the correction:
If there is a wide area of red like this sticker the red will glow. That is not acceptable (see picture 2).
The correction is simple:
Select the area
Copy cut the red out of the image to a new layer
Fill the area (on the original layer) with black or white
Proceed as per the tutorial.
What is interesting here for those concerned with blurring: None took place as evidenced by the lettering.
Note: This capture was offered by Uuglypher
Uuglypher original
(Download)
First correction - Notice the red glowing
(Download)
Second correction - using an additional layer

(Download)
If you want to reply, then register here. Registration is free and your account is created instantly, so you can post right away.