Help Removing Distracting Object in Photoshop CC
Oct 27, 2015 09:12:29 #
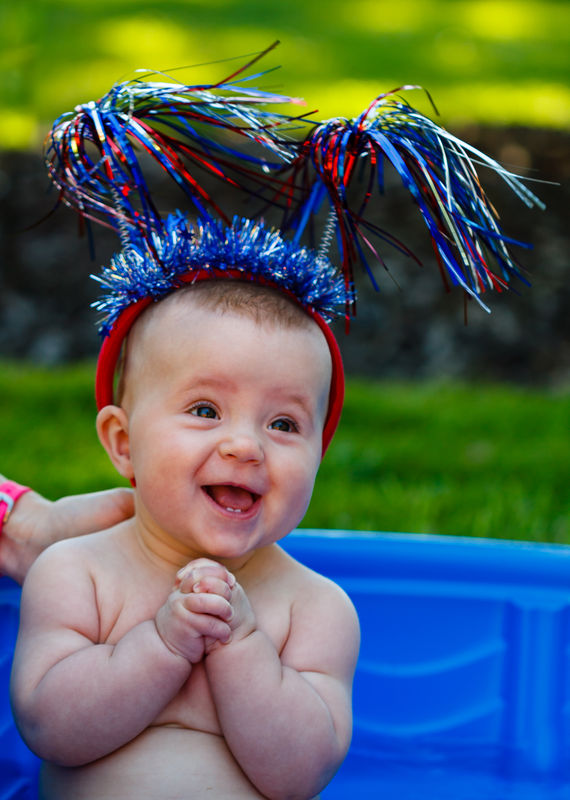
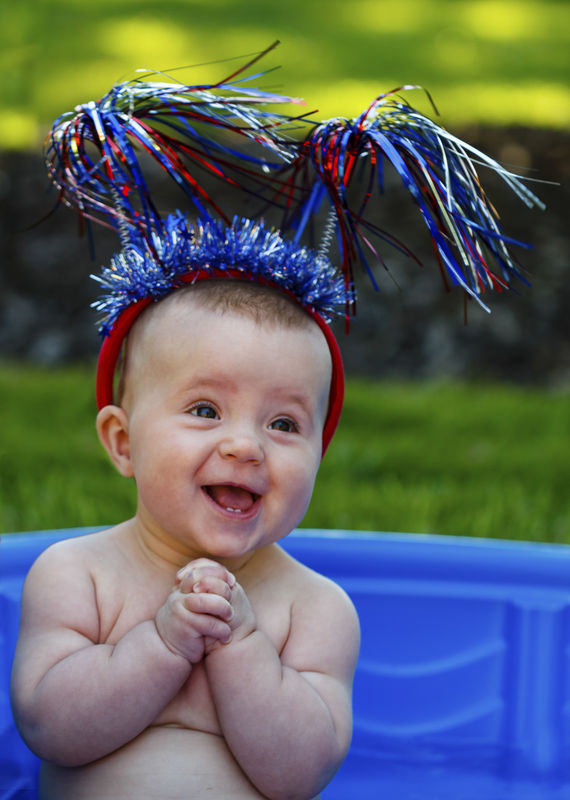
I could really use some editing help removing an adjacent object. I am only just starting to use PS and have tried to duplicate the steps indicated in a video by Julienne Kost involving the Lasso, Patch, and Content Aware tools, but my finished product leaves unacceptable artifacts.
I can remove the label on the pool with no problem, but removing the arm holding up my granddaughter has proven beyond my current PS skills. Can anyone offer any suggestions as to how to best go about this, or if you care to, provide a finished product and explain how you did it.
Thanks in advance!
FYI - I shoot in RAW but am providing a pdf here for transfer purposes. Let me know if a different file format is needed.
Oct 27, 2015 12:03:04 #
I started off with the magic wand and selected the hand.
Then went to the clone tool - selecting the top of the pool on the opposite side as my start point I just cloned in the area of the hand with the clone tool.
Deselected the area after completion and used the smug tool to remove the residue line from the selection tool.
brought back my selection and used the paint brush to help balance the blue color on the lower portion of pool in the selected area.

Oct 27, 2015 12:21:20 #

Oct 27, 2015 12:23:37 #
Bill Houghton wrote:
I started off with the magic wand and selected the hand.
Then went to the clone tool - selecting the top of the pool on the opposite side as my start point I just cloned in the area of the hand with the clone tool.
Deselected the area after completion and used the smug tool to remove the residue line from the selection tool.
brought back my selection and used the paint brush to help balance the blue color on the lower portion of pool in the selected area.
Then went to the clone tool - selecting the top of the pool on the opposite side as my start point I just cloned in the area of the hand with the clone tool.
Deselected the area after completion and used the smug tool to remove the residue line from the selection tool.
brought back my selection and used the paint brush to help balance the blue color on the lower portion of pool in the selected area.
:thumbup:
Oct 27, 2015 13:56:03 #
Thanks Bill. Not that this is any new revelation to me, but this confirms I have much to learn in PS. Argh!
Oct 27, 2015 14:19:13 #
Just a little FYT. I selected the hand to help keep the cloning tool from wondering on to another area when. I could have also used the the Refine Edge to reduce the Line left by selection tool. The Refine edge will allow you to feather the edge reducing the hard edge of of a general selection.
There are many ways to do things in PS. Another method would be select the grandchild. Copy her into memory then just past her back, leaving her where she is. This will create a separate layer. Above the base layer. You can work on the base layer, anything you do on base will not effect her, being on the second layer.
There are many ways to do things in PS. Another method would be select the grandchild. Copy her into memory then just past her back, leaving her where she is. This will create a separate layer. Above the base layer. You can work on the base layer, anything you do on base will not effect her, being on the second layer.
Oct 27, 2015 14:40:03 #
Thx for the additional info Bill. Again, mucho appreciado! I will play with your suggested actions.
Oct 27, 2015 15:58:09 #

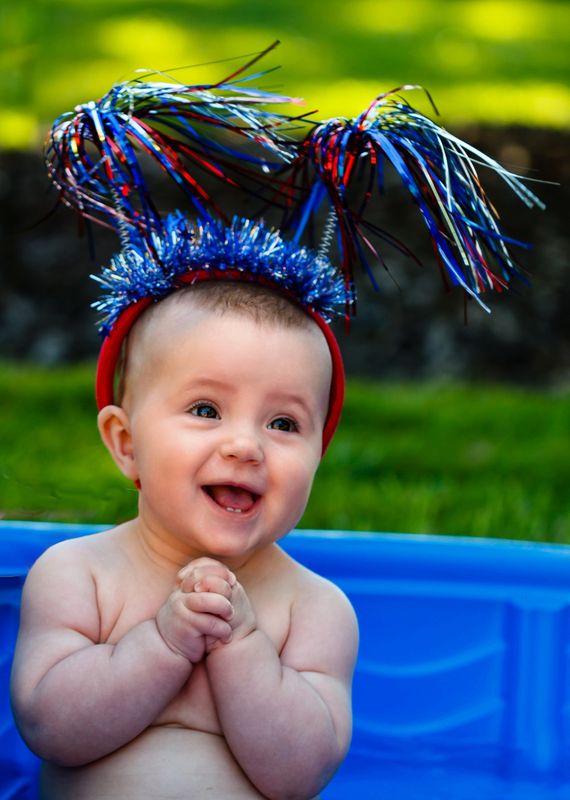
Nothing fancy about the removal - just repeated cloning. However, I did manage to do something about the purple arms and skin tone in general.
-
-
Oct 27, 2015 17:28:44 #
Oct 28, 2015 10:41:06 #

R.G. wrote:
Nothing fancy about the removal - just repeated cloning. However, I did manage to do something about the purple arms and skin tone in general.
-
-
Looks good R.G. :thumbup:
Oct 28, 2015 12:41:23 #
Lazy J wrote:
Thx R.G. Looks much better. Can you enlighten me what you did?
Thanks. Quick summary - made quite a few selections of the problem areas (forearms, elbows, blue patch on left cheek etc). Unfortunately you're limited in Lightroom when it comes to working on selections, so I did what I could with the WB and Tint sliders, Shadows, Saturation, Contrast etc.
For the global adjustments I gave it positive Clarity, negative Contrast, positive Vibrance, negative Saturation, full lifting of Shadows, slight reduction of Highlights. In HSL I lightened red and shifted it towards orange a little, I darkened yellow and shifted it towards orange a bit, found that the purple forearms responded a fair bit to magenta so lightened, desaturated and shifted towards red a bit.
I found that the face had a slight excess of yellow so I selected the face and shifted WB towards blue a little (-3) and desaturated. That sort of neutralised the face's skin tones but left it looking a bit flat so I tried something that I've used before for skin tones - I used Split Toning to add a slight touch of yellow/orange to the highlights and added red/orange to the shadows (very small amounts is all that's needed). That seemed to "flesh out" the skin tones and stopped them from being so bland. Skin tones can vary quite a bit and I didn't know what Emie looked like in real life so I had to guess. Split toning gives a fair amount of control over skin tones and provided it's not overdone it's not too hard to end up with a realistic effect.
Oct 28, 2015 12:43:36 #
Nov 7, 2015 12:29:03 #
I will try my hand at explaining how I did this in a way that you can try to duplicate my process. First there are many ways of doing the same thing in PS. You will find that some processes are easier than others depending on how you first learn PS.
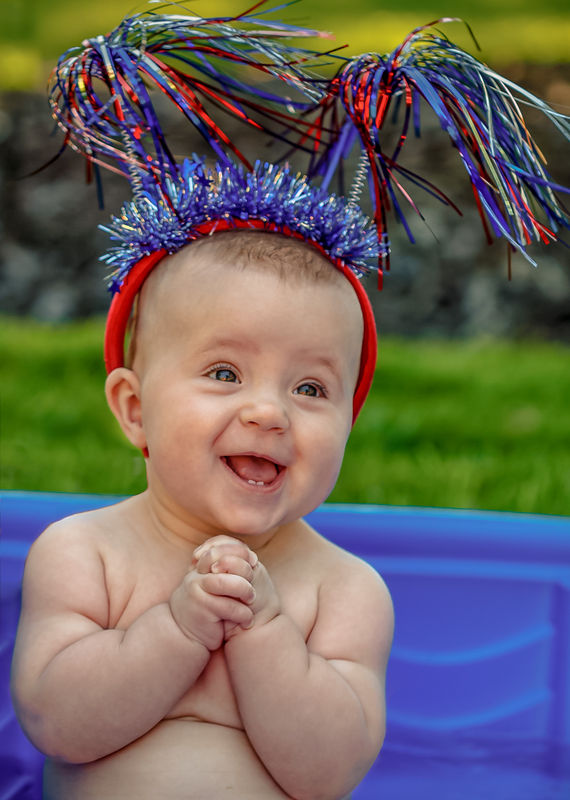
I first noticed that the right side of the picture looks very similar to the left side. Also I noticed that if I was to flop the image and overlay this area to be fixed it should fill and correct the distraction area and keep the contour of the top edge of the pool. So this is my fix. I opened up your image in PS then made a duplicate of image (Command J). This creates a layer called "Layer 0 copy". Now click on this new layer to highlight it. Next type Command T. You will see a new border around the picture. Have you mouse inside the border and right click. You will see a new set of moves. Go to the bottom and click on Flip Horizontal. Now double click inside the box and the border will go away. Now to see if it will cover the area to be corrected I went to the bar above Layer 0 and clicked the fill button and changed it to about 35%. Now I see that this new area will work and it keeps the contour of the pool edge. Now change the Fill back to 100%. Now we need a Mask to open just the area to cover the hand and correct the pool edge and other surrounding areas. Make sure the Layer 0 bar is highlighted. Go to the bottom of the panel and click the 5th icon from the right (Square with circle in it). When you do you will see a new white box in the Layer 0 panel. We need to change this white to all black. Type Option Delete and you will see your original picture as you started out. We now need to open just the area we want to cover the hand and surrounding areas. On the long panel where you Lasso tool go to the bottom and find the 2 boxes. They should be white and black if not click the quite small boxes just above with the arrow when you do you will see the boxes change. You want white on top. This next step can be done in several ways, you might get a lot of options from other people. I used the Magnetic Lasso Tool and went around the shoulder and arm up the neck around the ear then left and down and back to the arm for a connection I then went to top bar and hit refine edge moved the Smooth bar to about 8 and the Feather to about 2.4 then OK box. I then went To top menu Edit, Fill, Foreground color (white). When completed you will see the change in the picture. I now saw I needed a bit of clean up.I went back to my Layer 0 bar clicked on the mask. When you do you will see a thin white box around it. Went and chose the Brush Tool and made the size small and started to paint additional areas to let come through. Even went into the grass and made it look more natural. If you opened to much you go to the Black and white box change to have the black one on top and now you can remove the area that went to far. I found that my pool edge was a bit to far down and didn't look natural.
I went and unlocked the chain between the picture and mask. Just click on the chain. I now clicked on the picture and the white box moves over to the picture. Then typed Command T and the transform box show around the picture again. I moved it up just a bit. Doubled clicked inside the box and now you have it the final product. The whole process took about 5 minutes about 40 minutes less than typing my explanation. :
Nov 7, 2015 13:57:24 #
Interesting approach I would never had thought of at this point. Thanks for taking the time to do this. Very helpful!
If you want to reply, then register here. Registration is free and your account is created instantly, so you can post right away.