Compositing Tutorial
Oct 16, 2015 08:56:43 #

I was asked to create a tutorial on compositing so ...
In an effort to help beginning and intermediate photographers learn how to composite two different images together to create one image I have created this brief tutorial. The goal is to create a finished composite that will fool those viewing it into believing it is the original, out-of-camera shot.
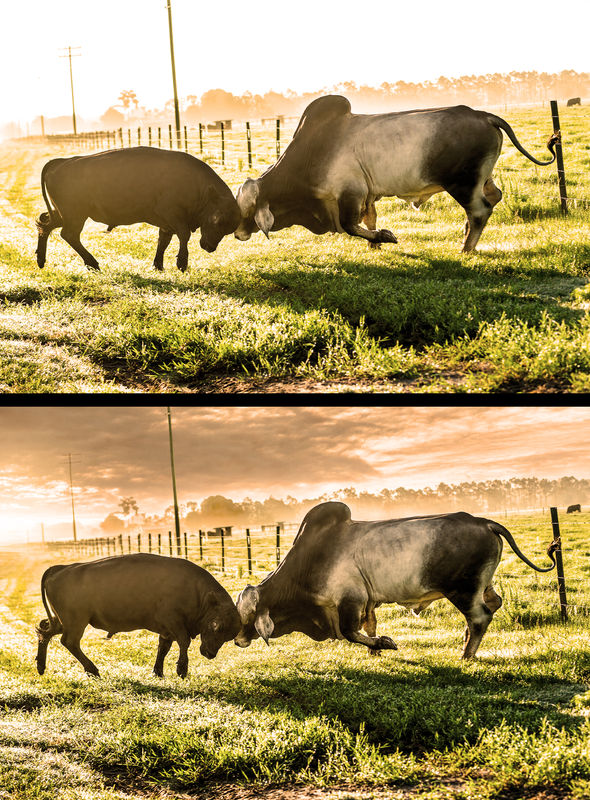
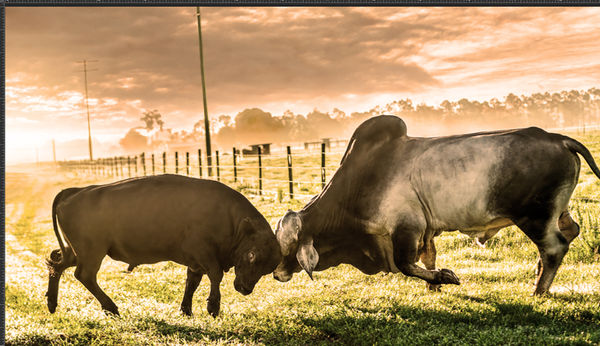
I wanted to make this a real-world scenario, instead of one of my usual in-depth, difficult, time-consuming pieces. To that end, I am using fellow Hogger Walt Childs awesome image of Bulls Fighting that was selected through a contest to be included in a calendar created by the Univ. of Florida.
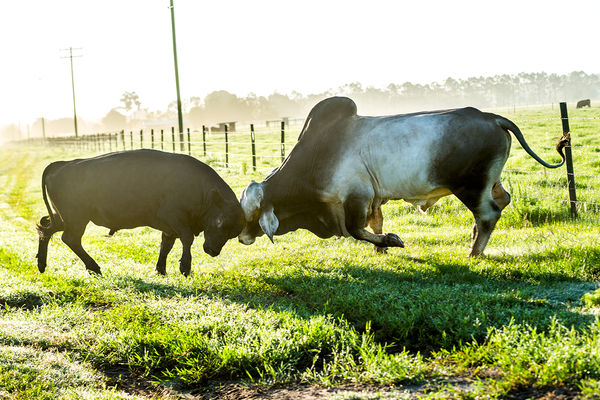
The scenario presents us with a problem that occurs when the unexpected happens. Walt explained to me that this was early a.m. harsh lighting and the bulls unexpectedly decided to challenge each other only six feet or so in front of him. He is correctly exposed for the subject, but that presents us with the challenge of the blown out sky. So what do we do?
Compositing with Layer Masks, thats what. Well just go ahead and add in our own sky
Keep in mind, I am working on a Mac in Photoshop CC 2015. I don't know if this works with Elements as I have never used it. I don't know what it's capabilities and limitations are.
1. Open the original shot and unlock the layer; either by double-clicking on the layer or clicking on the small lock icon for that layer. Since we wont be making any adjustments to the original file you can either convert it to a Smart Object or not.
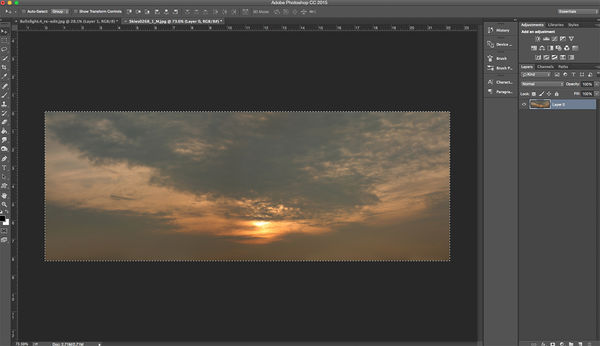
2. Open a photo of a sky that you like; unlock that layer and cut and paste or drag and drop into the original. The sky that I am using is just an old sunset I shot a few years ago.
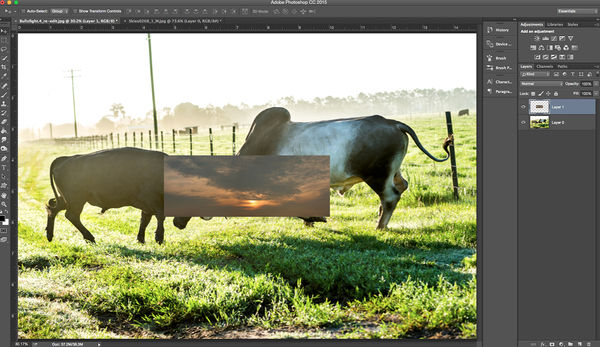
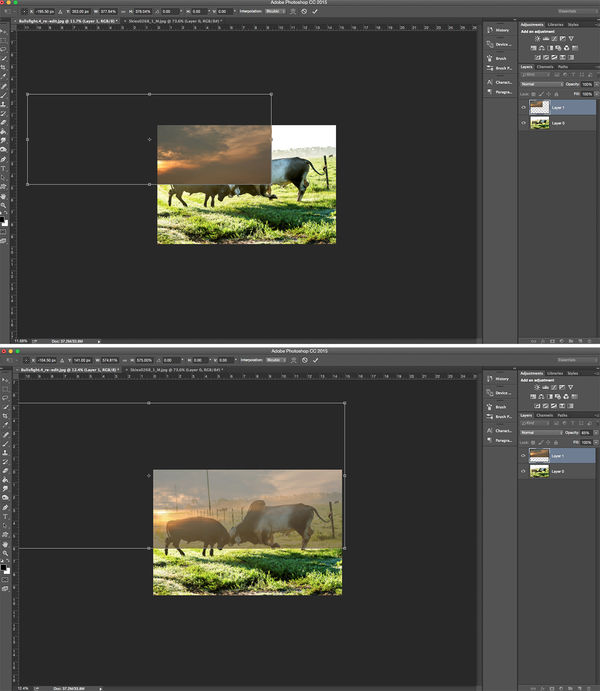
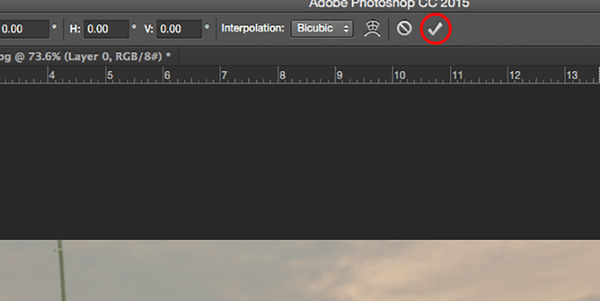
3. My image is too small for this photo, So Ill use my Free Transform tool (Command or cntrl +T) and resize it and position the sun in my sky to where the sun is rising in Walts original. Ill reduce the opacity of the sky to about 60% so I can position it correctly. When you are satisfied with your placement, double-click anywhere in the image to accept the selection, or select the check to commit your transform selection.
4. Now, add a Layer Mask by clicking on the white rectangular icon with the small gray circle. Be sure to set your sky layer back to 100% opacity. Now grab a brush with Hardness set at 0, with no other settings youll want a nice soft brush. I used a 1300 px brush to start the larger the brush, the softer the blend. You can increase or decrease your brush size by hitting the left ] or right [ on your keyboard. Now make sure your black color is selected and all you have to do is paint away the unwanted area to create a nice, smooth, natural looking blend. If you make a mistake, you can paint back in any area by switching the color of your brush to white (black reveals, white conceals)
5. The next thing I did was create a faux sun which Ill save for another simple, yet effective tutorial.
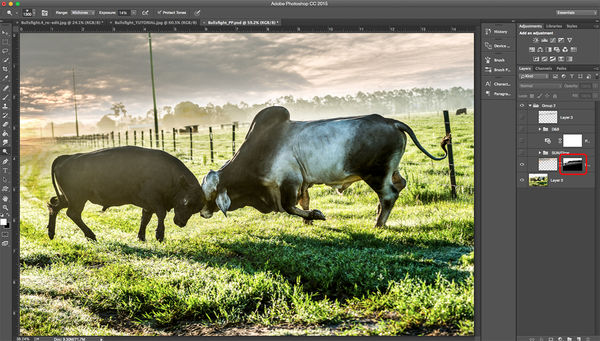
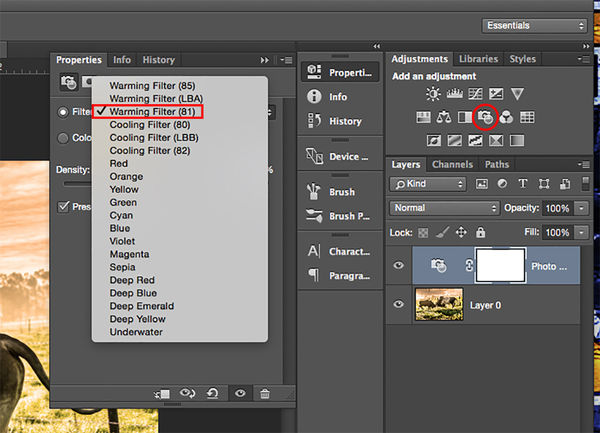
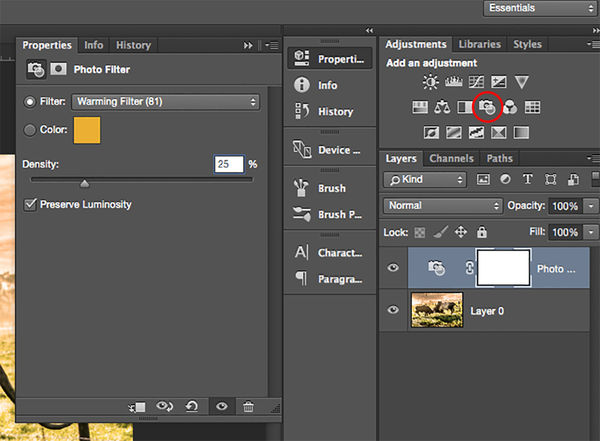
6. I then added a Photo Filter Adjustment layer to give the entire image an overall warming feel and making all the colors blend together as one image.
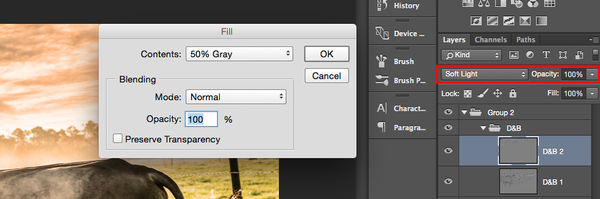
7. Finally, I added two Dodge & Burn layers which are used to strengthen the highlights (Dodge tool) and shadows (Burn tool). To do this, create a new top layer and fill it with 50% gray. If you are using a Mac, Shift+delete is the quick key to bring up the fill window. Then change the blending mode to Soft Light. Select either your Dodge or Burn tool, set your exposure to between 15-20% to start. It may be a little light at first, but you can brush back and forth over the same are a to lighten or darken depending on your needs. As you become more experienced with the tool, youll have a better grasp of where to set your starting exposure. When you think youve hit all the important areas, well youre done! These images are with the D&B layers off (?), then on (?), so you can see the subtle differences.
So this wraps up this composting tutorial. Keep in mind, I know of at least three other ways to accomplish the same thing in Photoshop, but I believe this is the easiest way to et started and learn about layer masks.
If you have any questions regarding this tutorial or anything else, PM me. If you use this tutorial please post your before and after shots!
Enjoy and have fun!
Don
In an effort to help beginning and intermediate photographers learn how to composite two different images together to create one image I have created this brief tutorial. The goal is to create a finished composite that will fool those viewing it into believing it is the original, out-of-camera shot.
I wanted to make this a real-world scenario, instead of one of my usual in-depth, difficult, time-consuming pieces. To that end, I am using fellow Hogger Walt Childs awesome image of Bulls Fighting that was selected through a contest to be included in a calendar created by the Univ. of Florida.
The scenario presents us with a problem that occurs when the unexpected happens. Walt explained to me that this was early a.m. harsh lighting and the bulls unexpectedly decided to challenge each other only six feet or so in front of him. He is correctly exposed for the subject, but that presents us with the challenge of the blown out sky. So what do we do?
Compositing with Layer Masks, thats what. Well just go ahead and add in our own sky
Keep in mind, I am working on a Mac in Photoshop CC 2015. I don't know if this works with Elements as I have never used it. I don't know what it's capabilities and limitations are.
1. Open the original shot and unlock the layer; either by double-clicking on the layer or clicking on the small lock icon for that layer. Since we wont be making any adjustments to the original file you can either convert it to a Smart Object or not.
2. Open a photo of a sky that you like; unlock that layer and cut and paste or drag and drop into the original. The sky that I am using is just an old sunset I shot a few years ago.
3. My image is too small for this photo, So Ill use my Free Transform tool (Command or cntrl +T) and resize it and position the sun in my sky to where the sun is rising in Walts original. Ill reduce the opacity of the sky to about 60% so I can position it correctly. When you are satisfied with your placement, double-click anywhere in the image to accept the selection, or select the check to commit your transform selection.
4. Now, add a Layer Mask by clicking on the white rectangular icon with the small gray circle. Be sure to set your sky layer back to 100% opacity. Now grab a brush with Hardness set at 0, with no other settings youll want a nice soft brush. I used a 1300 px brush to start the larger the brush, the softer the blend. You can increase or decrease your brush size by hitting the left ] or right [ on your keyboard. Now make sure your black color is selected and all you have to do is paint away the unwanted area to create a nice, smooth, natural looking blend. If you make a mistake, you can paint back in any area by switching the color of your brush to white (black reveals, white conceals)
5. The next thing I did was create a faux sun which Ill save for another simple, yet effective tutorial.
6. I then added a Photo Filter Adjustment layer to give the entire image an overall warming feel and making all the colors blend together as one image.
7. Finally, I added two Dodge & Burn layers which are used to strengthen the highlights (Dodge tool) and shadows (Burn tool). To do this, create a new top layer and fill it with 50% gray. If you are using a Mac, Shift+delete is the quick key to bring up the fill window. Then change the blending mode to Soft Light. Select either your Dodge or Burn tool, set your exposure to between 15-20% to start. It may be a little light at first, but you can brush back and forth over the same are a to lighten or darken depending on your needs. As you become more experienced with the tool, youll have a better grasp of where to set your starting exposure. When you think youve hit all the important areas, well youre done! These images are with the D&B layers off (?), then on (?), so you can see the subtle differences.
So this wraps up this composting tutorial. Keep in mind, I know of at least three other ways to accomplish the same thing in Photoshop, but I believe this is the easiest way to et started and learn about layer masks.
If you have any questions regarding this tutorial or anything else, PM me. If you use this tutorial please post your before and after shots!
Enjoy and have fun!
Don
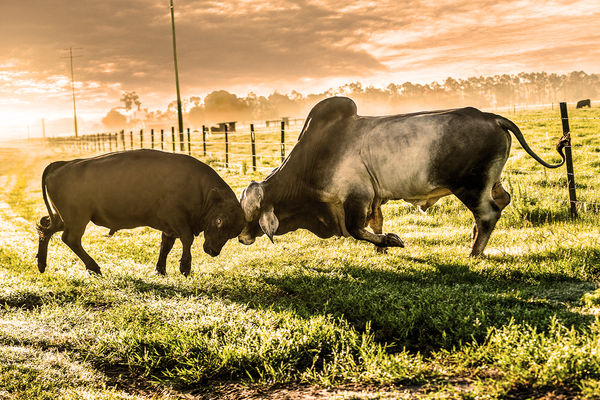
Before and After ... Adding clouds to an overexposed sky
(Download)
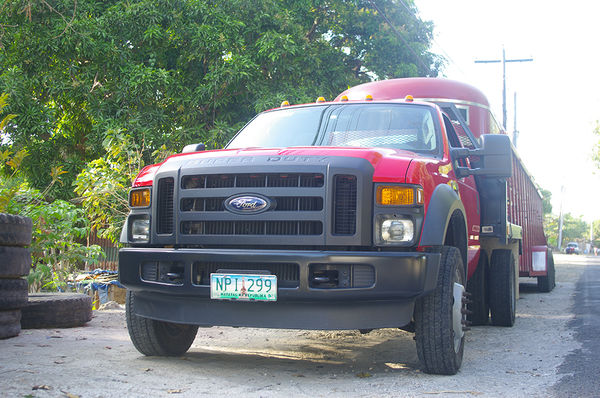
Walt Childs' original out of camera shot ...
(Download)
The sky shot I used ...
(Download)
My photo is too small for this image ...
(Download)
Place the sun where you want it, then resize your sky to fit ...
(Download)
Double click on the image or select the check (circled) to accpet the transformation ...
(Download)
Create your layer mask by selcting this icon in the lower right corner ...

(Download)
The layer mask is circled in red. As you can see by the black, I have already painted away the unwanted portion of the sky ...
(Download)
This is the Photo Filter Adjustment layer, click on the circled icon, then, in the fly out window, scroll down to Warming Filter (81) and select ...
(Download)
Use the slider to adjust the density of the filter ...
(Download)
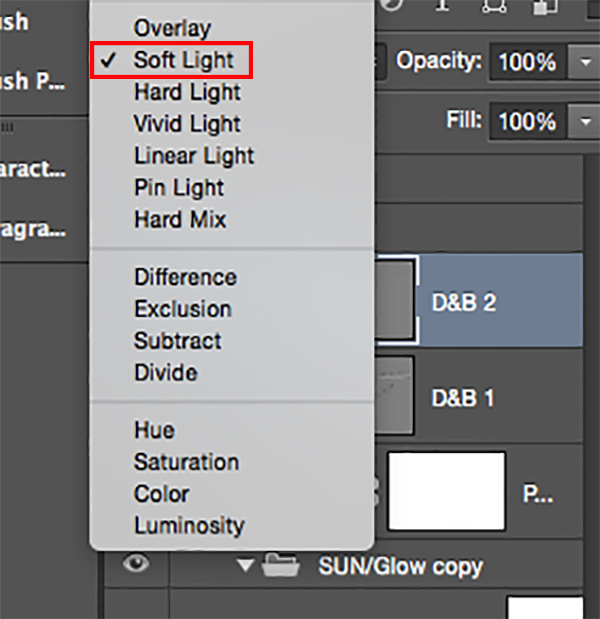
Dodge & Burn layer on top; Shift + Delete to fill with 50% grey; change Blending Mode (circled in red) to Soft Light in fly out menu (seen below) ...
(Download)
The Dodge & Burn layer turned of ...
(Download)
The Dodge & Burn layer turned on. Notice the subtle changes in the highlights and shadows on the bulls and in the sky ... ...
(Download)
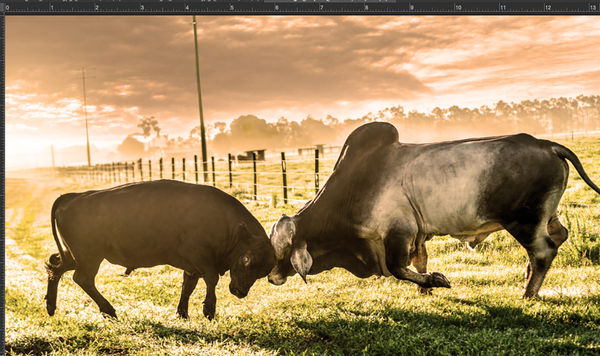
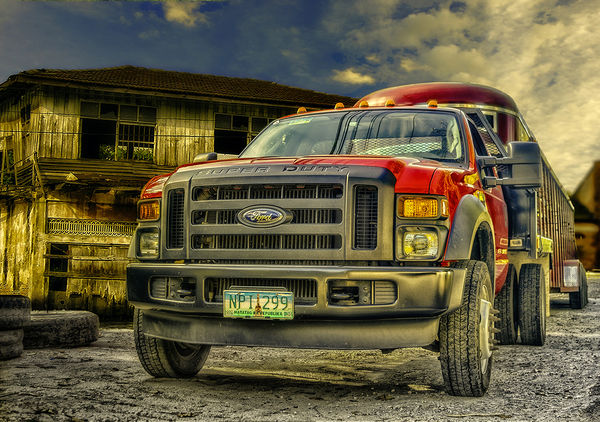
The final image ...
(Download)
Oct 16, 2015 09:13:47 #

Thank you so much for sharing. I'll definitely be working with this once I get home next week and have access to my computer. These are skills that many of us struggle to learn.
It's exciting for me to see this section host photo art education offerings like this. Much appreciated!
It's exciting for me to see this section host photo art education offerings like this. Much appreciated!
Oct 16, 2015 09:31:48 #
minniev wrote:
Thank you so much for sharing. I'll definitely be working with this once I get home next week and have access to my computer. These are skills that many of us struggle to learn.
It's exciting for me to see this section host photo art education offerings like this. Much appreciated!
It's exciting for me to see this section host photo art education offerings like this. Much appreciated!
You bet, glad to see the interest. I'll continue to do it as long as their is interest. I look forward to seeing what you come up with.
Oct 16, 2015 10:10:47 #
Frank2013
Loc: San Antonio, TX. & Milwaukee, WI.
donolea wrote:
If you have any questions regarding this tutorial or anything else, PM me. If you use this tutorial please post your before and after shots!
Enjoy and have fun!
Don
If you have any questions regarding this tutorial or anything else, PM me. If you use this tutorial please post your before and after shots!
Enjoy and have fun!
Don
Don I want you to know how much I appreciate your time and effort in putting this together for all of us. Thank you. There are tons of things on you tube and what not but having something a bit personalized for the members here is very gratifying. If I post any more pigs you can bet they'll look better.
Oct 16, 2015 10:40:42 #
Frank2013 wrote:
Don I want you to know how much I appreciate your time and effort in putting this together for all of us. Thank you. There are tons of things on you tube and what not but having something a bit personalized for the members here is very gratifying. If I post any more pigs you can bet they'll look better.
Thanks for the kind words Frank, glad to do it and hopefully help others.
Oct 16, 2015 11:00:36 #
Don, this is an excellent tutorial, thanks for taking the time to put it together. This weekend I plan to go through it and learn how to do this technique. Your expertise is much appreciated.
Oct 16, 2015 13:14:53 #
waltchilds wrote:
Don, this is an excellent tutorial, thanks for taking the time to put it together. This weekend I plan to go through it and learn how to do this technique. Your expertise is much appreciated.
Thanks Walt, and thanks for the photo. I called you last night and sent you an email the day before, but don't know if you get 'em yet.
Oct 16, 2015 14:25:38 #
jim hill
Loc: Springfield, IL
I understand what you have done. It's really a nice job. It's a shame that I can't follow all of your steps as I work only with Serif PhotoPlus and have since the X4 version. Too old to change now but thanks for your time and efforts. I'm sure many here appreciate your expertise in this area of image making and you willingness to share.
Oct 16, 2015 14:33:43 #
jim hill wrote:
I understand what you have done. It's really a nice job. It's a shame that I can't follow all of your steps as I work only with Serif PhotoPlus and have since the X4 version. Too old to change now but thanks for your time and efforts. I'm sure many here appreciate your expertise in this area of image making and you willingness to share.
Jim I knew it would be a problem for some. Perhaps you can see if there are any YouTube tutorials for your software based on the individual steps, then piece those steps together to get you somewhere close to this.
Oct 16, 2015 15:10:25 #
jim hill
Loc: Springfield, IL
donolea wrote:
Jim I knew it would be a problem for some. Perhaps you can see if there are any YouTube tutorials for your software based on the individual steps, then piece those steps together to get you somewhere close to this.
Thanks for your response. Much appreciated.
Oct 16, 2015 15:21:35 #
Oct 16, 2015 19:30:46 #
Great tutorial Don.
I have used Blend Modes in the past like Soft Light or Multiply to "blend" two images together but you recommend Photo Filters so Ill give that a try.
You use Dodge and Burn on a grey layer with a Soft light blend mode why not just paint with black to dodge and white to burn on this layer? Your no doubt right but what difference does using the correct dodge and burn tools make.
Does it give more control?
By the way thank you for taking the trouble to do this my man most informative.
Oct 16, 2015 19:49:35 #
Some of the techniques you outlined Don were indeed used in my rather pathetic attempt. Yep I know back to the drawing board!!
Oct 16, 2015 20:47:58 #
Billyspad wrote:
Great tutorial Don. br I have used Blend Modes in ... (show quote)
I have used black and white on a D&B layer. I just find I have to constantly adjust the opacity layer when paint with B&W. Six of one half dozen of the othe r, I suppose. Like I always say with Photoshop, there's no right or wrong way to achieve to achieve a certain look, only good or bad results. Either way will work, it's just personal preference. Also the Photo Filters aren't a blending mode, they are a filter that goes over the top of an entire image to change the mood of the light. Think of it like putting a red or Amber gel over an 800w light to warm up a room.
Oct 16, 2015 20:49:40 #
Billyspad wrote:
Some of the techniques you outlined Don were indeed used in my rather pathetic attempt. Yep I know back to the drawing board!!
I really like what you did with the background on that. :thumbup: :thumbup:
If you want to reply, then register here. Registration is free and your account is created instantly, so you can post right away.