How Do I Digitally Extend the Borders
Oct 6, 2015 13:24:42 #

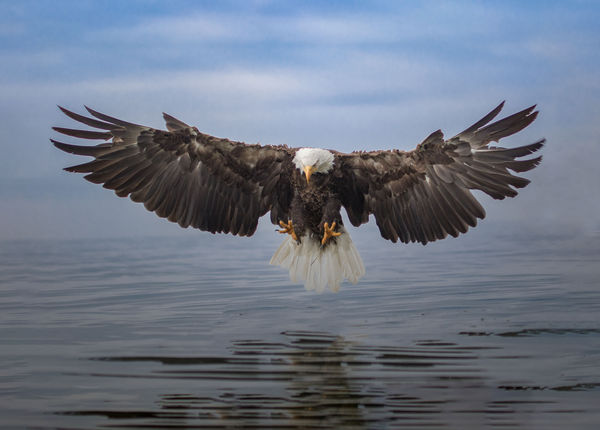
I have received feedback that this image is cropped too tightly. Can anyone tell me how I would go about extending the borders?

Oct 6, 2015 14:35:41 #

If you mention your PP program, someone can give you specific directions ... but you can usually use the crop tool in reverse.
Oct 6, 2015 15:13:35 #

In PS CC 2015, do the following (works only in PS CC where the Color Adaptation function has been added to the Fill process
Open the original photo
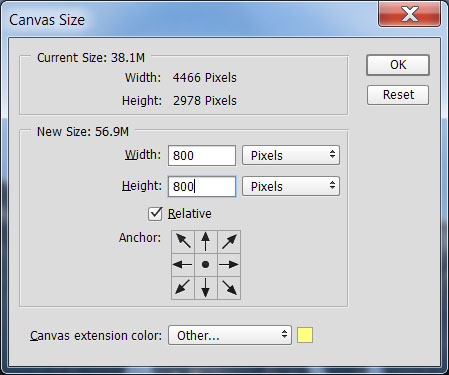
Step 1. Expand the Canvas Size. From the top menu, select Image>Canvas Size. Change the units to pixels, add 800 each to height and width and change Canvas extension color to Other, and from the color palette, select bright yellow
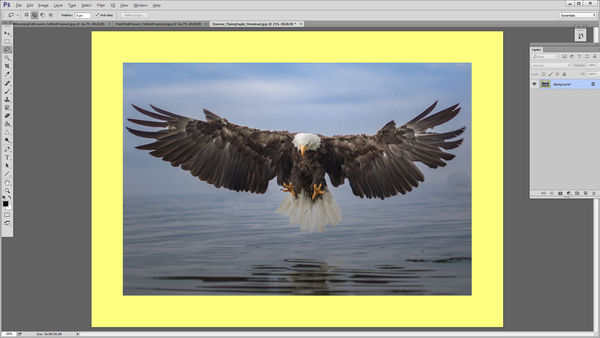
Step 2. After clicking OK in Step 1, the extended Canvas becomes visible
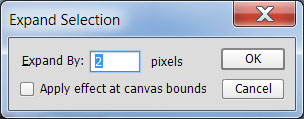
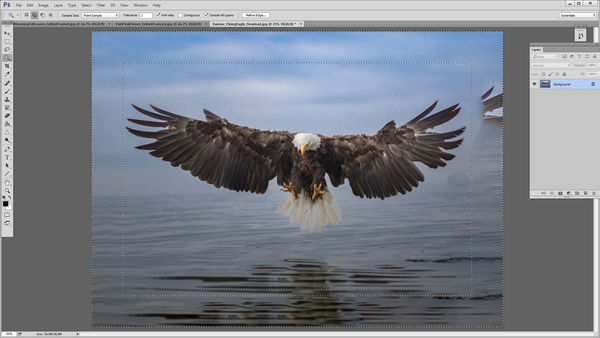
Step 3. Expand the selection by using the Magic Wand Tool and clicking in the yellow color. Then go to Select>Modify>Expand and expand the selection by 2 pixels.
Step 4. From the top menu, select Edit>Fill> Content-Aware, Color Adaptation box checked, Normal, 100% Opacity, and click OK. To clear the selection upon completion of the fill, chose menu items Select>Deselect.
Step 5. Clean up the extra wing that was added using the Clone Stamp Tool, select a small swatch of color next to the eagle's wing and cover up the extraneous pixels with complementary colors (you can also use the Spot Healing Brush Tool to do this).
Now you can re-crop the photo to take out any extra border you don't need. I notice the content aware tool replicated the birds reflection and you might want to crop out some of that.
Open the original photo
Step 1. Expand the Canvas Size. From the top menu, select Image>Canvas Size. Change the units to pixels, add 800 each to height and width and change Canvas extension color to Other, and from the color palette, select bright yellow
Step 2. After clicking OK in Step 1, the extended Canvas becomes visible
Step 3. Expand the selection by using the Magic Wand Tool and clicking in the yellow color. Then go to Select>Modify>Expand and expand the selection by 2 pixels.
Step 4. From the top menu, select Edit>Fill> Content-Aware, Color Adaptation box checked, Normal, 100% Opacity, and click OK. To clear the selection upon completion of the fill, chose menu items Select>Deselect.
Step 5. Clean up the extra wing that was added using the Clone Stamp Tool, select a small swatch of color next to the eagle's wing and cover up the extraneous pixels with complementary colors (you can also use the Spot Healing Brush Tool to do this).
Now you can re-crop the photo to take out any extra border you don't need. I notice the content aware tool replicated the birds reflection and you might want to crop out some of that.
Step 1 - Edit Canvas Size
Step 2 - Extended Canvas Size becomes visible
(Download)
Step 3 - Expand selection to include 2 pixels of original photos
Step 4 - Edit>Fill> Content-Aware, Color Adaptation box checked, Normal, 100% Opacity
(Download)
Step 5 - Clean up extra pixels with the Clone Stamp Tool
(Download)
Oct 6, 2015 15:15:20 #
Thank you very much!
dannac wrote:
If you mention your PP program, someone can give you specific directions ... but you can usually use the crop tool in reverse.
Oct 6, 2015 15:24:22 #

Curl wrote:
I have received feedback that this image is cropped too tightly. Can anyone tell me how I would go about extending the borders?
I think this is what you are looking for?
I use PS CC 2015. With PS there are a lot of different ways to accomplish the same thing. There's no right or wrong way, only good and bad results.
First, I double-clicked on the original layer to create a transparent background. Then I selected the crop tool, grabbed the center node while holding the option (Mac) key. That extends both the left and right side evenly.
From here I used the Content Aware Move tool and selected a portion of the bottom left, then moved it around to an open area. I also used the Clone tool to create the area close to the wings and recreate portions of the clouds.
I then just copy and pasted certain areas of color that I need to separate layers and then I used a custom smudge brush to blend/paint in the rest.
That is pretty much what I did to extend the image. Others may do something completely different to achieve the same results.
Hope this helps. ;-)

Oct 6, 2015 15:33:59 #
Oct 6, 2015 15:41:26 #
Curl wrote:
Thank you very much!
You are most welcome. BYW, that's a tremendous shot! Where was it taken?
Oct 6, 2015 15:54:54 #
Oct 6, 2015 16:46:31 #
Curl wrote:
Shot was taken at Vittoria Ontario - not far from Hamilton.
I know the area. Very nice. Now that you've seen a couple of different options/techniques now you need to pay attention to detail. the first technique just repeats some of the areas and it stands out like a sore thumb. Judges will notice that type of thing straight away.
It all comes down to being as creative as your skills will let you be. My technique is not as quick, but I feel it will allow you much more creativity and a more realistic finish.
Just practice and do what is most comfortable for you.
Oct 6, 2015 20:28:20 #
Bob Yankle - You did a top-notch job of expanding the background around spread eagle. Your final image enlarges beautifully. And your tutorial is well explained. Kudos to you. :thumbup:
Oct 6, 2015 21:18:05 #
Nikonian72 wrote:
Thanks for the kind words Nikonian. This is one of the few times I would NOT recommend leveling the horizon (the waterline has a definite port list), because the outspread wings of the eagle are the center of attention and look pretty good just as they are now.Bob Yankle - You did a top-notch job of expanding the background around spread eagle. Your final image enlarges beautifully. And your tutorial is well explained. Kudos to you. :thumbup:
Oct 7, 2015 03:55:26 #
Bob Yankle wrote:
I am focused on the eagle, and never noticed the horizon line.This is one of the few times I would NOT recommend leveling the horizon (the waterline has a definite port list), because the outspread wings of the eagle are the center of attention and look pretty good just as they are now.
Oct 7, 2015 06:56:14 #

Bob, thanks for the explanation and excellent Tutorial. Works in my CS5. Gary
Bob Yankle wrote:
In PS CC 2015, do the following (works only in PS ... (show quote)
Oct 7, 2015 08:43:15 #
Bob Yankle wrote:
In PS CC 2015, do the following (works only in PS ... (show quote)
Bob, I do like the ease of this technique and I can certainly use it for future projects and I thank you for posting it. That said and with all due respect, however, I do have some technical issues with this process for this particular piece.
The Content Aware tool is a good tool, but it is essentially just duplicating certain areas which is great, except in this case as a one-step fix.
I have highlighted what I feel are some problem areas. Content Aware has certain algorithm issues. Firstly, as I have highlighted in No.1 and No.2 Content Aware is not seamless and it has left blank ares where highlights and/or shadows should appear in the waves. Secondly, it duplicates certain areas in an unnatural, repeating pattern (see No. 3). That's a dead giveaway in our retouching process.
However, the biggest and most noticeable issue is with the second reflection of the eagle as seen in No. 4. One eagle; one reflection.
Like I said, there are many ways in PS to do the same thing there's no right way or wrong way. However as photographers, we also need to hone our skills on the retouching side of things. My example did take longer than yours and a bit more knowledge and practice about certain techniques is required. In a case like this, it's up to us to fool the person viewing the image to make them think what they are seeing is the out of camera shot.


Oct 7, 2015 10:26:39 #
Good points Donolea. Pehaps next time you can use that detail-oriented mind of your's to fully illustrate your own solution to a problem in addition to the text. Some of the folks who frequent this forum are editors themselves, and know pretty much what you're talking about. Others come here for the first time, trying to learn what we know. Detailed instructions are generally well received.
In my own defense, I did suggest in the last sentence of my presentation that the OP might want to crop out the dual reflection in the water. I'm curious, though, why you left in an apparent "smudge" to the right of the eagle's wing.
In my own defense, I did suggest in the last sentence of my presentation that the OP might want to crop out the dual reflection in the water. I'm curious, though, why you left in an apparent "smudge" to the right of the eagle's wing.
If you want to reply, then register here. Registration is free and your account is created instantly, so you can post right away.