Before and After 1
Sep 4, 2015 11:25:39 #


Sep 4, 2015 11:30:40 #

buddah17 wrote:
Just learning, and finding it's not easy!!!
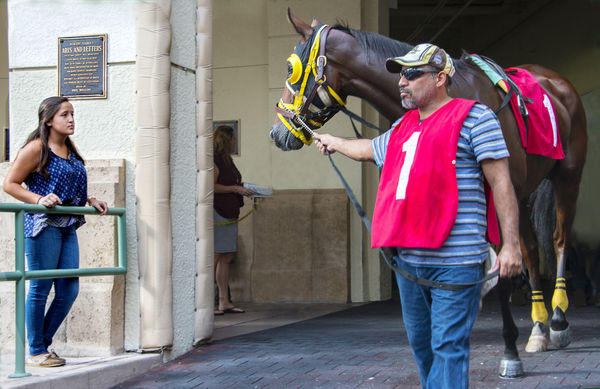
Okay Buddah17, I see what you've done and the after shot is much better that the before. I have to ask though did you clone one person out in that back doorway area and if so why didn't you clone both of them out. Your color saturation in the after shot is more to my liking, but I'm a saturated color kinda guy. Keep going you're doing fine. :thumbup:
Sep 4, 2015 11:37:30 #
I agree I needed to clone out the second person. But I am so basic in this, that it takes me a LONG time to do even the first one. The shot is pretty straight forward, I liked the horse "eyeing" the girl. I am posting some more that may be more to your liking...
jwt wrote:
Okay Buddah17, I see what you've done and the after shot is much better that the before. I have to ask though did you clone one person out in that back doorway area and if so why didn't you clone both of them out. Your color saturation in the after shot is more to my liking, but I'm a saturated color kinda guy. Keep going you're doing fine. :thumbup:
Sep 4, 2015 18:52:10 #
Hello William, I see your using CS6.
You straightened the photo = good.
When you decide to clone something out of a photo. You might find it easier if you select what you want to clone out. I will sometimes use the fine edge to widen the selection a few pixels. This will help prevent a line once you release the selection. The selection will help in that it will keep you from over shooting the target area keeping in the desired space. I also like to do my cloning before I start with the effects. This will help hide and cloning mistakes. One thing to be aware of is repeat pattern's when cloning. The eye is some how attracted to repeated patterns so it is advisable to move your source point to help reduce this. Another tip is to reduce the opacity which helps reduce the dreaded cloning circle.
Hope that helps. and welcome to the world of PP.
Sep 4, 2015 19:46:21 #
Thanks for your help. A couple questions:
Can you elaborate what you mean when you say "use the fine edge to widen the selection of a few pixels?"
I understand about repeating the pattern, (I tend to rush as this is slow going for me, and hope that the subject matter is strong enough to keep the viewer from searching the background to throughly.)
Why is it when I make the cloning brush bigger, the spot that the pattern is covering still seems to remain small?
When you make the opacity lighter, I am assuming that you keep going over the cloned spot until it is (at least) as vivid/dark as the background?
Thanks again for your help, this stuff is perplexing and I appreciate any help that I can get!!
Bill Houghton wrote:
Hello William, I see your using CS6. br br You ... (show quote)
Sep 4, 2015 20:05:08 #
Refined edge, when you use the Wand or other tool you will see a box labled ReFine Edge, this moves your selection by the number pixels shown in the box. It's not a hard selection but a fade in the selection. I you press Q on the key board, after making your selection, it will come up with a red mask showing you the selected area. Press Q again and it goes away.
Lowering the Opacity, presume you are doing a grass line. grass tends to blend into the tree line above. lowering the opacity will make for a softer blend. It would be same on doing the sky or skin. I helps to blend in changes in shades reducing hard lines.
Your cloning tool has choices on the point Second Selection top tool bar) or pattern you apply, must use the Round Tip as common. Below is the apply pattern, the first is a soft brush which will give you s splatter type of pattern becoming more solid to the center. The second is a solid brush which will copy the pattern all the way to the outside edge. Some will give you an over spray in the circle, I recommend not using this when doing a something on a hard line like a suit suit coat or bracelet. Pratice with it. You see what I'm saying.
Changing the Opacity will allow you blend in. If you doing and open area 100 percent is fine. But your doing a check on a portrait. Another example, in your photo you notice a change in color on the wall behind the man. With a 30 percent opacity it will allow you build the color matching the change in color as you go down the wall better buy going over it a few times. Note: when you use 50 and go over it again at 50 percent it is NOT 100 percent. It is 50 percent of the first application or 75 percent. Hope you understand that. LOL .
Good Luck.
Sep 4, 2015 20:25:25 #
WOW... Sounds like a cerebellum overload to this island boy!!
I grew up in the "pre-computer" age and actually got an AA degree in Fine Arts back in 1972, without having to look at a computer screen.
This stuff is SO much like a episode of Star Track, (or The Jetsons!) So much to digest, and not sure how much time to do so!!
I shall TRY what you are suggesting, and see what happens.. Once again THANK YOU SO MUCH for taking the time to help me.
Bill Houghton wrote:
Refined edge, when you use the Wand or other tool... (show quote)
Sep 4, 2015 20:38:16 #
Sep 4, 2015 21:28:50 #
Would you believe I FORGET about that GREAT resource?
Thanks for the reminder..
Thanks for the reminder..
Bill Houghton wrote:
I have found YouTube to be great resource.
Sep 5, 2015 10:02:23 #
I mislead you last night, REFINE Edge does NOT work with the Magic Wand, it only works Other Selection Tools. Sorry for that bit of Miss information.
Sep 6, 2015 01:18:05 #
Bill Houghton wrote:
Hello William, I see your using CS6. br br You ... (show quote)
You might also try the patch tool or content aware fill to disappear the guys.
If you want to reply, then register here. Registration is free and your account is created instantly, so you can post right away.