Help with removing small speck please
Aug 31, 2015 12:18:51 #
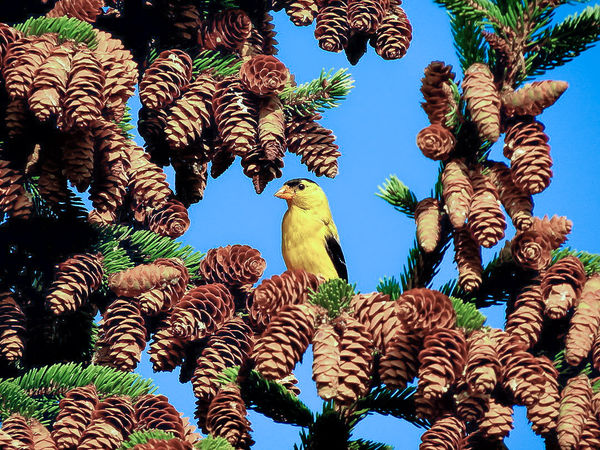
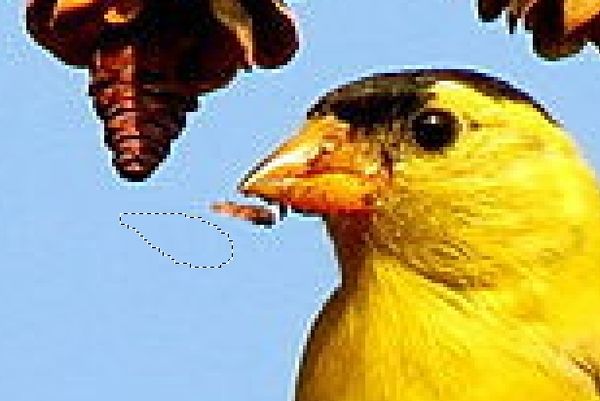
I'm a bit embarrassed to admit it but I don't know how to go about removing the small piece of whatever it is beneath the birds beak. I truly appreciate assistance with removal. Thank you so much !

Aug 31, 2015 12:26:37 #


Aug 31, 2015 12:29:08 #
In Photoshop I suggest you use a small cloning spot picking up the sky just below the object.
Aug 31, 2015 12:39:14 #

There is also a slight colour cast and the colours are a bit hyper. Both points could easily be addressed.
Aug 31, 2015 12:54:17 #
SonyA580 wrote:
Here it is.
Thank you so much!! I will look into getting Photoshop and learning how to use it.
Aug 31, 2015 12:54:58 #
R.G. wrote:
There is also a slight colour cast and the colours are a bit hyper. Both points could easily be addressed.
From the comments by the OP it would seem that he has limited knowledge of how to make post processing changes. I think it would help if you could tell him how to make any changes you suggest.
Aug 31, 2015 13:13:18 #
Thomas H. wrote:
Thank you so much!! I will look into getting Photoshop and learning how to use it.
There are few Programs that are Free that you use to clone.
Gimp - Fairly hard to learn, but is a top notch program of free.
Light Zone - Fairly easy and a few hours to learn, fun to play with.
Searcher has listed both at in the free software listing.
Aug 31, 2015 14:09:14 #
amersfoort wrote:
From the comments by the OP it would seem that he has limited knowledge of how to make post processing changes. I think it would help if you could tell him how to make any changes you suggest.
With some PP software, when you turn up the saturation it boosts yellow more than the other colours. The effect on the bird is fine, but the rest of the picture suffers, in particular the pine cones.
You can counter an overall colour cast using the White Balance (WB) and Tint sliders, and if anything in the shot is refusing to normalise or is becoming unnaturally tinted, you can counter that in the HSL section (Hue, Saturation and Luminosity) which gives you access to the individual colours.
In my posted edit I found that my efforts to subdue yellow and orange were having an adverse effect on the bird, so I selected it and upped the saturation and used the WB slider to shift its colour more to the yellow end.
-
Aug 31, 2015 14:15:33 #
R.G. wrote:
With some PP software, when you turn up the satura... (show quote)
Thanks for that. I think it will help the OP a lot.
Aug 31, 2015 21:19:05 #
R.G. wrote:
With some PP software, when you turn up the satura... (show quote)
Thank you ! I like this very much !
Sep 1, 2015 09:40:29 #

amersfoort wrote:
In Photoshop I suggest you use a small cloning spot picking up the sky just below the object.
In addition, you could easily remove it with Lightroom.
Sep 29, 2015 16:17:40 #
People have suggested using the clone tool in a post processing program, which will work. I would use the lasso tool, myself, selecting the area with the unwanted pixels, feathering that selection a little, and then sliding that selection over into an adjacent blue sky area, copying and then pasting as a new selection which can then be eased into place under the beak.
1,2,3- easy.
Mike
1,2,3- easy.
Mike


Sep 29, 2015 18:33:53 #
Sep 29, 2015 18:45:35 #
If you want to reply, then register here. Registration is free and your account is created instantly, so you can post right away.