Check out Professional and Advanced Portraiture section of our forum.
Looking for some feed back
Jun 6, 2015 12:31:00 #

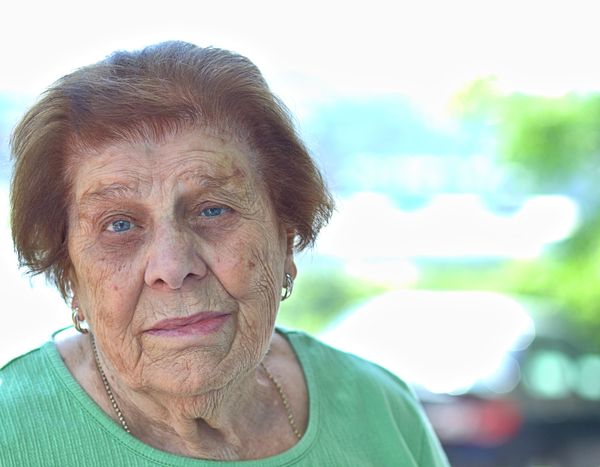
I am trying to improve my skill levels in portraits. I am aware that lighting is ever thing . This shot was taken out side with harsh back lighting on mothers day 2015.
What could I have done to improve this shot under these conditions? saying hello from Pittsburgh.
What could I have done to improve this shot under these conditions? saying hello from Pittsburgh.
Jun 6, 2015 13:29:44 #

northsidejoe wrote:
I am trying to improve my skill levels in portraits. I am aware that lighting is ever thing . This shot was taken out side with harsh back lighting on mothers day 2015.
What could I have done to improve this shot under these conditions? saying hello from Pittsburgh.
What could I have done to improve this shot under these conditions? saying hello from Pittsburgh.
Joe,
In any portrait the single absolute necessity is focus on the eyes...this gets really close, just a touch soft, but close enough to see the proverbial "window" that they provide...and here that direct gaze and the reactions and emotions it elicits is the total impact!
It is an open, frank, totally honest gaze ...totally absent of guile...of concealment...ask any question, you'll get a complete and honest answer.
how often do we really capture exactly that?
technically no changes necessary.
Composition ould be improved simply by bringing her face closer to center, given her straight-on gaze, dead-center would work well. Crop from the right until you have it.
It's gripping of the viewer's attention.
i'm not, by any means, experienced in accomplishing portraiture, but am experienced in reacting to strong portraiture.
This is strong portraiture.
I'll be very interested in the comments of the more accomplished portraitists here in UHH.
Dave
Jun 6, 2015 15:15:04 #

I have to agree with Dave. The focus on the eyes is so important. The light does not do this photo any favors. On a day like this it is important to find shade for your subject. The expression is very natural and warm .. you nailed that. I shot some graduation photos yesterday. I had to shoot some in harsh light because of circumstances .. but I did get the graduate to move to a shady place after I shot the necessary ones that I had to get without moving her. The ones in the shade turned out beautifully. It makes such a difference!
Jun 6, 2015 19:25:25 #

You have captured a wonderful expression on her face with a good strong gaze directly into the camera.
The white balance is a little cold in my opinion and reacts well to a slight warming. Sharpness is close but again responds well to either a tweak on the clarity slider or using a High Pass layer with Soft Light blend mode.
A trick most portrait snappers do is to whiten the eye whites on a new layer using soft light again and adjusting opacity. Just enough to focus attention on the eyes.
You have certainly captured this ladies soul in your shot and must be commended for that big style.
The light was totally wrong for the shot and unfortunately no amount of PP can cure that. Areas are completely blown with no detail that can be retrieved. Some clever work and painstaking work could repair and mask the background in Photoshop but if this lady is available a re shoot in a shaded setting is a lot quicker and easier. A lovely lady and a great model sensitively treated
Jun 7, 2015 09:42:11 #
I have to say that the photo is very good. In photo one all I did was to adjust the levels and contrast slightly in Photoshop elements and the photo then pops.. you can change the back ground or blur it out totally along with some minor cropping to even enhance the photo more.. In photo 2 I used a simple program called Portrait Professional that once I made the first adjustment in Photoshop elements, then used this program and it cleans the photo up and you can adjust sections like the eyes, as you can now see they pop even more.
Jun 7, 2015 13:24:23 #

MyPharo wrote:
I have to say that the photo is very good. In phot... (show quote)
I am sorry. The rules in the critique section do not allow for edits.
Jun 7, 2015 15:51:57 #

northsidejoe wrote:
I am trying to improve my skill levels in portraits. I am aware that lighting is ever thing . This shot was taken out side with harsh back lighting on mothers day 2015.
What could I have done to improve this shot under these conditions? saying hello from Pittsburgh.
What could I have done to improve this shot under these conditions? saying hello from Pittsburgh.
As you said, "lighting is everything" in portraiture.
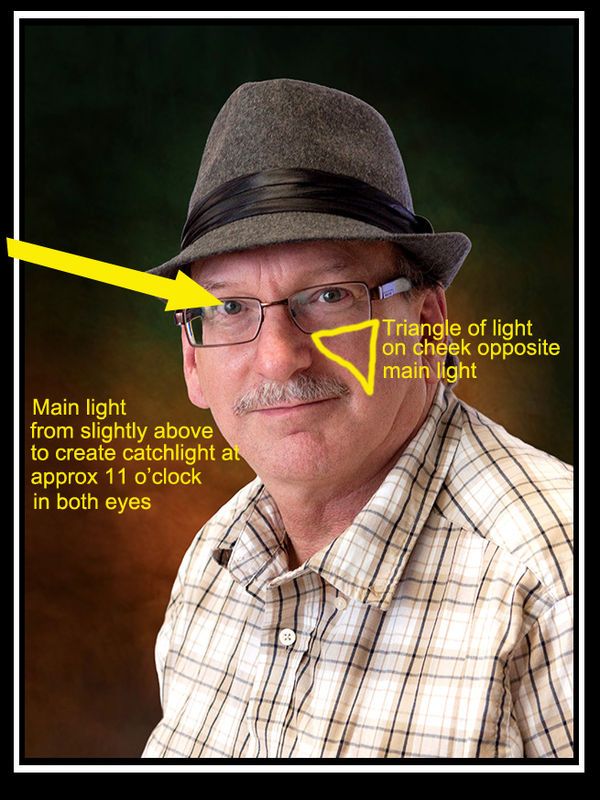
Portrait lighting
Different subjects require different lighting techniques to bring out their best features . . . or to subdue their worst. There is a lighting method that is used more than any other because it is glamorizes most subjects. It is called "short" lighting and the result gives a "Rembrandt" style of lighting. It makes most people look more slim, (and who doesn't want to be slimmer?) and adds wonderful depth and modeling to the image. Here is an example of "Rembrandt" lighting. This is "short" lighting, meaning that the shaded side of the face is towards the camera.
Where you are does not matter, indoors or out. What matters is that in order to use any of the portrait lighting styles one must be able to control the direction from which the light is coming. In a studio this is quite simple as studio lighting is very moveable and controllable. Using existing natural light means that the light source cannot be moved . . . so the subject must be moved to accomplish the same thing. In studio the main light comes from only one source and direction. There is no ambient light being recorded to diminish the effect of the main light.
Out of doors there is light coming from all directions, sometimes harsh (direct sun) and sometimes very flat.(cloudy or foggy) Neither is desirable.
To control the quality and direction of light out of doors, several things must happen. We must get out of the direct sun from any direction, and we must go to where the non-direct sunlight is directional. Enter "subtractive" lighting!!!!
Subtractive lighting is just as it sounds . . . subtracting light from one or more directions. In the studio we have only one main light and we can add others from different directions as we wish . . . . out of doors we start with light coming from all around us, so we want to subtract the light from one or more directions leaving us with "one main light". For example we can move into the shade of a building and as long as the building does not reflect too much light, we have subtracted the light from the direction of the building. Add a roof as we would find on a porch or in a gazebo or under a tree and we have subtracted the light source from above. By repositioning the subject we can have the light fall on the face from the direction we want.
In elaborate on location shoots we also sometimes carry gobos to block the sun. Check out this site for subtractive lighting.
http://crewofone.com/2013/subtractive-lighting-the-secret-to-outdoor-portraits/
Using flash
The above systems are using the existing light as our main light by controlling the subject position and subtractive lighting. Another method is to use the existing light as our "fill" light, and using an off-camera flash as our main light. It's like carrying your own sunlight and is very effective. Simply underexpose the existing light by about 1 F/stop and set the flash for proper exposure. Here is an example.
Hope that helps. Nothing is more fun that accomplishing a great portrait . . . keep on practicing and studying.

Check out Advice from the Pros section of our forum.
Jun 8, 2015 18:18:28 #
Thanks ever one for taking the time to look and give such knowable advice. With the information provided I now realize with a little planning and proper preparation this photo could be so much better. The one question I do have is a blowing out back ground on an outside picture like this not acceptable photography practice? Thanks ever one again saying hello from Pittsburgh.
Jun 8, 2015 18:30:28 #
Hey Joe ... I have seen some beautiful portraits done with the background overexposed. But .. it has to be done well. Since you are learning, I would encourage you to get the basic portrait down first and then branch out into the creative.
I know weddingguy has posted two images on this thread. I am going to leave his post. It is a tutorial, not an edit. There is a big difference. The purpose of this section is to help photographers. I am thrilled that weddingguy has given us his time and shared his expert knowledge.
I know weddingguy has posted two images on this thread. I am going to leave his post. It is a tutorial, not an edit. There is a big difference. The purpose of this section is to help photographers. I am thrilled that weddingguy has given us his time and shared his expert knowledge.
Jun 8, 2015 23:41:57 #
Ok no offence meant. I am the type of person who likes to show the results, as well as help others learn.. I am a visual person . Well I guess this is not the room for me to help others in.
Thank you
Thank you
Country's Mama wrote:
I am sorry. The rules in the critique section do not allow for edits.
If you want to reply, then register here. Registration is free and your account is created instantly, so you can post right away.
Check out Infrared Photography section of our forum.