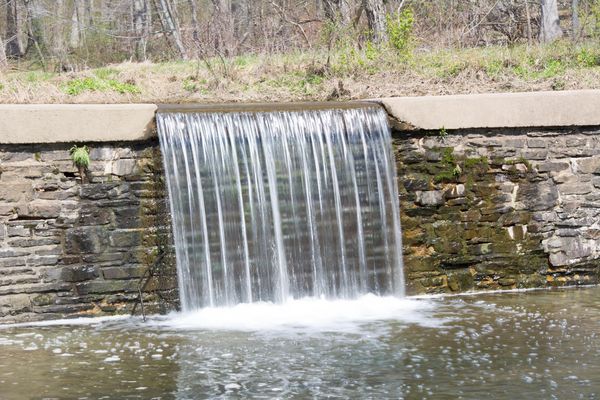
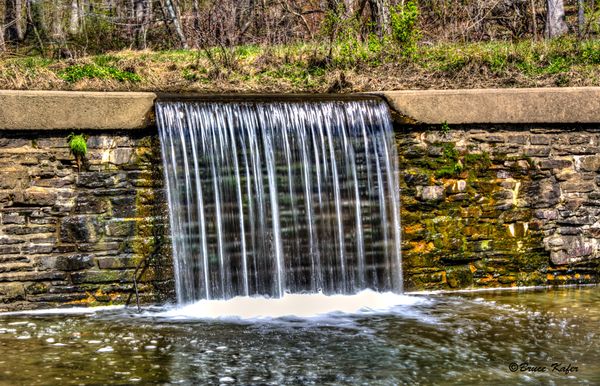
waterfall
Apr 24, 2015 16:32:08 #
Out roaming around, found this, it was very bright day so I used a ND fader filter,
original
HDR
Apr 24, 2015 16:47:24 #

Apr 24, 2015 17:00:24 #

It's an LDR scene and after a lot of work it looks like the exposure was decreased by maybe a stop or 2. The entire scene is bright making it a low dynamic range so why HDR? Why not just shoot it properly exposed?
Apr 24, 2015 17:28:16 #

good job....I'm not a big fan of HDR they always seem to over done for my taste, but your photo is very nice....Tom
Apr 24, 2015 19:09:33 #
I couldnt get a proper exposure, it kept coming out too bright, I used a filter in later exposures which helped a lot. Because I shot it bracketed I put it up here for all to enjoy as this area needs some help...
Apr 24, 2015 20:25:26 #

bdk wrote:
Out roaming around, found this, it was very bright day so I used a ND fader filter,
:thumbup: :thumbup: nice
Apr 25, 2015 06:46:54 #

Its nice for sure but this would respond well to merging the images without tone mapping. Are you a Photoshop user?
Apr 25, 2015 08:29:09 #

Apr 25, 2015 08:48:49 #
bdk wrote:
Out roaming around, found this, it was very bright day so I used a ND fader filter,
:thumbup: :thumbup:
Apr 25, 2015 10:35:09 #

Tom DePuy wrote:
good job....I'm not a big fan of HDR they always seem to over done for my taste, but your photo is very nice....Tom
I agree with Tom. Most overdone, but yours is a ten.
Apr 25, 2015 18:05:18 #
Yes I am a PS user, though I am NOT very good at it. sometimes I tone back my images like the one above and some times I go way overboard it depends on how I feel on any given day
Apr 25, 2015 18:54:54 #
bdk wrote:
Yes I am a PS user, though I am NOT very good at it. sometimes I tone back my images like the one above and some times I go way overboard it depends on how I feel on any given day
Try this on your shots. Will make the water look more natural
OK set your camera to Aperture Priority at the F stop you feel is right for the scene. Set it to take 3 bracketed shots 1 EV (Exposure Value) apart if hand held. You can set it for 5 if you use a tripod. Take the shots.
Download the RAW files onto your PC.
In Photoshop go File>Automate>Merge to HDR Pro.
When box opens Browse and find your Raw files. Tick the box that says Try to aligns files and click OK
Photoshop will chunter wheeze and cough for a few minutes.
Another box opens showing your image.
At the top tick Remove Ghosts and change Mode to 32 bit
Move white point preview slider to get best image and click OK
Image opens in Photoshop. Save this as a 32 bit Tiff.
Thats it job done. Open the 32 bit Tiff, which at this stage looks horrible often, in Camera Raw and process as normal. You have all the information from 3 shots you took in one Tiff image. Cures blown areas and dark areas in one go and with your barn I would guess give you some sky.
http://www.uglyhedgehog.com/t-301085-1.html
This is no great shakes as a photo but was shot in tropical full sun. 3 bracketed images at f8 1EV apart. No dark shadows and nothing blown and no resemblance to an HDR image either which is the conclusion most jump to when they hear bracketed shots.
In bright sun only way to go my man!!!
Apr 26, 2015 19:54:27 #
bdk wrote:
Out roaming around, found this, it was very bright day so I used a ND fader filter,
:thumbup:
If you want to reply, then register here. Registration is free and your account is created instantly, so you can post right away.