Advice re: sharpen Tool"?
Apr 22, 2015 13:51:33 #

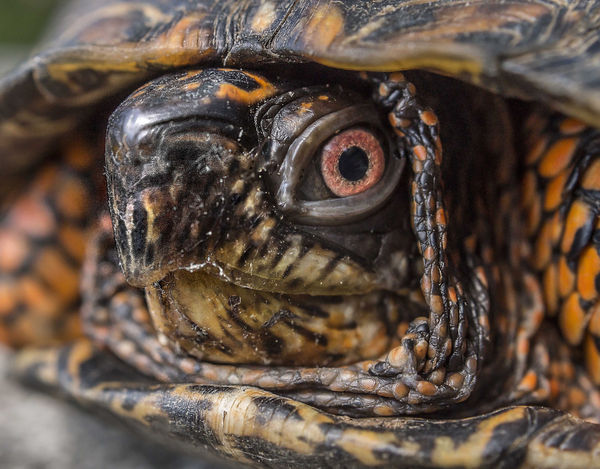
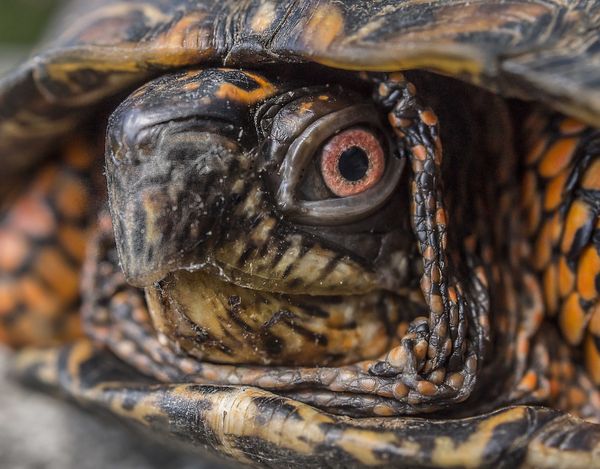
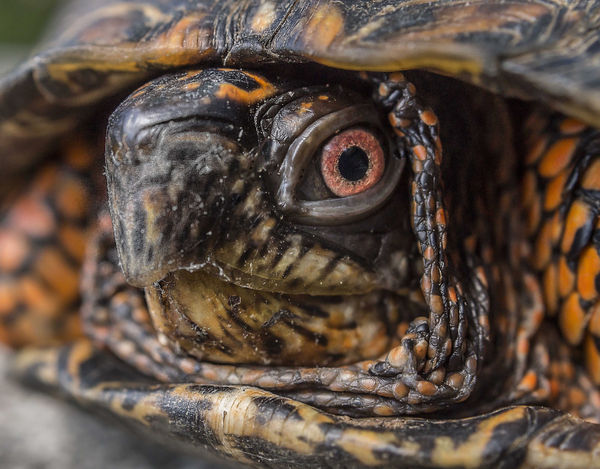
I'm well familiar with the other tools, filters and techniques of sharpening, but, used the "Sharpen Tool" for local sharpening of the nose/beak area of this turtle. I know some adore the "Sharpen Tool" for brush-on local sharpening in PS, but in my hands it fels unrefined and "clumky". I prefer the adjustment brush/sharpening combination of ACR/Lightroom. Just tried the Sharpen Tool here in hopes of getting some specifica advice on getting my head around its controls and refinements..
Anynhelp out there?
Dave in SD
Anynhelp out there?
Dave in SD

Apr 22, 2015 17:07:40 #

Dave, The Sharpen tool can get out of hand real fast! I used the Blur/Darken tool to soften some of the sharpness artifacts and then increased the contrast in levels to give the illusion of sharpness. Not perfect, but I think it looks better
Apr 22, 2015 20:19:47 #
SonyA580 wrote:
Dave, The Sharpen tool can get out of hand real fast! I used the Blur/Darken tool to soften some of the sharpness artifacts and then increased the contrast in levels to give the illusion of sharpness. Not perfect, but I think it looks better
Hi, Sony, and thanks for the input. My problem, though, wasn't getting it sharp, I did that with the ACR adjustment brush using sharpening and positive clarity.
The reason I submitted this version here was to get some substantial suggestions on using the Sharpen Tool...I've heard that it's the cats pyjamas from some fans of it, but it's just...clunky...in my hands. I know I must be doing something wrong and I'd hate to leave a potentially useful tool unused out of ignorance.
Dave
Apr 23, 2015 06:42:14 #
Apr 23, 2015 07:13:05 #
Uuglypher wrote:
I'm well familiar with the other tools, filters an... (show quote)
Dave,
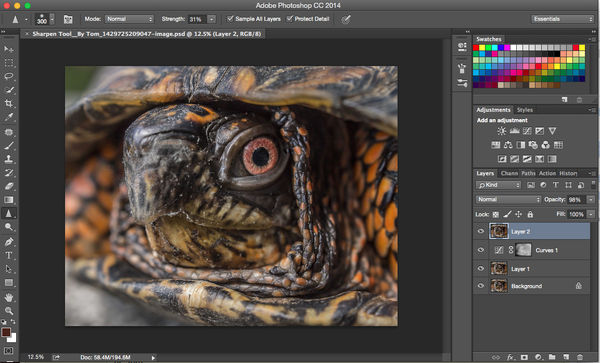
I have to leave very soon, but took just a minute to sharpen your original in PS CC. I made a copy of your image, then I used a curves layer and darkened it selectively just ever so slightly, then I did a Merge All Visible Layers, then I used the sharpen tool at 31% Flow rate and 100% Opacity. I just sharpened the eyes/Iris and nothing else. If too sharp, either decrease the Flow (but never higher than 31%), or you can decrease the opacity slider in the right hand column. Take a look and I will be able to check your reply probably later this afternoon. A little is a lot when sharpening.
Best Regards,
Tom
Better seen in the download! Bye for now!!!
Apr 23, 2015 07:32:25 #
Patw28 wrote:
You nailed that one! Lol.Using high pass filter with layer mask helps protect me from myself.
Apr 23, 2015 09:36:17 #
trc wrote:
Dave, br br I have to leave very soon, but took j... (show quote)
xxxxxxx
hi, Tom,
Thanks for your resoonse specifically re: the Sharpen Tool.
i want to be certain that we are using the same terms.
Size is obvious.
I find no "flow rate" . Is that your term for "spacing"?
When you refer to "opacity" are you refering to "hardness"?
Also, what are the circumstances when you might wish to alter the angle?
Our differences in terminology suggest that we may be using different editions of PS. I'm using PSCC. Which one are you using?
Dave
Apr 23, 2015 11:24:17 #
RRS
Loc: Not sure
Uuglypher wrote:
xxxxxxx br hi, Tom, br Thanks for your resoonse sp... (show quote)
Well Tom is gone so I'll give it a try. When you use the sharpen tool you can go too far and then you "turn down the volume" so to say with the opacity slider which is located on the right hand side just above your layers. It will be at 100% and you slide it to the left to reduce your over sharpening. Play with it , it's in real time and you can see the changes. It also helps to have your image at 100% to be able to better see and adjust what you are working on. Hope this helps.
Apr 23, 2015 11:37:46 #
RRS wrote:
Well Tom is gone so I'll give it a try. When you use the sharpen tool you can go too far and then you "turn down the volume" so to say with the opacity slider which is located on the right hand side just above your layers. It will be at 100% and you slide it to the left to reduce your over sharpening. Play with it , it's in real time and you can see the changes. It also helps to have your image at 100% to be able to better see and adjust what you are working on. Hope this helps.
Thank you, RSS. I appreciate your input. I'll give it a go.
...
brief time passes...
Gave it a go. Definitely more refined control. I'm sure that's what Tom was talking about as well.
Many thanks.
Dave
Apr 23, 2015 12:59:30 #
Uuglypher wrote:
xxxxxxx br hi, Tom, br Thanks for your resoonse sp... (show quote)
Hi Dave - I'm Back!
My apologies out to you. In my hurried and rushed state this morning trying to quickly work on your image and thinking about getting out of here for work, I misrepresented myself - stuff happens. The strength, not the flow rate, should be no more than 31-32%. You should also make sure you Sample All Layers, and, Protect Detail. Also, there is no opacity at the top of the PS CC window - once again, I was thinking of what is present when doing a curves layer adjustment. Wow, I can certainly see why you were confused. :)
As RSS has stated in my absence, the opacity slider is in the right column and can be moved to the left for decreasing the opacity, and, hence, whatever change you make if applicable. Also as he said, have your image up to 100% to see the real affects made by your changes and also to be able to 'see' your image.
As an aside, whenever you do have Opacity as a % changeable property using a tool, always keep it at 100% at the top of your PS CC screen. That way, you can always adjust it (lower it) using the Opacity slider on the right hand column above the layers. If you reduce the % opacity or flow or Strength at the top of the PS CC screen, you can never get that back once you make the change (perhaps you can delete the layer and then start over from scratch).
Quote:
Patw28 wrote:
Using high pass filter with layer mask helps protect me from myself.
Using high pass filter with layer mask helps protect me from myself.
You can use the High Pass Filter which is excellent at times, but it is also a Global change and affects your entire image under normal usage. Also, beware you don't make your numbers too high since over sharpening (especially on an entire image) can be deadly and quite destructive. As I mentioned before, a little sharpening goes a long ways. You can always apply another layer and sharpen more if you feel that is what is needed.
OK, I hope I cleared up a thing or two. Once again, I apologize for my rapid response and confusing comments. Yes, I was using PS CC and I am including a screen image from my computer so you can possibly see what I had done.
Once again, I have to leave, but I will respond to any reply you may add to my comments, here, but later in the day. Hopefully, I didn't make any more mistakes or typos - Hah! :) Thanks Dave for understanding.
Best Regards,
Tom
Layers Defined:
Background - Background Layer
Layer 1 - Copy of Background layer
Curves 1 - Curves Layer - Darkening Selectively (Helps contrast and 'sharpness'
Layer 2 - Merge All Visible Layers & Sharpen Tool Used Selectively with brush
Apr 23, 2015 14:24:22 #
trc wrote:
You can use the High Pass Filter which is excellen... (show quote)
thank you Tom, for your thoughtful and detailed response. And I agree with your cautionary comments re: Hi-pass Blend sharpening.
I really do appreciate the perspectives that came forth in relation to this image.
I often wish we had more sharpening topics discussed here.
Best regards,
Dave
Apr 23, 2015 16:58:36 #
Uuglypher wrote:
thank you Tom, for your thoughtful and detailed response. And I agree with your cautionary comments re: Hi-pass Blend sharpening.
I really do appreciate the perspectives that came forth in relation to this image.
I often wish we had more sharpening topics discussed here.
Best regards,
Dave
I really do appreciate the perspectives that came forth in relation to this image.
I often wish we had more sharpening topics discussed here.
Best regards,
Dave
Dave,
I think your example was a good one for learning and also a refresher probably for some others. That is one thing I like about UHH: People can present an image and it most often times allows for a learning environment for the poster as well as for extraneous viewers.
They may not comment, but usually helpful information is contained in replies to others questions; and, sometimes an educational debate/discussion results with a boost in people's knowledge. That is one thing that often makes a good Photography Forum. Thanks for your contribution, Dave. :)
Best Regards,
Tom (truce) :thumbup:
Apr 23, 2015 22:19:07 #
trc wrote:
Dave, br br I think your example was a good one f... (show quote)
Ahhhhh, I see the word Truce at my signing with Tom & 'Best Regards.' There is no need for a truce since there never was any problem. The word is simply a combination of added letters 'u' and 'e' to what I had typed: Tom (trc).
For some reason, not known to me, my computer feels like it has to add letters sometimes to what I actually type. I suppose it thinks it is a mis-typed word, so it comes up with it's own idea and makes a non-sense word for a given circumstance.
In this case, I simply typed 'trc' since that is what my user name is here on UHH. My computer added a 'u' and an 'e' making it 'truce'! If I don't proof read what I type, often times there are mistakes due to this involuntary adding of letters to words I actually type. My utmost apologies, Dave.
Sincerely,
Tom :thumbup:
Apr 24, 2015 18:16:36 #
trc wrote:
Ahhhhh, I see the word Truce at my signing with To... (show quote)
Obviously, none needed!
Dave
:thumbup:
Apr 24, 2015 19:06:00 #

trc wrote:
Dave, br br I think your example was a good one f... (show quote)
So right! I am one of those chronic non-commenters, and this thread got me playing around intently with my infrequently used Sharpen tool. I have never been a big fan of much localized editing in general if I can help it, and have always felt like sharpening in particular is something typically best left for subtle, global use. The handful of times I can think of when I felt a "need" for localized sharpening, I have tended to use a really big brush with low Hardness (20-50), and set the Strength percentage really low, so I can click it a whole bunch of times, then usually back off a bit in the History to a point where it's not overdone.
I have some downright hideous versions of that turtle pic on my desktop right now.... Thanks!
If you want to reply, then register here. Registration is free and your account is created instantly, so you can post right away.