Two LR questions what is Refine and how to go to Photoshop
Apr 17, 2015 14:40:00 #

Well I have had LR CC since about June of 2014, when Apple dropped the bomb about Aperture. In that time I have come to like the LR program and it has become my default photo-organizer and light editing program.
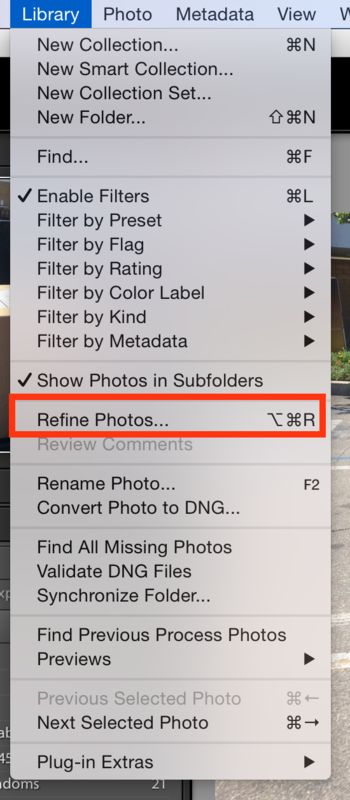
There is a menu option in LightRoom called "Refine Photos..". It's under the library toolbar tab (see attached photo).
Question (1) what does "Refine Photos.." do?
Once upon a time a long time ago I used to use PhotoShop Elements. However I migrated to Aperture at ver 1.0, and eventually over time used Elements less and less as I'm not into heavy graphic-arts type editing, was using it very little, and it didn't make sense to keep buying updates for Elements. But now, since I have the cc I think maybe I should at least explore the Photoshop option.
Question (2) How do I open an image in Photoshop from Lightroom?
Apr 17, 2015 15:00:59 #
I'm fairly new to Lightroom also, have used Photoshop for some years.
I can't answer your first question.
Second question - after doing your edits in LR and you want to send it to PS for further work, go to the toolbar at the top, click on "Photo" and a pull down list appears. One option says "Edit in Photoshop". the file will automatically go to PS. Once you have done your edits there, saved and closed it, it will re-appear in your LR list of files edited.
Apr 17, 2015 16:17:38 #
Jolly Roger wrote:
I'm fairly new to Lightroom also, have used Photoshop for some years.
I can't answer your first question.
Second question - after doing your edits in LR and you want to send it to PS for further work, go to the toolbar at the top, click on "Photo" and a pull down list appears. One option says "Edit in Photoshop". the file will automatically go to PS. Once you have done your edits there, saved and closed it, it will re-appear in your LR list of files edited.
I can't answer your first question.
Second question - after doing your edits in LR and you want to send it to PS for further work, go to the toolbar at the top, click on "Photo" and a pull down list appears. One option says "Edit in Photoshop". the file will automatically go to PS. Once you have done your edits there, saved and closed it, it will re-appear in your LR list of files edited.
Well thank you. How did I miss that?
So that covers question 2.
Apr 17, 2015 16:29:46 #

quick google..
http://www.youtube.com/watch?v=t3rz_VaChAA
http://blogs.adobe.com/jkost/2014/02/refine-photos-in-lightroom.html
http://www.outdoorphotographer.com/community/blogs/in-the-zone/lightroom-quick-tips.html#.VTFskZOA3To
http://www.youtube.com/watch?v=t3rz_VaChAA
http://blogs.adobe.com/jkost/2014/02/refine-photos-in-lightroom.html
http://www.outdoorphotographer.com/community/blogs/in-the-zone/lightroom-quick-tips.html#.VTFskZOA3To
Apr 17, 2015 17:15:46 #
lightcatcher wrote:
Well thank you. Glad I didn't punch it to see what it does! LOL.
That's an interesting workflow, black and white so to say. Picks and rejects with no middle ground.
Apr 17, 2015 17:53:18 #
JD750 wrote:
Well thank you. Glad I didn't punch it to see what it does! LOL.
That's an interesting workflow, black and white so to say. Picks and rejects with no middle ground.
That's an interesting workflow, black and white so to say. Picks and rejects with no middle ground.
You are welcome glad it helped. :thumbup:
Apr 17, 2015 20:41:02 #
OR, right click the photo and select Edit In then select Edit In PS CC 2014 which is easier and less clicks.
Apr 18, 2015 01:53:04 #
grusum wrote:
OR, right click the photo and select Edit In then select Edit In PS CC 2014 which is easier and less clicks.
Yes that works too! Thank you. I don't know how I missed that. Thank you for the tip.
There is another option "open as smart object in Photoshop". What is that?
Apr 18, 2015 05:29:59 #

grusum wrote:
OR, right click the photo and select Edit In then select Edit In PS CC 2014 which is easier and less clicks.
Or Ctrl-E for PC and Option-E for Mac or whatever that key is called. LOL
Apr 18, 2015 05:38:29 #
JD750 wrote:
Well I have had LR CC since about June of 2014, when Apple dropped the bomb about Aperture. In that time I have come to like the LR program and it has become my default photo-organizer and light editing program.
There is a menu option in LightRoom called "Refine Photos..". It's under the library toolbar tab (see attached photo).
Question (1) what does "Refine Photos.." do?
There is a menu option in LightRoom called "Refine Photos..". It's under the library toolbar tab (see attached photo).
Question (1) what does "Refine Photos.." do?
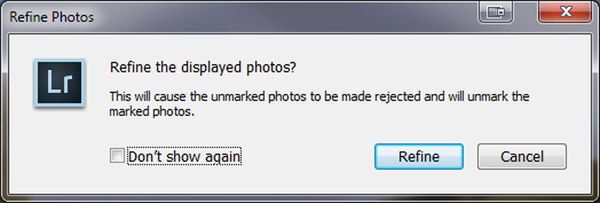
This is what it does. When you are culling through your images you can mark each photo with a shortcut key like "x" that marks an image for rejection, and "P" is flagged and "U" unflags. So pressing the Refine or Ctrl/Alt/R will cause the un marked photos to be flagged as rejected and any that are marked with the P key as a Pick or Flagged, will lose their flag or reset the flag.
Apr 18, 2015 06:26:01 #

There is another option "open as smart object in Photoshop". What is that?[/quote]
No quick explanation, best do a search for "Smart Objects in Photoshop", I do use the option quite often especially if I plan on scaling...re-scaling.
No quick explanation, best do a search for "Smart Objects in Photoshop", I do use the option quite often especially if I plan on scaling...re-scaling.
Apr 18, 2015 11:40:20 #
jeep_daddy wrote:
This is what it does. When you are culling through your images you can mark each photo with a shortcut key like "x" that marks an image for rejection, and "P" is flagged and "U" unflags. So pressing the Refine or Ctrl/Alt/R will cause the unmarked photos to be flagged as rejected and any that are marked with the P key as a Pick or Flagged, will lose their flag or reset the flag.
This is confusing to me or I don't understand its use!
Why would one process 500 images flagging some as rejects and some as picked; then hit the refine key which seems to essentially UNDO everything you have spent an hour doing.
It would mark as rejected all the photos you DIDN'T mark as rejected OR picked and all the photos you marked picked would lose their flag and become unflagged.
I can't see anyway that would be helpful... What do I not understand?
HUH?
Apr 18, 2015 12:11:53 #
grusum wrote:
This is confusing to me or I don't understand its use!
Why would one process 500 images flagging some as rejects and some as picked; then hit the refine key which seems to essentially UNDO everything you have spent an hour doing.
It would mark as rejected all the photos you DIDN'T mark as rejected OR picked and all the photos you marked picked would lose their flag and become unflagged.
I can't see anyway that would be helpful... What do I not understand?
HUH?
I believe it works on the premise that once you load the shots into LR you firstly go through them one by one, to see which are keepers and which are rejected. Once you have gone through that process you then just work on all the keepers.
Apr 18, 2015 12:27:28 #
Jolly Roger wrote:
I believe it works on the premise that once you load the shots into LR you firstly go through them one by one, to see which are keepers and which are rejected. Once you have gone through that process you then just work on all the keepers.
Please reread my question.
IF I spend an hour flagging photos as rejected or as keepers; my NEXT step is to delete the rejects and edit the keepers.
The ones I didn't mark as either rejects or picks sit in my folder till I tire of seeing them occupying space at which time I select and delete them.
At no time would I want to cause the unmarked photos to be flagged as rejected and any that are marked with the P key as a Pick, to lose their flag.
BINGO !!! In typing this I had the Eureka experience.
The refine key does what my third paragraph says I do with the photos at some time in future. It takes all the photos I didn't reject (that were ho hum photos) and rejects them and unflags the Picked photos so that when I delete the rejected photos I end up with only the ones that I had originally picked.
That is as confusing as the editing box not moving but the photo is what moves UNDER the edit box. Whew!
Apr 18, 2015 12:30:40 #
grusum wrote:
This is confusing to me or I don't understand its use!
Why would one process 500 images flagging some as rejects and some as picked; then hit the refine key which seems to essentially UNDO everything you have spent an hour doing.
It would mark as rejected all the photos you DIDN'T mark as rejected OR picked and all the photos you marked picked would lose their flag and become unflagged.
I can't see anyway that would be helpful... What do I not understand?
HUH?
Why would one process 500 images flagging some as rejects and some as picked; then hit the refine key which seems to essentially UNDO everything you have spent an hour doing.
It would mark as rejected all the photos you DIDN'T mark as rejected OR picked and all the photos you marked picked would lose their flag and become unflagged.
I can't see anyway that would be helpful... What do I not understand?
HUH?
Don't push that button!! LOL.
There were some links provided above by light catcher, that explain it's use. Essentially it's what Jolly Rogers said. It's a workflow tool.
It might work like this. First you run through and pick the best shots from a set. Then you hit "Refine" and hide what are now REJECTS. Now you have a select set that you can edit and then you can re-pick the best of the edits. You can repeat this process to gradually cull down to the very best image or images.
I think it could work well for a case where you have a large number of very similar images. You want to pick the best then edit them then pick the best of those.
Those are just my thoughts about it. Other ideas thoughts or experiences about this are welcomed and encouraged.
If you want to reply, then register here. Registration is free and your account is created instantly, so you can post right away.