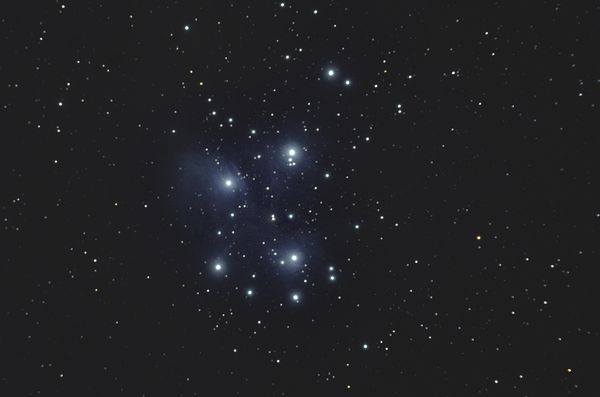
Messier 45/Pleiades
Apr 5, 2015 14:23:24 #
Shot this a couple of months ago, just got around to processing the files.
Constructive criticism is always welcome, thanks for looking.
Matthew
Constructive criticism is always welcome, thanks for looking.
Matthew
Apr 5, 2015 17:43:37 #
Apr 5, 2015 17:51:13 #
Apr 5, 2015 23:39:24 #
Very nice, no cons from here, except it wants me to actually download the TIFF file.
Apr 6, 2015 11:42:15 #

Oknoder wrote:
Shot this a couple of months ago, just got around to processing the files.
Constructive criticism is always welcome, thanks for looking.
Matthew
Constructive criticism is always welcome, thanks for looking.
Matthew
This looks really good. I always have trouble with the nebula causing the image to saturate around the bright stars. This one worked out well.
Apr 6, 2015 12:01:25 #
I use photoshop to create a starmask to help preserve the as points so that way all my corrections are done to mid/background space. For lack of a better way of describing my process.
Apr 6, 2015 12:25:53 #
Oknoder wrote:
I use photoshop to create a starmask to help preserve the as points so that way all my corrections are done to mid/background space. For lack of a better way of describing my process.
Can you explain how to create a star mask?
Thanks
Apr 6, 2015 12:25:53 #
Oknoder wrote:
I use photoshop to create a starmask to help preserve the as points so that way all my corrections are done to mid/background space. For lack of a better way of describing my process.
Can you explain how to create a star mask?
Thanks
Apr 6, 2015 13:11:35 #
in Photoshop you create a duplicate layer of your original starfield, click on the layer of the stars that you want to protect so that it is an active layer, press Ctrl A to select the whole picture then control C to copy the image. now once you have the image same to your clipboard you create a mask in the regular way, now press Alt while you click on the mask, which should turn your screen pure white since it is only showing the mask. now that just the mask is selected you can press Ctrl V to paste your image in the mask. Now if you press control I this will invert the mask. you can play with your levels so that only the brightest stars are selected. if any of this does not make sense it is probably because I am using Google Voice to type and not really able to proofreadas I'm out cruising the countryside
Apr 6, 2015 13:48:10 #
Oknoder wrote:
in Photoshop you create a duplicate layer of your ... (show quote)
Thank you. I will give this a try.
Apr 8, 2015 09:21:39 #
JimH123 wrote:
Thank you. I will give this a try.
I tried it. Also had to do some Googling to understand it. And the end result is that I really liked what the Star Mask accomplishes. Tried it with several images and was able to produce a superior looking image in all cases.
:thumbup: :thumbup: :thumbup:
Apr 8, 2015 09:37:32 #
yeah sorry my instructions we're a little bit off but I'm glad you figured it outand that it works well for you which in the end is all that matters.
Matthew
Matthew
Apr 9, 2015 04:21:09 #
Nice Matthew!
I'm going to look into that Star Mask technique. It's sounds interesting. And your stars look very good.
:thumbup: :thumbup:
I'm going to look into that Star Mask technique. It's sounds interesting. And your stars look very good.
:thumbup: :thumbup:
Apr 9, 2015 10:46:31 #
I find it's a nice way to stretch your background without blowing out the stars. Now only if I could keep them nice and round I would be happy, far too often I tend to have oblong stars from either flexure or field rotation.
Apr 9, 2015 12:11:00 #
SonnyE wrote:
Nice Matthew!
I'm going to look into that Star Mask technique. It's sounds interesting. And your stars look very good.
:thumbup: :thumbup:
I'm going to look into that Star Mask technique. It's sounds interesting. And your stars look very good.
:thumbup: :thumbup:
There is a learning curve to this tecnique, and I am a novice at it right now. From my early results, the stars really pop, and the background is really black.
But I haven't mastered dealing with nebula and galaxies yet. When strecthing the star mask, there has to be a right level beyond which you destroy the nebula or galaxy. And same for when adjusting the dark portion of the image.
If you want to reply, then register here. Registration is free and your account is created instantly, so you can post right away.