From Sacrifice contest
Feb 28, 2015 16:47:09 #
manofhg
Loc: Knoxville, TN
I just posted this under the critique section, but am posting it here after the suggestion that there may be more advice gained here regarding the "fringe" problem.
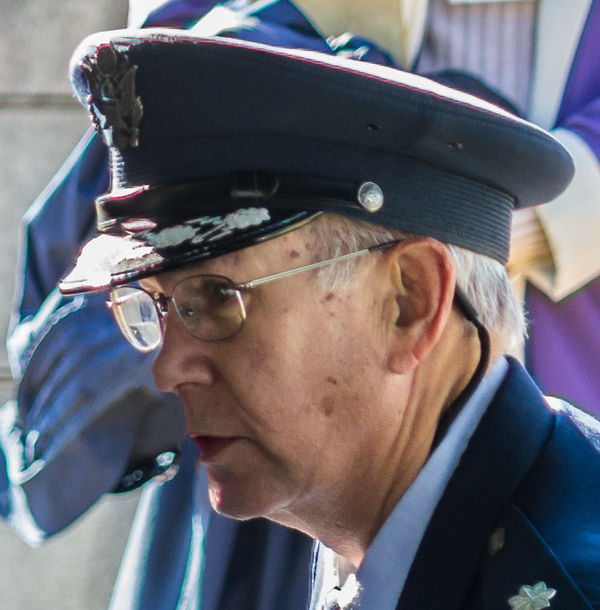
I would like your input on improving how I might have shot the the picture as well as PP. Specifically, I noticed some fringing on the area including the right edge of the folded flag in her lap. I'm not sure if I could have prevented this in how I shot the image or how to remove it in PP.
As for the setting, the little girl on the end (fingers in ears) was expecting the gun salute. The three seated are the daughters and son of the deceased Navy captain.

Feb 28, 2015 17:03:25 #
donrent
Loc: Punta Gorda , Fl
In my opinion, that is a picture that should NEVER have been published...............
Feb 28, 2015 17:03:25 #
donrent
Loc: Punta Gorda , Fl
In my opinion, that is a picture that should NEVER have been published...............
Feb 28, 2015 17:04:16 #

The lighting in general is not very favourable, with such strong back-lighting and with all of the main subjects of interest lacking in direct illumination. However, to get the shot as shown you were stuck with it.
The good news regarding the fringing is that it's all the same colour, which makes it easier to remove, and it's also limited to just a few edges, most of it not too prominent. It also looks like there's nothing important in the shot that's red, so red is an expendable colour.
The most problematic fringing is the stuff on the guy's face. If your software's de-fringe tool can't sort his face, some careful selection and adjustments should fix it. I suspect that even if the de-fringe tool can get rid of the red fringing on the face, it will leave grey areas where the fringing was, so the face will still need further PP.
You don't say what PP software you have, so it's difficult to comment further.
Feb 28, 2015 17:27:42 #
manofhg
Loc: Knoxville, TN
R.G. wrote:
The lighting in general is not very favourable, wi... (show quote)
Thanks for your comments. I use Lightroom and Elements 12, but am not very good with Elements so far.
Feb 28, 2015 17:42:16 #
If you think that Lightroom might recognise the lens that you used, you could try opening BASIC in the Lens Corrections section and tick all of the boxes, which will correct lens distortion as well as remove the fringing.
However, LR has to identify the lens first (if it can it will do this automatically). If it can't you'll have to do the de-fringing manually, as described below. (If it was a Canon lens, there's a good chance that LR will recognise it). You might also have to select PROFILE in the Lens Correction section and check the "Enable Profile Corrections" box (if that hasn't been done already).
For manual removal of fringing, you would first need to open the COLOUR section in the Lens Correction section, then check the "Remove Chromatic Aberration" box. Then (if I remember correctly) you should be able to use the eye dropper to select the fringing that you want to get rid of. You would then just have to move the pointers on the Purple Hue slider so that they contain the colour red (or red/magenta), then move the Amount slider to suit. Since the guy's face will be the difficult bit, it might be an idea to use the eye-dropper to select the fringing on the face first. If that goes, you'll probably find that the other fringing will go as well.
Feb 28, 2015 18:11:51 #
manofhg
Loc: Knoxville, TN
R.G. wrote:
If you think that Lightroom might recognise the le... (show quote)
When importing into Lightroom, I've set up the preset to select the camera, lens, remove chromatic aberration, etc. What I posted was what was left. I found that if I increase the highlights slider, that much of the fringe goes away, but then the stone in the background becomes much brighter and detracts some from the rest of the image. Didn't get much help from the eye dropper either. I did do some manual that turned it gray as you said it would and that is better.
Feb 28, 2015 18:27:48 #
manofhg wrote:
When importing into Lightroom, I've set up the preset to select the camera, lens, remove chromatic aberration, etc. What I posted was what was left. I found that if I increase the highlights slider, that much of the fringe goes away, but then the stone in the background becomes much brighter and detracts some from the rest of the image. Didn't get much help from the eye dropper either. I did do some manual that turned it gray as you said it would and that is better.
If you're still not happy with what you have you could take advantage of the fact that red is pretty much totally expendable. You could open up the HSL section (in HSL/Colour/B&W) and experiment with the red Luminance, Saturation and Hue sliders to see what works optimally.
As I said, the guy's face is the trickiest bit, so you'd probably want to adjust the sliders to minimise the fringing there. As you said, lightening is one of the things you can do, but you'll probably find that shifting the hue towards orange a little will help, then you can adjust the saturation to suit (you'll probably find that weakening the colour a fair bit will be the best option - but not so much that it greys out.
The bright bits in the background are so bright I'd be inclined to select them and tone them down quite a bit. And if you haven't already done so you'll find that lifting Shadows and toning down Highlights (both fully) will help the overall exposure. You might find that after that the Contrast needs to be increased (to suit) and the Blacks slider might need readjusting to restore some proper blacks.
Feb 28, 2015 18:30:25 #
manofhg
Loc: Knoxville, TN
R.G. wrote:
If you're still not happy with what you have you c... (show quote)
Thanks. I'll try some of that.
Feb 28, 2015 18:50:38 #
manofhg wrote:
Thanks. I'll try some of that.
Just an afterthought - red is probably not the only colour that you can try. It looks like magenta is totally expendable too, and while the background bystander's coat is purple, its exact colour is not significant, so there's some leeway with purple as well.
Feb 28, 2015 19:38:12 #
manofhg
Loc: Knoxville, TN
R.G. wrote:
Just an afterthought - red is probably not the only colour that you can try. It looks like magenta is totally expendable too, and while the background bystander's coat is purple, its exact colour is not significant, so there's some leeway with purple as well.
Yeah, I played around with different colors and while one might fix one area, it sometimes messes up another area.
Mar 1, 2015 02:19:15 #

I learned a technique today that can help fix 2 or more different areas of a photo, where fixing one area, makes the other worse or changes it.It involves making a virtual copy of the photo, adjusting one area, without regard to what it does to the rest of the image, making a second virtual copy to fix the next area without regard to what it does to the rest of the picture. additional virtual copies for other areas and fix one at a time. then load all the virtual copies into layers in photoshop add black masks and then paint in the changed area for each picture with white on the mask.
manofhg wrote:
Yeah, I played around with different colors and while one might fix one area, it sometimes messes up another area.
Mar 1, 2015 07:42:10 #
manofhg wrote:
Yeah, I played around with different colors and while one might fix one area, it sometimes messes up another area.
Try creating a selection around one area and make your adjustments. All areas outside the selection will be unaffected. Continue on each area, as above, to be sure your colors are as you want them. Just my 2 cents.
Mar 1, 2015 08:46:39 #

A highly emotional shot, the existence of a shot of such a moment has long and many been debated. So to keep from being a voyeur look at a message by analyzing and changing the real-estate.
If we crop tight, the center most woman with child and on the right, just in front of the presenter's ear... then at the hat brim and below just under the flag. Of course clean junk out... use sinister clouds in background... well then we present a very somber reality of war and death.
IMO... A Very Good Photo-journalistic Shot. I have taken several which received criticism near the time... praise as the "historic" label was given based on passing years.
Mar 1, 2015 10:29:24 #

I'm not all that familiar with LR, however if it has a brush you can select shades of colors adjacent to the area to be corrected and brush it in.
Here is an example by using PS CS5
Here is an example by using PS CS5
If you want to reply, then register here. Registration is free and your account is created instantly, so you can post right away.