Check out Film Photography section of our forum.
Question about a kid with a bad complexion
Jan 8, 2015 12:15:16 #
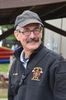
I did senior pictures for a guy here in town (actually did em a few months ago when the weather was better).
Anyway, he's a nice kid, but has a really bad acne problem. We spent a nice morning doing outside shots, some at the beach, some at a couple other places.
His mom was along, so there were shots she wanted, and I went along with it.
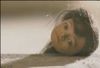
Anyway, I've attached a crop of one of the shots. I did the best I could with his acne, but the best I could do was to get his face down to a mild orange glow.
Have any of you ever encountered this problem, and what, if anything, did you do to correct it.
Thanks for your input.
Anyway, he's a nice kid, but has a really bad acne problem. We spent a nice morning doing outside shots, some at the beach, some at a couple other places.
His mom was along, so there were shots she wanted, and I went along with it.
Anyway, I've attached a crop of one of the shots. I did the best I could with his acne, but the best I could do was to get his face down to a mild orange glow.
Have any of you ever encountered this problem, and what, if anything, did you do to correct it.
Thanks for your input.

Jan 8, 2015 12:29:25 #
repairing this is not particularly difficult, but it IS terribly time-consuming. I do not have the time to go into how to do it, but you DO need to be quite proficient with Photoshop. Some can be done in ACR, but the heavy lifting requires detailed use of the patch tool, clone stamp, the HSL dialog, etc.
This images falls short in a number of areas, not just his acne.
I take it by his expression, he was not really involved with the process.
This images falls short in a number of areas, not just his acne.
I take it by his expression, he was not really involved with the process.
Jan 8, 2015 12:45:34 #
Guess my first question would be did both he and his Mom want the correction done? He's a handsome young man with or without the acne so I can only assume by your input that you did discuss this with them but if not I have had folks who did not want so many corrections done in PS that the photo was totally unrealistic. IMHO I would, if you did not, make sure that the client wants the acne, in this case, removed or lessened. He will most likely grow out of this and might just want his sr photos to be truly representative of what he looked like at that point in time. Some do and some don't...and agree with the good Captain that this young man does not look involved in this process at all.
Check out Close Up Photography section of our forum.
Jan 8, 2015 12:46:24 #

I was using Spot Healing brush, Patch tool and blur tool. I edited only right cheek. Try to finish editing if you like my result.
twindad wrote:
I did senior pictures for a guy here in town (actu... (show quote)

Jan 8, 2015 12:51:59 #

Even though it is not perfect, this a sample of what can be
done with Photoshop, it would take to long to make it ideal.
done with Photoshop, it would take to long to make it ideal.
twindad wrote:
I did senior pictures for a guy here in town (actu... (show quote)
Jan 8, 2015 12:54:18 #

Jan 8, 2015 13:25:00 #
CaptainC wrote:
repairing this is not particularly difficult, but it IS terribly time-consuming. I do not have the time to go into how to do it, but you DO need to be quite proficient with Photoshop. Some can be done in ACR, but the heavy lifting requires detailed use of the patch tool, clone stamp, the HSL dialog, etc.
This images falls short in a number of areas, not just his acne.
I take it by his expression, he was not really involved with the process.
This images falls short in a number of areas, not just his acne.
I take it by his expression, he was not really involved with the process.
Cliff,
Yeah, he really didn't want to be there. I realize this isn't the best shot of a couple hundred I took, but i did want to show the acne.
Unfortunately, I didn't get a chance to meet with him before the shoot. Even if I had , I'm not sure what I'd have done differently.
Thanks, though, for the input.
Check out Traditional Street and Architectural Photography section of our forum.
Jan 8, 2015 13:35:30 #

I still use photoshop elemints 8 and the healing brush can do wonders. If the acne is super bad you may want to just get the worst of it. If you get it all the kid just wont look like himself. With most kids I will tell them that the few zits they have I will zap them. If they have severel pictures it gets so you know just what to zap (healing brush) and goes fast after the first one. _ Dave
Jan 8, 2015 13:51:03 #
To me, the bigger problem with the photo is the flash lighting. The flash looks like it was straight on the subject. You can see the shadow on the wall behind him. The lighting looks very flat. A more appealing lighting effect can be achieved by bouncing the flash of the ceiling and by having the subject a little bit farther from the wall.
Jan 8, 2015 14:02:41 #
haroldross wrote:
To me, the bigger problem with the photo is the flash lighting. The flash looks like it was straight on the subject. You can see the shadow on the wall behind him. The lighting looks very flat. A more appealing lighting effect can be achieved by bouncing the flash of the ceiling and by having the subject a little bit farther from the wall.
Yes, I suppose I should have prefaced this with, "I'm not looking for critique, I'm looking for help with the kid's acne."
But thanks for your input.
Jan 8, 2015 14:27:31 #
I would wonder why it needs to be "Perfect"?
10-20-30 years from now the scaring will remain, and he will always know this picture was over-doctored.
Life is not perfect, far from it.
And I'd bet he is a nice kid. And has probably been picked on his whole life. Most fair complected, red-headed kids are.
I would bring him in and ask his opinion and show him the ropes of the changes you propose.
He might like something in between "as shot" and "Digitally BS'd".
And in doing so, you just might find a budding Photographer. ;)
Respect him and his thoughts. He would probably return the respect. :-D
Check out Sports Photography section of our forum.
Jan 9, 2015 06:16:48 #

Healing brush provides awful results, as does most approaches to bad skin. There are two problems, and the need to be dealt with carefully, unless the "Gumbi" look is what you and the client are after.
Using a non-destructive dodge and burn layer will preserve the skin texture, but diminish the visual impact of the blemishes. They will still be there, but not as obvious. I use two layers, one to diminish the dark tones in the blemishes, and another to dial back the bright tones.
A non-destructive D&B layer is nothing more than a layer, filled with middle gray, with its blend mode changed to overlay. Overlay blend mode is one of the "contrast" blend modes, so middle gray is transparent. If you paint with a white brush, low opacity and low flow (15 and 15 or lowe), you can gradually "lighten" the dark areas, using a tiny brush to pinpoint the action of the brush, and vice versa for using a black brush on things like whiteheads and bright blemishes. Separating the two actions- dodge on one gray layer and burn on the other, makes it easier to edit.
The coloring of a face with bad acne is another challenge. I have had great success with using frequency separation to do this, narrowing the color selection to select all of the red patches and replace the red with a more suitable color, possibly one sampled from another patch of skin that is relatively blemish free.
All of the above is how professional retouchers get the results you see. All the natural skin texture is preserved, but the blemishes are dialed down considerably. Directly editing the pixels is ok for proofs, but not for a final product.
If you don't mind the "gumbi" skin texture - you can run it through Portrait Professional - which does a decent and very fast job at producing better proofs.
You might want to look at this to get some ideas:
http://blogs.adobe.com/jnack/2012/12/demo-non-destructive-burndodge-in-photoshop.html
http://petapixel.com/2013/10/13/photoshop-tutorial-retouching-shiny-skin/
http://www.psdbox.com/tutorials/dodge-burning-manipulation-secrets
http://www.webdesignbooth.com/23-professional-facial-photoshop-retouching-tutorials/
And this is a completely different "complete" retouch tutorial using yellow channel, smart objects, non-destructive D&B and other pretty effective techniques.
http://www.photoshoptutorials.ws/photoshop-tutorials/photo-retouching/retouch-airbrush-skin-photoshop/
Jan 9, 2015 06:25:04 #
twindad wrote:
I did senior pictures for a guy here in town (actu... (show quote)
Portrait Professional, 55 seconds

Jan 9, 2015 06:27:02 #

Plenty of issues with this photo not just acne. Lighting is harsh and straight on, he's too close to the background, I could go on....This type of retouch is not hard, but you do need to be proficient in PS or other layering software. There are plenty of retouch videos available out there, some better than others.
But here is my general rule. If the blemish won't be there in a month, I remove or lighten it. This is something I would discuss with the client (most likely his parent) before the shoot to see how they feel and explain my policy. I can't believe a mother would want a professional photo of her son with acne. I'd be willing to bet she has taken cell phone photos of him that way for posterity. The reason they hire a professional is to get a good portrait.
But here is my general rule. If the blemish won't be there in a month, I remove or lighten it. This is something I would discuss with the client (most likely his parent) before the shoot to see how they feel and explain my policy. I can't believe a mother would want a professional photo of her son with acne. I'd be willing to bet she has taken cell phone photos of him that way for posterity. The reason they hire a professional is to get a good portrait.
Jan 9, 2015 06:39:50 #
Bobbee wrote:
Portrait Professional, 55 seconds
Bobbee - that is a great result.
I used to have difficulty in deciding whether or not to zap facial aberrations, and then decided - if the marks were temporary - remove them. If permanent - retain them, but perhaps tone them down using a bit of transparency. Are you able to be selective with that prog?
If you want to reply, then register here. Registration is free and your account is created instantly, so you can post right away.