Orton Effect using PSE 9
Feb 19, 2012 22:08:04 #
Yes, Orton's site said it was new in PSE 10. Sorry.
CanonShot wrote:
quote=MtnMan Does PSE 9 have the Orton Effect Gui... (show quote)
Feb 19, 2012 22:10:58 #

Of course your's will look less blurry because I added this on top of what you already did ...
Feb 19, 2012 22:14:09 #

MtnMan, I appreciate any and all help to understand the up-front and side issues of this thread. It is simply great to jump in with BOTH feet, thanks to many willing to make suggestions such as yourself. Will learn lots more that way and that is what I am after... always.
MtnMan wrote:
Yes, Orton's site said it was new in PSE 10. Sorry... (show quote)
Feb 19, 2012 22:14:16 #
Here is what I get with the PSE 10 Guided Effect. It has three sliders so you can make it look quite different: blur, noise, and brightness. This is what I kinda liked.
It only takes a few seconds with the tool.
It only takes a few seconds with the tool.
Snow Lady PSE 10 Example

Feb 19, 2012 22:20:05 #
This is one of my photos I did the effect on just now to show you it doesn't normally come out as blurry as how it did adding it on top of something blurred already
Feb 19, 2012 22:24:55 #
photogrl57 wrote:
Of course your's will look less blurry because I added this on top of what you already did ...
Photogrl57, WOW! I need to make one more request. May I post another "street" photo here where you work on it. Luckily, it has a back-up copy... I will go nuts if I make that mistake again.
The reason for the request is that I will see yours, based on your experience with the one-photo Orton Effect. Then, I will try it and see how close I get to yours and post it here. Great of Michael Orton to give permission to push the experimental box around.
Feb 19, 2012 22:25:48 #
CanonShot wrote:
quote=photogrl57 Of course your's will look less ... (show quote)
Absolutely ! Be sure to check (store original)
Feb 19, 2012 22:46:26 #
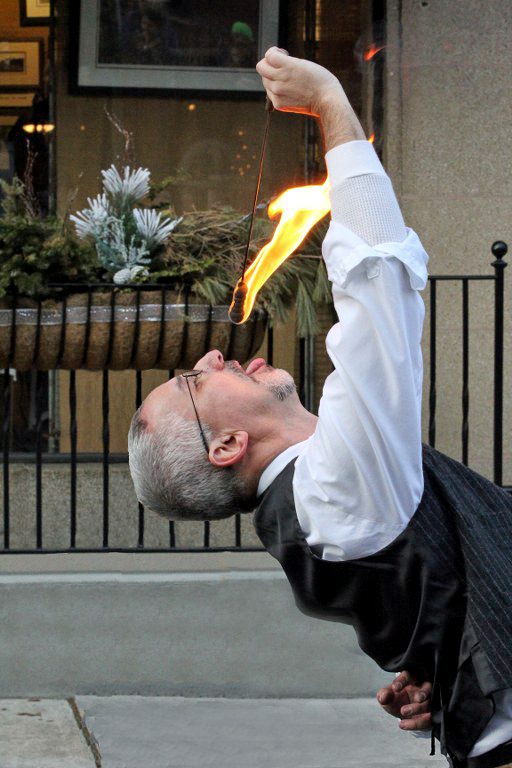
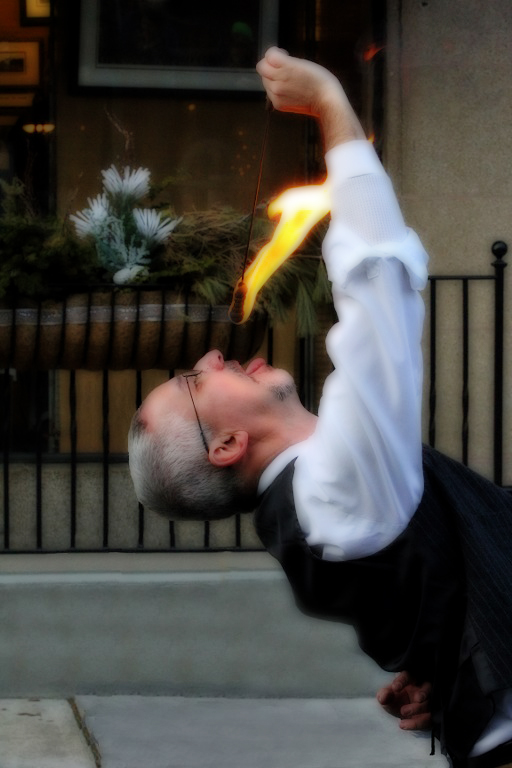
ATTN: photogrl57:
Here's my Friday night fire eating street entertainer for single-photo Orton Effect processing.
Here's my Friday night fire eating street entertainer for single-photo Orton Effect processing.
60D f/16 1/125 ISO 4000

Feb 19, 2012 22:47:25 #
Canonshot:
Lightroom 3's import dialogue, on the right hand side under "File Handling" allows you to "Make a Second Copy To:" I have an external hard drive hooked up to my PC that I make that second copy to. I do a complete backup every week using alternating external hard drives. Only when I have made two backups of a file do I delete it from that temporary "2nd Copy" This basically means that I always have at least three copies of my files: the one on my primary hard drive, the one on the "second Copy to" drive and one on my alternating backup drives. It is important NOT to make that "second copy" to your primary drive, or even a partition on it, because if you have a complete drive failure that backup will not be accessible, either.
Lightroom 3's import dialogue, on the right hand side under "File Handling" allows you to "Make a Second Copy To:" I have an external hard drive hooked up to my PC that I make that second copy to. I do a complete backup every week using alternating external hard drives. Only when I have made two backups of a file do I delete it from that temporary "2nd Copy" This basically means that I always have at least three copies of my files: the one on my primary hard drive, the one on the "second Copy to" drive and one on my alternating backup drives. It is important NOT to make that "second copy" to your primary drive, or even a partition on it, because if you have a complete drive failure that backup will not be accessible, either.
Feb 19, 2012 22:51:24 #
Awesome photo .... Here you go .. I did it in elements to make it easier for you ...
only takes 4 steps
1. 2 layer copies (ctrl/j)
2. middle layer set blending mode to screen
3. top layer .... filter menu/blur/gaussian blur/set to 5.0 pixels ... blending mode in layers pallette to multiply
4. layers menu/flatten image ... then save as (new name)
only takes 4 steps
1. 2 layer copies (ctrl/j)
2. middle layer set blending mode to screen
3. top layer .... filter menu/blur/gaussian blur/set to 5.0 pixels ... blending mode in layers pallette to multiply
4. layers menu/flatten image ... then save as (new name)
original
orton effect
Feb 19, 2012 22:53:29 #
birdpix wrote:
Lightroom 3's import dialogue, on the right hand s... (show quote)
Thanks for your info about LR3 backup. I am "baby new" about LR3 and I am not sure yet what I need to do, but I have somehow made back-up files of my weekend photo shoots. I do have an external 1TB storage drive. Since I know that the back-up files will automatically go to my storage drive, I am wondering if the ones in LR3's Library will end up there also. Will they?
Feb 19, 2012 22:58:53 #
I don't use LR3 much ....but it doesn't actually store the photos does it ? ... I mean all the other programs just access the folder where it uploaded ....
for instance from my memory card my photos go to a folder with that days date in my pictures. Then I drag a copy of the folder to my external harddrive. Once I'm finished with the photos in my pictures I delete that folder and I still have all the original .. plus the edited ones.
I'm not positive about LR but I know Photoshop cs5,Elements 10, Paintshop Pro 4x, Gimp ... etc all access the original folder in my pictures
Feb 19, 2012 23:11:39 #
photogrl57 wrote:
Awesome photo .... Here you go .. I did it in elements to make it easier for you ...
only takes 4 steps
1. 2 layer copies (ctrl/j)
2. middle layer set blending mode to screen
3. top layer .... filter menu/blur/gaussian blur/set to 5.0 pixels ... blending mode in layers pallette to multiply
4. layers menu/flatten image ... then save as (new name)
only takes 4 steps
1. 2 layer copies (ctrl/j)
2. middle layer set blending mode to screen
3. top layer .... filter menu/blur/gaussian blur/set to 5.0 pixels ... blending mode in layers pallette to multiply
4. layers menu/flatten image ... then save as (new name)
How do I set blending mode to screen? Are you using PSE9?
Feb 19, 2012 23:13:37 #
CanonShot wrote:
How do I set blending mode to screen? Are you using PSE9?
photogrl57 wrote:
Awesome photo .... Here you go .. I did it in elements to make it easier for you ...
only takes 4 steps
1. 2 layer copies (ctrl/j)
2. middle layer set blending mode to screen
3. top layer .... filter menu/blur/gaussian blur/set to 5.0 pixels ... blending mode in layers pallette to multiply
4. layers menu/flatten image ... then save as (new name)
only takes 4 steps
1. 2 layer copies (ctrl/j)
2. middle layer set blending mode to screen
3. top layer .... filter menu/blur/gaussian blur/set to 5.0 pixels ... blending mode in layers pallette to multiply
4. layers menu/flatten image ... then save as (new name)
How do I set blending mode to screen? Are you using PSE9?
In the layers pallette there is a dropdown menu that by default says *normal* .. click on that arrow for the dropdown menu and scroll down to screen ... its the same for setting the top layer to multiply after applying the blur
Feb 19, 2012 23:15:16 #
I used pse 10 but that is a basic command that is in pse 9 also that hasn't changed since the beginning
If you want to reply, then register here. Registration is free and your account is created instantly, so you can post right away.