Panorama
Aug 22, 2014 22:45:18 #

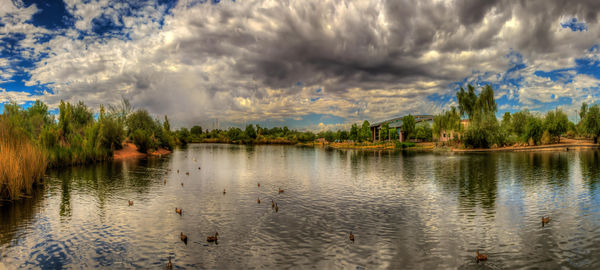
This image was created from 3 shots taken today with my Canon 7D, Tamron 16-300mm lens, ISO 400, f/11, @ 251mm, 1/500. Each image was processed in LR to improve exposure and tone. The 3 images were then loaded in Photoshop and merged into a panorama. The resulting image was then re-imported into LR. I created 3 virtual copies and changed the exposure in 2 of them to make them bracketed. I then exported the 3 new images into Photomatix Pro to create the HDR image. Once that image re-imported into LR I made some final adjustments to achieve the final results. Sounds like a lot, but it didn't really take that long.
C&C welcomed.
C&C welcomed.

Aug 22, 2014 23:33:08 #

It's very pretty George. HDR is one of those tools where a little goes a long way, at least for me. With that sais, I like what you have done with this one. You can tell its been altered but it isn't so over the top that it's unpleasant. Nice job.
Aug 23, 2014 00:56:52 #

Very nicely done. I'm sure it took more than ten minutes to do. To me, it is on the edge of being over done but it does look very good with the clouds and their reflection on the water. Good color. Have a GREAT DAY!
Aug 23, 2014 06:15:54 #

Aug 23, 2014 06:41:17 #

gemlenz wrote:
This image was created from 3 shots taken today wi... (show quote)
I like it George. Just enough Oomph! :thumbup:
Aug 23, 2014 09:25:34 #
gemlenz wrote:
This image was created from 3 shots taken today wi... (show quote)
Beautiful work. I love it! :thumbup: :thumbup: :thumbup:
Aug 23, 2014 09:38:32 #
Not bad at all. The trees loose detail when looked at up close but the image holds up well for normal viewing. Thank you for posting the process along with the picture. Will have to give this some study.
Aug 23, 2014 11:15:06 #

Aug 23, 2014 12:59:48 #

gemlenz wrote:
Seems like a lot of work, but you can't argue with the result. It's beautiful and belongs in your home or studio. Well done!!This image was created from 3 shots taken today wi... (show quote)
Aug 23, 2014 13:26:13 #
Nice shot and lots of work. I do however think the center of your Pano is a bit darker. I always use manual and use the same settings for each shot to avoid processing problems.
JMHO.
John
JMHO.
John
Aug 25, 2014 09:34:15 #

That is one of the best panos I have ever seen - simply outstanding - you should be very proud - could look at it all day!!
Aug 25, 2014 12:25:02 #
thx everyone for the positive remarks. Now if I could just figure out how to crop it to 18x40 and still maintain the wide panorama and not loose a lot of the image in the crop.
I have a frame in my house that size.
I have a frame in my house that size.
Aug 25, 2014 14:46:11 #

I increased the canvas to an 18 X 40 300ppi then selected the photo and with control T. I found the double arrow in the middle at the top, click and drag the photo back down just a couple of pixels, then move upward to the edge of the canvas. Then do the same with the bottom. Next I used the crop tool set at 18x40 and brought the whole thing in using the corner arrows just to make sure there was no blank canvas left.
Aug 25, 2014 17:42:01 #
thx... I did that.. It kinda scrunches it and looses the effect of the panorama...
CajonPhotog wrote:
I increased the canvas to an 18 X 40 300ppi then selected the photo and with control T. I found the double arrow in the middle at the top, click and drag the photo back down just a couple of pixels, then move upward to the edge of the canvas. Then do the same with the bottom. Next I used the crop tool set at 18x40 and brought the whole thing in using the corner arrows just to make sure there was no blank canvas left.
Aug 25, 2014 21:49:50 #
The ratio that you are trying to get (40/18= 2.222:1)is not the same as what the pano is now (132/39= 3.384:1). To make it look right you will need to change your desired dimentions to something more close to the 3.384:1 ratio. A 14 X 48 would work as would a 18 x 60 without lopping off very much of tthe picture. Just plug in your own number for the height then multiply by 3.384 and that will give you an idea of what size you can get. Make sure to work on a copy and convert the copy layer to a smart object before resizing.Good luck
If you want to reply, then register here. Registration is free and your account is created instantly, so you can post right away.