Capturing Startrails
Feb 1, 2012 16:24:30 #
Someday we might have a cloudless night without rain. If so, I want to make startrails.
The way I understand it, I can leave the shutter open for an hour or more with a small aperture. Or, I can take a series of 30-second shots and combine them with Startrails, or another program. The advantage of using many shots is supposed to be that you avoid noise and ambient light.
I would appreciate any comments and suggestions. Tonight might be the night!
Feb 1, 2012 18:21:30 #
I have no first-hand experience, but have heard that extremely long exposures on a digital can cause hot pixels: one that remains on causing a red, blue or green dot. I'd think multiple, shorter exposures would prevent this.
I also understand that this kind of exposure will take the battery down faster than normal, so make sure it's fully charged, or use an external power supply, if possible.
I also understand that this kind of exposure will take the battery down faster than normal, so make sure it's fully charged, or use an external power supply, if possible.
Feb 1, 2012 18:41:03 #
snowbear wrote:
I also understand that this kind of exposure will take the battery down faster than normal, so make sure it's fully charged, or use an external power supply, if possible.
Thanks.
Feb 1, 2012 19:23:25 #

jerryc41 wrote:
Someday we might have a cloudless night without rain. If so, I want to make startrails.
The way I understand it, I can leave the shutter open for an hour or more with a small aperture. Or, I can take a series of 30-second shots and combine them with Startrails, or another program. The advantage of using many shots is supposed to be that you avoid noise and ambient light.
I would appreciate any comments and suggestions. Tonight might be the night!
The way I understand it, I can leave the shutter open for an hour or more with a small aperture. Or, I can take a series of 30-second shots and combine them with Startrails, or another program. The advantage of using many shots is supposed to be that you avoid noise and ambient light.
I would appreciate any comments and suggestions. Tonight might be the night!
Good luck with your startrails! With my camera 30 second shots still have noise in them, but if you have a DSLR you probably not have that issue. I will look forward to seeing the results.... ps I'd try the 30-second shots ;-)
Feb 1, 2012 19:27:03 #
jerryc41 wrote:
Someday we might have a cloudless night without rain. If so, I want to make startrails.
The way I understand it, I can leave the shutter open for an hour or more with a small aperture. Or, I can take a series of 30-second shots and combine them with Startrails, or another program. The advantage of using many shots is supposed to be that you avoid noise and ambient light.
I would appreciate any comments and suggestions. Tonight might be the night!
The way I understand it, I can leave the shutter open for an hour or more with a small aperture. Or, I can take a series of 30-second shots and combine them with Startrails, or another program. The advantage of using many shots is supposed to be that you avoid noise and ambient light.
I would appreciate any comments and suggestions. Tonight might be the night!
I have done several startrails and used the 30 second exposure for 2 or 3 hours (depending how long you can stand the cold), and stacked them in startrails. Another advantage to many shots to one shot, if something freaky happens (passing car ect.), you can delete that image and fix the gap in the trails with the healing brush.
A couple of tips that worked for me:
1) turn off "long exposure noise reduction" and IS
2) find an interesting foreground, just stars is boring
3) "paint" the foreground with light if needed
4) wide as possible, I use 8mm fisheye
5) your lens will be colder than the air temp. this can cause fog to build up on your lens, it has happened to me many times. Solution: get foot/hand warmers that hunters use, activate them, now attach to the lens barrel with a gumband, making sure not to change any settings.
6) follow this link exactly, note CAPS and no "www"
aa.usno.navy.mil/data/docs/RS_OneDay.php
This gives you all the moon seetings for your zip for that day. So even a full moon won't hurt if it sets at 11:00 p.m., and you go out at 11:30. Good luck!! Have fun!!
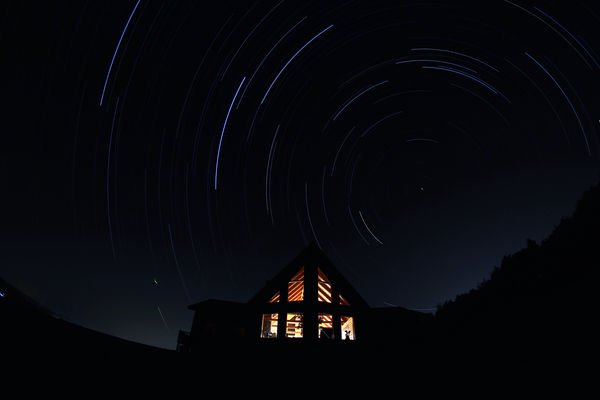
Here is a couple I took.
p.s. a sixpack isn't a bad idea either :thumbup:

Feb 2, 2012 08:07:17 #
I'll drink to that as I'm still waiting for clear skies ~ we've had nothing but clouds !
Feb 2, 2012 08:12:26 #

jerryc41 wrote:
Someday we might have a cloudless night without rain. If so, I want to make startrails.
The way I understand it, I can leave the shutter open for an hour or more with a small aperture. Or, I can take a series of 30-second shots and combine them with Startrails, or another program. The advantage of using many shots is supposed to be that you avoid noise and ambient light.
I would appreciate any comments and suggestions. Tonight might be the night!
The way I understand it, I can leave the shutter open for an hour or more with a small aperture. Or, I can take a series of 30-second shots and combine them with Startrails, or another program. The advantage of using many shots is supposed to be that you avoid noise and ambient light.
I would appreciate any comments and suggestions. Tonight might be the night!
Jerry,
I think you will find this funny but I am laughing like hell as I right this. I was asking what the hell are" Start rails". I had to stop typing I was just laughing too hard. Great way to start my day, with a laugh, thank you. Star Trails will be my word of the day. Still very funny. Thanks.
George
Feb 2, 2012 08:18:47 #
George H wrote:
Jerry,
I think you will find this funny but I am laughing like hell as I right this. I was asking what the hell are" Start rails". I had to stop typing I was just laughing too hard. Great way to start my day, with a laugh, thank you. Star Trails will be my word of the day. Still very funny. Thanks.
George
jerryc41 wrote:
Someday we might have a cloudless night without rain. If so, I want to make startrails.
Tonight might be the night!
Tonight might be the night!
Jerry,
I think you will find this funny but I am laughing like hell as I right this. I was asking what the hell are" Start rails". I had to stop typing I was just laughing too hard. Great way to start my day, with a laugh, thank you. Star Trails will be my word of the day. Still very funny. Thanks.
George
I'm glad I got your day started with a laugh.
Feb 2, 2012 08:23:05 #
jerryc41 wrote:
quote=George H quote=jerryc41 Someday we might h... (show quote)
My friend the older we get the more important those laughs get to be. Again thanks.
George
Feb 2, 2012 09:04:06 #
jerryc41 wrote:
Someday we might have a cloudless night without rain. If so, I want to make startrails.
The way I understand it, I can leave the shutter open for an hour or more with a small aperture. Or, I can take a series of 30-second shots and combine them with Startrails, or another program. The advantage of using many shots is supposed to be that you avoid noise and ambient light.
I would appreciate any comments and suggestions. Tonight might be the night!
Here's help-
Star Trails Basics
There are multiple ways to go about shooting star trails. I will start with the basics that do not change whether you are using an analogue SLR or a DSLR.
Before dialing in any settings you should go ahead and mount your camera onto a tripod. Roughly compose your shot and set the focus.
Focusing
In the dark, it is not easy to get the AF to lock on to anything, but do not worry there are several solutions to this.
If you are including foreground objects I suggest making sure that they are in focus. If you are using a wide angle lens the foreground object and the stars will probably both be in focus even at a very wide aperture. I find that it is fairly safe to just set the focus to infinity if it is a wide angle or fisheye lens right from the start.
Some lenses will not have those markings so shining the light on the foreground subject while using the AF function may work if the flashlight is bright. If not go lay the flashlight on the ground at the base of what you are shooting and focus on that.
Once you have achieved the glorious state of "in focus" be sure to set it to MF or manual focus before starting your exposure or it will start searching again when you start the exposure and you will lose your focus.
Composition
So now you should have your camera focused and set to manual focus (MF) and the shot roughly composed.
When composing the shot try not to include any direct light sources, like streetlights, in the shot.
If you are not using film then I suggest doing a test shot which aids in composing your final shot. A test shot can be made by doing a 2-3 minute exposure at very high ISO and wide aperture. This should be enough to be able to see which direction the stars are moving and allow one to imagine what the final shot will look like.
Recompose the shot if necessary and zoom in on the LCD to double check you focus is accurate.
White balance
White balance set to 10000 Kelvin
White balance could be a whole separate tutorial on its own so I will keep this really brief. If you would like to know more about white balance in general then check out this very comprehensive article.
White balance is the relative warmth or coolness of white light. A white object would appear slightly blue with a cold color temperature and it would look slightly orange with a warm color temperature. I tend to shoot night skies with the white balance set to tungsten which gives a nice blue look or the extreme opposite of 10000 Kelvin giving it a deep orange color. I find that auto white balance leaves the sky brownish or "dirty" looking. You will have to refer to your cameras manual if you do not know how to change these settings.
White balance setting will affect the whole image so if you have included some foreground objects, you will need to consider what you are using to light them with. I use a variety of flashlights for this job and my white balance settings help me to determine which one to use.
LED light is very blue so if you are shooting with your white balance set to tungsten the objects lit with that light may look unnaturally blue. To avoid this I use a xenon flashlight or flashlight with an incandescent bulb which have a much higher color temperature and neutralize the blue effect. A warm light leaves objects lit with them with a natural or true color.
If LED is your only choice then consider putting some orange cellophane over the front to alter the shade of the light but doing this will reduce it effective power.
If I am shooting with my white balance set to 10000K I would generally use an LED which is the exact opposite of the above situation. Its bluish hue would neutralize the high color temperature of 10000K leaving the objects lit with it a natural or true color.
So for a cool white balance use a warm light and for a warm white balance use a cool light for lighting your foreground interest.
Single Shot Vs. Stacking
For shooting options, one could choose to do it all in one shot or shoot multiple shots and stack them after the fact using computer software. I personally find that shooting multiple images and stacking them yields much nicer images than those done all in one shot.
Single Shot
single exposure, 573 seconds, f/4, ISO 800,
25mm
If you are going to do it all in one shot then your biggest concern should be noise. To fight noise, one could use a narrower aperture and a lower ISO speed but these settings will typically not pick up very many stars. If this is the route you are going to take, and I suggest at least trying it, then here are the steps and settings to follow:
Focus and compose the shot.
Set the time value to bulb
Set the aperture to its widest
Set the ISO at 200
try for a 30-minute exposure with a wide aperture of 3.5 - 4.0.
If there is too much noise then drop the ISO to 100 and either shorten the exposure time or try a narrower aperture.
If shooting this way is your only option, there is something that you can do to increase the appearance of the length of the trails in the frame. (remember, those will be limited to due to the short exposure time). The actual length (or appearance of length) of the trails is determined by two factors: Exposure time and the focal length you are shooting at.
For example, stars over a 30-minute exposure would appear much longer in the frame at 50mm than they would at 15mm. If you find that you are limited to shorter exposure time due to noise, or any other factor, try shooting at a longer focal length to increase the appearance of the star trail length in relation to the frame. See this article that explains focal length and relative star trail length.
Stacking
A 90 min stack. Passing clouds broke a few of the trails especially at
the bottom of the frame
My heavily preferred way of shooting is shooting multiple shots and "stacking" them later using computer software. Shooting short exposure pictures means less noise, so one can shoot with a wide aperture and a faster ISO that will pick up many more stars than the previous method.
One can do this because noise becomes much less of a factor. Noise generally increases with time and with stacking, you only have to worry about 30 seconds. That means even at ISO 800 noise will be less of an issue to worry about.
There is even an option to include dark frames, which are frames shot with the lens cap on, so that even the tiny bit of noise from ISO 800 over 30 seconds will be removed.
With the higher end DSLRs and the improvement of sensor noise reduction in newer DSLRs the ISO can be bumped even higher which will result in even more visible stars streaking across the sky. Of course, you will need to find the balance for your camera based on how it handles noise.
For the stacking method it is necessary to use a cable release. It could be done with a remote but then I would recommend shooting much longer exposures than 30 seconds and stacking those, simply because a remote is not as comfortable to use.
You will be shooting possibly hundreds of images so it is important to make sure there is plenty of space on your memory card.
To get started, set your focus and compose your shot.
Set the aperture to its widest and the ISO to 800 for starters.
Dial in 30 seconds for the time value and the drive mode to continuous shooting mode which allows for non-stop shooting when the cable release is locked. (Now you get the cable release thing, right?)
I suggest doing a test shot first to see if everything looks all right before locking that release. If anything is too bright then dial the ISO down. Once you have taken the shots you will need to stack them using software. (More on that in a bit)
What do you mean by "Lighting A Foreground Interest"?
I mentioned above about adding light to the foreground objects and explained a few things to consider about white balance in relation to that. I often include foreground objects to complete the shots because images of just stars sometimes seem to lack a subject (and interest).
I look for interesting buildings, infrastructure or natural objects like big trees or rock formations and make them the subject of the images. I light these foreground subjects with a flashlight or speedlite. A flashlight can reach far places and can be moved around while lighting to remove shadows while a speedlite can freeze a tree that may be moving in the wind.
You will probably use a flashlight most of the time because they are a much more flexible tool and leave the foreground with a much more organic look. I highly recommend doing a few lighting test shots to see how much light is needed before locking that cable release. Too much light will distract from that beautiful star filled sky you are about to create. Remember, for foreground lighting: if you are shooting at low whilte balance, use a "warm" light like Xenon torch; if you are shooting at tungsten white balance, use a "cool" light like LEDs flash light..
If you are stacking then I suggest doing the foreground lighting at the beginning and again at the end. In case one of those is unsuitable for the final shot. You simply exclude those frames from the stack. If it was done in the middle and a mistake was made leaving those frames unusable it would create a break in the trail that would take away from the shot.
A final note for those with experience in night photography, keep in mind that you are now shooting wide open with your ISO jacked so adjust your lighting techniques to accommodate for that with low power flashes or less lighting time with a flashlight.
Stacking software (all free)
StarStaX
This is my favorite software. Unlike other free programs, it runs on Mac and Linux as well as Windows. What I like about StarStaX is the incredible speed. It is waaaay faster than using Photoshop and much easier as it does not require you to create any blank documents to get started. Open up the program and import your images. Hit start and within seconds your image is finished. Check out the homepage to see the great features it has.
Photoshop Stacking action
This method gets the job done but is slow and ties up memory while stacking.
Startrail.exe
One major downfall of this software is that is only available for Windows. I used this a long time ago before I started using Mac. This got the job done and before StarStaX was a way of creating animated time lapse video of the stacks. I think this software has now become old and needs to be revamped if its author wants people to continue to use it.
There you have it, if you got here, you are brave! ma
Star trail photography
You are here: Home Techniques Star trail photography
Star trails to the west, using a 20mm wide angle lens.
Introduction
Since the Earth rotates, the stars are not at fixed places in the sky but appear to move, more or less towards the west. To photograph the tracks the stars make across the sky, all you need is a camera that remains fixed to ground and have it expose for an appreciable amount of time. Such photos can be quite artistic.
The stars appear to rotate around both the north and south poles in the sky, of which you generally only see one. Stars very near the pole are almost stationary in the sky, while stars closer to the equatorial plane move quite fast. All move about 15 degrees per hour in right ascension ("horizontally"), but do not move in declination ("vertically").
Star trail photos are always eye-catching, if done correctly. The major problem doing these exposures is that they can last a long time, like several hours. If you have nothing else to do this will be boring. I make my star trail photos during every photography session that I have at night, provided the sky is clear and I stay a long time at the vantage point. You can combine star trail photography very well with astronomy in general.
What you need
All you need to photograph star trails is a camera with lens that can do time exposures (on 'B' or Bulb mode), a cable release or lockable shutter release, and a tripod. I recommend using an SLR camera.
Any star trail photo needs an exposure time of several minutes up to several hours. Make sure the camera shutter can stay open by itself without your help, and that the batteries don't drain. An old manual SLR camera is ideal.
The choice of lens depends mostly on the composition you choose. If you are at middle latitudes on the northern hemisphere, for example, and want to include both the horizon and the north pole with Polaris in the frame, you will need a wide-angle lens. Wide-angle lenses have the advantage that the star trails will all have slightly different curves, while lenses that have a longer focal length allow for a shorter exposure time to make star trails of appreciable length.
For starters, use a 28mm lens and include the pole and horizon, if that horizon is interesting; otherwise use a 35mm or 50mm lens and a tree or big rock as foreground, with the pole centered in the frame.
The tripod needs to be sturdy enough to not move by wind and such, otherwise the star trails will not be perfect.
Star trails around the north celestial pole.
Exposure times, aperture and film
You should experiment with different exposure times to find out which star trails you like best for your kind of composition: short trails where the constellations are still recognizeable, or long trails to make the photo more artistic. I generally do very long exposure times of over 3 hours using very wide-angle lenses such as 20mm or 24mm, and aim to the east or west, or a telephoto lens that points at the pole with a shorter exposure time of about 30 to 60 minutes.
When you do star trail photography, keep in mind the reciprocity error of film. Every film is subject to this, some more than others. In fact, if you are at a dark location and the glow from cities and the sky itself is very faint, the film may stop responding to the sky background light altogether, except for the stars themselves that are brighter, and thus still produce trails on the film.
You can use this to your advantage. E.g. when doing a 3-hour exposure at f/4.0 on 100 ISO slide film, the film won't be much more fogged than if it would be exposed for 30 minutes! So, unless there is a lot of background glow from the sky, like near cities, you can use low apertures such as f/4.0 or f/5.6. Do not use any lens at its maximal aperture to avoid vignetting, coma, and other abberations.
I recommend using a slow, high resolution slide film like 100 ISO. You won't need a faster film, because the amount of time of your exposure is generally long.
Things to watch out for
If you are using a fast lens and film with short exposure time, you are more prone to have satellites or airplanes, that might fly through your frame, show up on the photo. When using 100 ISO film at f/5.6, most airplanes will hardly be visible if at all, unless they fly overhead or close by.
If an airplane or satellite is going to fly through your frame, you have three choices: either let it pass and hope it doesn't show up, start a new exposure, or temporarily hold a black cardboard in front of the lens while the airplane is in the field (don't touch the lens!). However, the latter option is not so good since the star trails will be interrupted.
This exposure was started with a large lens aperture (f/2.8), a few seconds later carefully reduced to f/16 to produce trails with the stars visible at one end.
Make sure the foreground is not much brighter than the sky; a darker foreground is not a problem.
Variations
You can enhance your star trail photos with some interesting things, once you have enough of the standard star trails:
Seek other composition: trees, tall plants and rocks do great.
Starting an exposure, have the aperture fully open for about a minute when using standard or wide-angle lens, or half a minute if using a telephoto lens. Then very carefully close down the aperture of the lens during the exposure, taking care not to move the camera. This will create bright spots at the beginning of the trail, and the constellations are easy to make out.
Do as above, but hold a black cardboard in front of the lens about 15 seconds after first opening the shutter, for a minute. The trails are then disconnected from the stars.
Periodically hold a black cardboard in front of the lens for a minute or so to create dashed or dotted trails. This may require a lot of devotion and patience though!
Bring a flashlight and "light-paint" the foreground in some color. For standard "white" flashlights, the foreground will become yellow-orange.
Feb 2, 2012 09:21:15 #
Nicely done, but don't forget to mention you have also used Polaris (North Star) to get the nice round star trails.
pigpen wrote:
quote=jerryc41 Someday we might have a cloudless ... (show quote)
Feb 2, 2012 09:24:43 #
Thank you very much greymule, from Colorado. Your tutorial is very helpful. After a couple glasses of wine, I see star trails too. But photographing them, is a completely different animal.
pigpen...I like your photo with the A-frame in the foreground.
pigpen...I like your photo with the A-frame in the foreground.
Feb 2, 2012 09:58:12 #

Feb 2, 2012 10:18:22 #

George H wrote:
quote=jerryc41 Someday we might have a cloudless ... (show quote)
Well, if it makes you feel any better George, I just did the same thing! Wondered what a start rail was. Duh! I need to finish my first cup of coffee!
Feb 2, 2012 10:59:57 #
Pixelpixie88 wrote:
quote=George H quote=jerryc41 Someday we might h... (show quote)
Pixie,
I hope you laughed as hard as I did when I realized what it was, I was in hysterics.
George
If you want to reply, then register here. Registration is free and your account is created instantly, so you can post right away.