Check out Digital Artistry section of our forum.
ETTR Study; the extreme case under sunny conditions
Jul 20, 2014 21:40:02 #
David Popham
Loc: French Creek, British Columbia
In this instance of the study first exposure is over exposed, but it is "exposed to the right" to see what happens under extreme conditions. The second image is an attempt to use software to salvage it. The third file holds the metadata.
the extreme case under bright conditions
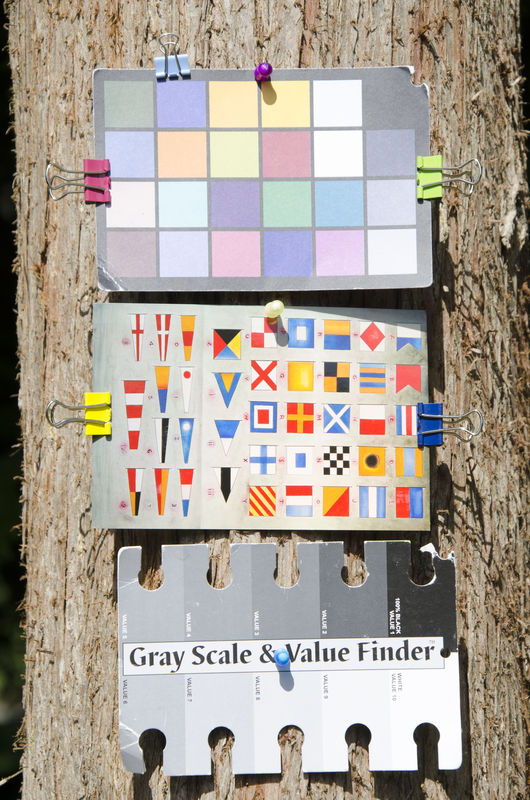
(Download)
salvaging the file
(Download)
the associated metadata
Attached file:
(Download)
Jul 21, 2014 13:37:00 #
Jul 21, 2014 14:56:05 #
David Popham
Loc: French Creek, British Columbia
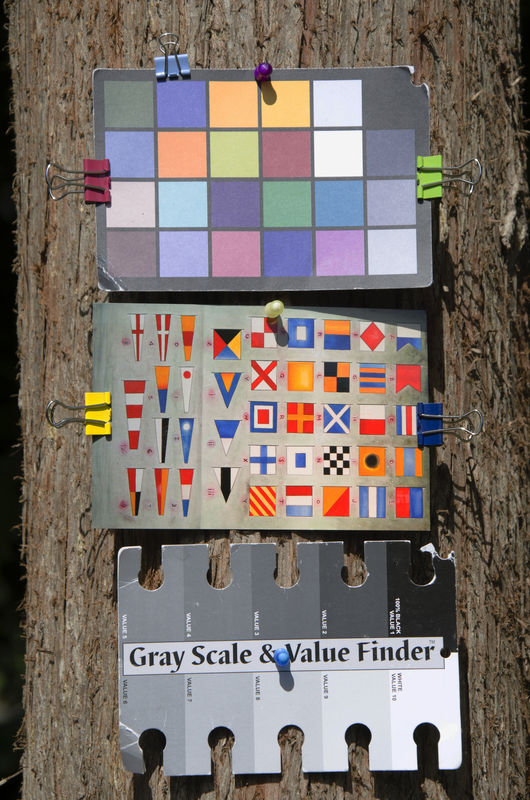
My goal in this project was to see for myself if ETTR is an effective concept. So the first image is the initial condition and the second condition is to find an exposure to correct the initial error. I did so by adjusting the shutter speed.
What I was looking for was to see distinct boundaries in the grey scale images. The swath of colours was used to see if there was an effect on the colours . And there was. Not one of my photos mimicked it. However, that could be due to my methodology. I used JPEG files rather than RAW files.
I added the post card because it had lots of fine lines.
I live very close to many dense forests, and for most of the year we have stratus clouds coming off the Pacific. August tends be the brightest month, and sometimes we have perfect skies in January when there is a cold snap. However the sun is invariably low. I am satisfied that it is a useful concept to use in this region. I just make sure that I bring a tripod.
This year my wife treated me to a trip to Las Vegas and surrounding area including parts of Arizona and Utah. It was a wonderful experience, but I had to learn all over again how to take pictures.
Check out Street Photography section of our forum.
Jul 21, 2014 17:19:30 #
David Popham wrote:
My goal in this project was to see for myself if E... (show quote)
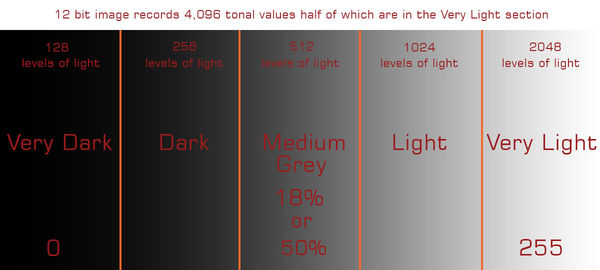
From what I gather about ETTR is that the reason to use it is because fully one half of all the information is in the right 5th of the histogram.(see diagram) So if you expose to the right without clipping All the information you will need to make an excellent image in post will be there for you to manipulate as you will. Of course converting to JPG negates this principle. An experiment I did a RAW file ETTR was 24MB and the same image 1 stop under exposed was 20.4 MB (with shadow clipping) a Large JPG of the same scene was 3.36 MB. Another advantage of ETTR is the reduction of noise in the shadows.
Sometimes I use ETTR but many scenes don't call for it so I just know the principle and use it when I can
Jul 21, 2014 21:46:18 #
David Popham
Loc: French Creek, British Columbia
To be a little clearer on my methodology, I used an exposure as given by the light meter and then used increasing exposure times to eventually almost blowing out the image as seen in the camera. In an over exposed image the peak, technically known as the mode, is shifted to the right. Post processing is then used to redistribute the values many of which will be then located to the left side of the histogram and thus towards the centre.
Perhaps if the images were downloaded one could see the histogram and adjust them. Possibly even better is to repeat or improve on the process to see if one gets the same or different results as a result of the methodology.
My process was most certainly imperfect, but for me at least I learned how and when to use it to obtain a better outcome.
Jul 21, 2014 22:19:27 #
David Popham
Loc: French Creek, British Columbia
I thank you all for responding to my posting. Communication is most certainly not my strong suit.
When I was setting up the shoot I looked at the histogram as displayed on my Nikon 7000. Normally I would adjust the shutter speed to make sure that the mode (peak) of the histogram was in the centre of the distribution of the data and that there very little, if any, clipping.
When I was doing this project I would create the base case, as stated above, and then I would gradually lower the shutter speed until the right side of the histogram was clipped.
Once the files were downloaded my goal was to produce as good an image as I could regardless of exposure time (the only variable).
I was shooting in camera raw and would liked to have used those images, but their file size is huge and so I made the compromise and used JPEGs.
I thank you all for helping me to express my thoughts in a clearer manner.
David
Jul 22, 2014 08:27:34 #
I opened the images in Photoshop and using only the eyedroppers in the Curves tool, reset the black, white and grey points.
I found the Colour swatch card unsuitable for this but the greyscale card at the bottom worked fine.
Having set the 3 points, they read as Black - 8%, grey - 55%, and white at 93%
With no further pp, and giving the same treatment to all images, the colours in the swatch became more vibrant and contrasted better with each other, the differences in the greyscale were more marked.
The "best" result was from the "taken in shade" image.
"Best" is a little subjective because I don't know what the original colours on the swatch are. The chart looks a little faded, and the Black square is certainly not black.
I wanted to find noise, (which is one reason I do use ETTR) but these images do not show enough to play with.
If you want to reply, then register here. Registration is free and your account is created instantly, so you can post right away.