Topaz Remask 4 released
Jul 14, 2014 12:47:01 #
Just downloaded ver. 4.0.0.
If you are running Norton Internet Security, disable download intelligence, otherwise it will automatically delete the download.
If you are running Norton Internet Security, disable download intelligence, otherwise it will automatically delete the download.
Jul 14, 2014 13:16:14 #
wolfman wrote:
Just downloaded ver. 4.0.0.
If you are running Norton Internet Security, disable download intelligence, otherwise it will automatically delete the download.
If you are running Norton Internet Security, disable download intelligence, otherwise it will automatically delete the download.
I have a discount code for 50% off. I'll get when I'm back on my computer.
Jul 14, 2014 14:23:56 #
I keep trying to watch a Topaz seminar on Remask so I can get a coupon code!
Jul 14, 2014 14:29:01 #
Jul 15, 2014 18:20:58 #
wolfman wrote:
Just downloaded ver. 4.0.0.
If you are running Norton Internet Security, disable download intelligence, otherwise it will automatically delete the download.
Code is: julyremask
If you are running Norton Internet Security, disable download intelligence, otherwise it will automatically delete the download.
Code is: julyremask
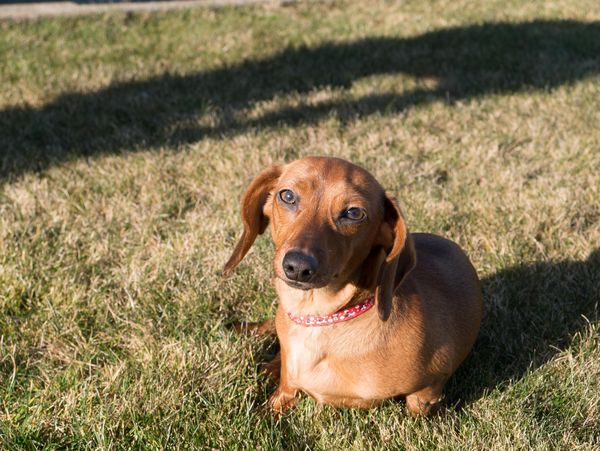
It worked. I bought it. Thank you very much for posting and providing the code. FWIW, Topaz displays the code as you go through the checkout. They aren't trying to limit the use. Basically the 1/2 price sale at $35 is good to the end of the month.
I've been putting off learning or buying Remask for months because the price was to high and I was not sure how to make it work.
If you have Photoshop Elements, it fits like a glove. Until I tried it this morning, I had no idea how to use Remask. Done once, it is now extraordinarily easy.
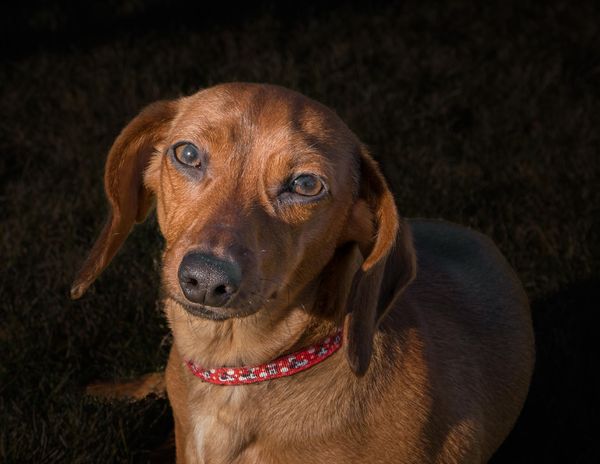
I tried it on a wiener dog in bad light with fur against grass. Results attached.
Jul 15, 2014 19:08:27 #
bsprague wrote:
It worked. I bought it. Thank you very much for p... (show quote)
I might be interested in this software. Could you explain what you did in ReMask to get that great photo?
Jul 15, 2014 20:00:25 #
Indi wrote:
I might be interested in this software. Could you explain what you did in ReMask to get that great photo?
Here's a tutorial on version 3, same technique would apply to version 4.
http://www.youtube.com/watch?v=huTeaT772Vc
Jul 16, 2014 11:44:14 #
Indi wrote:
I might be interested in this software. Could you explain what you did in ReMask to get that great photo?
I'll try.
Remask itself, does not work alone. It needs a "host" like Adobe Photoshop Elements or "PSE". I have version 11.
I always start in Lightroom. In this case, I made some basic exposure and contrast adjustments then cropped it. Then I sent it to PSE with an "Edit in..".
When installed, Remask shows up as a filter in PSE. When you open it helps you make a "cutout" of the dog. Normally that can be done without external help within PSE but fuzzy edges like fur and hair make it hard. Remask's purpose is to make it easier and faster. Remask has you draw a wide border around the subject, select what you want to keep and erase what you want to loose. When you close it, a cutout of the dog shows up as a layer in PSE.
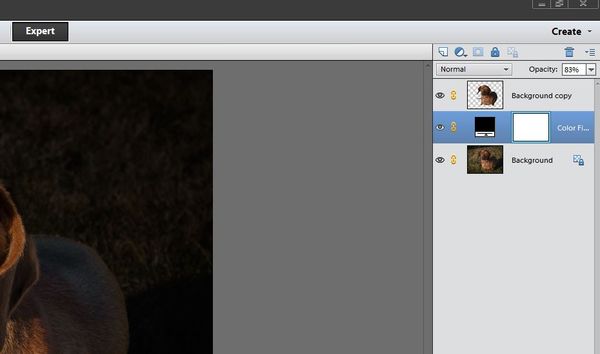
At this point there are two layers. In PSE. I want a third "Solid Color Fill Layer" and, using drop down menus, created a black one. I reordered the stack of three photos with the cutout on the top, the fill layer in the middle and the original on the bottom.
Now I could play with the adjustment for "Opacity" on the black fill layer. Basically is is like adjusting the darkness of sun glasses but it appears only as if it affects the grass background. I liked the background pretty dark.
I finished in PSE by closing it and the "masked photo" went back to Lightroom. A problem is the very small dog's feet are sunk in long grass so it looks like he has no feet. I cropped tighter on the dog's head. He needed some "glow so I used the Adjustment brush to lighten the face a little.
Attached is a screen shot of PSE and the layers.
If you want to reply, then register here. Registration is free and your account is created instantly, so you can post right away.