Tack Sharp Photos
Apr 10, 2014 05:32:53 #

your equipment looks good, so I would suggest that you google "taking tack sharp pictures". you'll get plenty of sound advice.
Apr 10, 2014 06:36:31 #

when you use tripod make sure the VR feature of lens and or camera is turned 'OFF'.
Apr 10, 2014 06:45:14 #
miller2110 wrote:
Thanks everyone. Lots of good information and tips. The information on testing the focus of the camera and lenses I'm sure will help isolate the problem - hopefully to my technique.
Oversharpening to correct the focus is considered a common mistake in processing. I just found this lat night.
http://www.diyphotography.net/10-common-photo-editing-mistakes/
Apr 10, 2014 07:40:04 #

miller2110 wrote:
I must admit that my photos do not meet my desires... (show quote)
I have found from personal experience, that it is possible that your viewing device or software could be part of the program. For way too long i was over sharpening in Photoshop try to get my soft pictures sharp. Turns out it was a setting in Photoshop that was the culprit.
Apr 10, 2014 08:18:15 #

miller2110 wrote:
I must admit that my photos do not meet my desires... (show quote)
There are three levels of sharpening in post. And due to the bayer filter, as mcveed explains, probably the most important first step is a mild capture sharpening, to overcome the softening effect of the filter. Low amount, radius consistent with the pixel size - smaller radius for high res cameras, slightly larger for lower res cameras. I use .4 for my D800, and .8 for my D700.
Creative sharpening. This is where you get the image to look acceptably sharp on screen. If done correctly, this involves applying different amounts of sharpening to the various parts of the image based on content. A smooth sky or skin will get less sharpening, foliage, highly textured surfaces, hair, and other finely detailed areas will get more.
Output sharpening. This ties print resolution, viewing distance and to a degree, image content. Here you will apply sharpening to the entire print, but the radius selected will depend on print resolution and viewing distance. If sharpened too much, at some point additional sharpening will not provide a sharper looking print. The microcontrast enhancement provided by a larger radius on sharpening, will provide a perceptively sharp print. As an example, using a radius of around 15 for a 200 ppi print to be viewed at 5 meters should work. It will not look great on screen, but will look amazing at that distance, which is what you would use for a 20x30 print on display in a gallery. If you print at 300 ppi, and use a viewing distance of 1m, which would be appropriate for an 8x10 or 11x14, then you would use a radius around 4 to get a print that looks sharp.
It is important to keep in mind that print "sharpness" is a relative term, and is generally difficult to quantify. It is not entirely based on resolution, and it does take into account contrast, viewing distance, and how small a detail the human eye can see. A 15 ft diagonal highway billboard will be printed at 12 ppi, yet it will look super crisp and sharp at 200 ft.
If you are on a PC, there is an application that eliminates the need for manual output to print sharpening - Qimage Ultimate. It calculates the proper sharpening based on your specific printer's metrics, paper type and print size. So if it looks pretty good on screen it will look similarly good in print at the optimum viewing distance.
As far as your concerns, it would be helpful to see an image, and find out if you are evaluating a print or an onscreen image.
Can you provide a sample image?
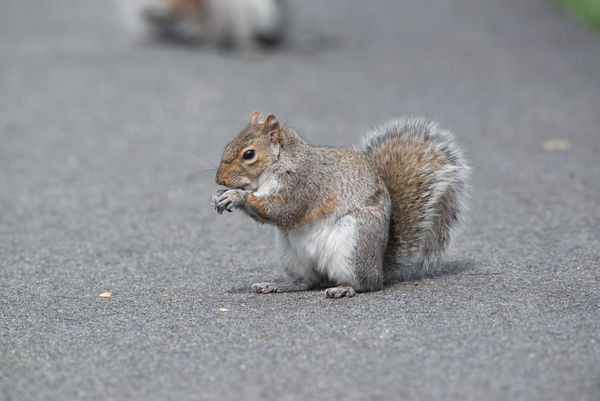
I took the image of the squirrel with a D800 ion a tripod at ISO 800 with a 600mm F4 lens at F6.3. One is the full frame raw capture, unprocessed. The other is a crop, properly sharpened. While this lens is sharpest at F4, the image quality does not suffer much at 6.3, but begins to degrade at f8 and smaller on the D800.
The second image with the deer on the lake were taken hand-held using a D800, 24-70mm at F8 and 1/100 sec. Same comparison, uncropped unsharpened vs cropped and sharpened.
Your results with the 24-70 or the 70-200 should be similar. I have no experience with the 16-35.


Apr 10, 2014 08:21:53 #

miller2110 wrote:
I must admit that my photos do not meet my desires... (show quote)
Last night I was poking around on a Canon forum and one tip for landscape was that if you are using Auto Focus for landscape, make sure the camera is using the focus points above the center line for focus. If it uses the lower points, the focus point is probably something in the nearer distance and not the far scene that you want crisp.
Apr 10, 2014 08:23:20 #

Haydon wrote:
You can using mirror lockup to minimize vibration. If your lenses have VR turned on while on a tripod, that can generate soft images as well.
mirror lock-up is only useful at shutter speeds 1/15 sec or slower
Apr 10, 2014 08:27:29 #
Here's how to get tack-sharp focus:
1.Set your Focus icons - detach lens, (so you are adjusting focus on focus point, not image) - adjust dioptre (next to viewfinder) so focus points are sharply in focus. (easier against a white, or light background) Re-attach lens
2. All modern cameras have Auto-focusing, which works very well, but there are times when you need to focus manually. For auto-focus to work properly it requires a certain amount of contrast, if the contrast isnt adequate you will need to focus manually.[ NOTE: In your cameras viewfinder, depending on camera-flagship models generally have many focusing spots, and lesser, entry-level dslrs will have around 5 focusing spots. With lens wide open, any of these spots can be used for selecting where to auto focus-But, depending on maximum aperture of lens in use, the ones you are able to use get fewer. Top-of-the-line cameras will only have the centre spot usable at F8,and entry level cameras at F5.6, and less than that, even these single spots arent reliable.]
Actually it is more beneficial to set auto focus by the centre spot, then re-compose, rather than use the peripheral spots-The reason being that only the centre spot has vertical and horizontal pixel rows. This means that if you use the peripheral spots (top and bottom spots have horizontal pixels only and right and left spots have vertical pixels only) To focus, you must have a part of the scene crossing a line of pixels at 90 degrees, and the centre spot gives you a more accurate reading ,having both vertical and horizontal pixels) It will pay you to manually focus most of the time, for full control of the situation. For instance, if an unnoticed reed encroaches into your image, when your are shooting a swan at the lake, for instance, your lens may auto-focus on that reed, rendering your actual subject out of focus.
There are times, you will find when auto focus will fail to respond favourably-although auto focus is able to lock on to any subject, there are certain conditions where it may not be possible ,even when the indicator lights are on, and the shutter releases/
Subjects with low contrast
Subjects in excessively bright light
Two subjects at differing distances
Subjects with repetitive patterns
High speed subjects at close range
To ensure you are in focus, there, in the viewfinder, is the electronic rangefinder icon, that comes on when you are in focus. NOTE: Each lens has its sweet-spot, that is when the aperture and zoom length combine to give optimum sharpness- 18-55 mm zooms usually have this sweet-spot at the 35mm distance setting and 2 stops back from wide open. On a 70-300mm zoom the sweet-spot would be around 185-200mm aperture 2 stops back from widest.
Auto focus is good for situations where you cannot focus fast enough, manually, such as sports and wildlife photography.
Depth of field appears to be the most confusing of focus elements. Depth of field is a range of acceptable sharpness in an image, from near to far. Three factors control Depth of field: Aperture: The wider the aperture, the shallower the depth of field. Focal length of lens, The longer the focal length of the lens, the shallower the depth of field will be. and Distance from subject, Landscape images have great depth of field, whereas Macro (extreme close-up) images have very shallow depth of field. Concerning depth of field, Hyperfocal distance seems to be even more confusing -Hyperfocal distance is a point of focus where at a certain aperture, Half the distance from that point to Infinity, (which starts at 30 feet, and extends to as far as you are able to see)) will be in acceptable focus, The best lenses for hyperfocal distance are 80mm or wider ; telephoto lenses, because of their relative short depth of field, are rarely used. (Prime lenses have a scale on them for this, zooms do not) Using a 18mm setting on your zoom lens at f11, Hyperfocal distance is somewhere around 5 feet (1500mm), so depth of field at this aperture would be from 2 1/2 feet ( 750mm) to infinity, when focused at 5 feet. A good guideline for great depth of field for landscapes is to use the bottom focusing marker in your DSLR viewfinder, (either horizontal, or vertical) as this will focus 1/3 of the way into the distance, (It is on the lower third imaginary Rule of Thirds gridline!) ,as is usually recommended. [ NOTE: Unless your camera has depth of field preview, looking through the viewfinder all will not be in focus, because your lens, until you press the shutter button to make the shot, will be open at full aperture.]
To avoid camera-shake, always use a sturdy tripod. When using lenses equipped with VR/IS (vibration reduction-Nikon/Image stabilisation-Canon), on a tripod you will need to turn off the anti-shake, or lens will still try to counteract vibration that isnt there,, and cause unwanted shake. If, for some reason you cannot use a tripod, use your self as one-
Feet at T-Stance, left hand supporting camera, elbow against ribs
Camera pressed against nose and brow
Right hand also elbow against ribs, index finger on shutter button
Set shooting mode to continuous, and Roll index finger on shutter button - First couple of shots will probably be blurred, but somewhere between 3-4 and 5 you should have a shake-free shot of the scene. ( When using zoom lenses longer than 200mm-I usually set ISO to 400, when hand-holding)
Trap focusing: (Nikon Only)
This is a neat way to use auto focus especially for fast sports/wildlife action.
Custom (pencil) menu:
Autofocus set to AF-S
AF area mode set to single
AE-L/AF-L set to AF ON
Compose your shot and set the focus by aiming the centre focus icon at a definite target at the precise distance you want, (Say a tree branch where a bird is about to land, or on second base where the baseball player's foot will land) and pressing the "AE-L/AF-L" button near the viewfinder. This will focus the lens, let go of AE-L/AF-L button. Turn away,
press and hold the shutter button all the way down. Point camera at pre-focused point when subject approaches, and your camera will take the shot (or shots, if you are in continuous shooting mode.)
Much faster than Human reflexes.
And if you cannot accurately focus after understanding all that-there's no hope for you,Sorry.

Apr 10, 2014 08:35:24 #

Note that when using mirror lock-up, the slap from the mirror action introduces a slight vibration into the camera body which lasts about 2 seconds. You can detect this vibration by visual means: Put a bubble level in the hotshoe. The fluid it in will dance a little when the mirror locks up. So wait it out until the motion stops. Then press the cable release shutter button for the exposure.
Further, Photoshop Creative Cloud has a new filter called Camera Shake Reduction. This filter removes image blur by analyzing its direction of motion. Then the filter corrects the blur. This correction brings out the potential of the lens optics for achieving image sharpness.
All my images contain some blur. I attribute this blur to the vibration induced by mirror lock-up. In any event, CSR successfully removes this blur.
In using CSR, I find that removing image noise before applying CSR produces fewer image artifacts. CSR itself also has an adjustment for the amount of image noise present.
Good luck.
Apr 10, 2014 08:51:27 #
nekon wrote:
mirror lock-up is only useful at shutter speeds 1/15 sec or slower
Mirror slap has its greatest impact in the danger zone - 1/80 to 1/160 of a second. It has to do with frequency of vibration. If you are not taking images at night where light sources will readily expose camera vibration, you are unlikely to see the effect of mirror slap at shutter speeds slower than 1/15.
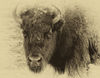
Here is an image taken at 1/10 second - with a D300 and a 600mm lens (effective field of view of 850mm), at ISO 400, no mirror lockup, no remote shutter release.

Apr 10, 2014 08:53:12 #
Mark7829
Loc: Calfornia
Is the soft results with auto or manual focus? If auto, calibrate. You have a menu option on the D800 to do just that. You can find calibration charts on Amazon.com.
Of course follow the other recommendations, shutter speed, stay away from high aperture, tripod, polarizers, etc. Over sharpened images are just as bad as under -IMO
Of course follow the other recommendations, shutter speed, stay away from high aperture, tripod, polarizers, etc. Over sharpened images are just as bad as under -IMO
Apr 10, 2014 09:08:20 #
Manual focus with a DSLR is difficult with the stock focusing screen. Better to get a microprism, or a combination microprism/split center circle. But you might have trouble finding one, and you will void your warranty.
here is a quick tutorial on how to replace it:
http://www.focusingscreen.com/work/d800en.htm
It will affect spot and center weighted metering, so you have to really do a lot of manual focus work to justify it.
here is a quick tutorial on how to replace it:
http://www.focusingscreen.com/work/d800en.htm
It will affect spot and center weighted metering, so you have to really do a lot of manual focus work to justify it.
Apr 10, 2014 09:10:45 #
Bear2
Loc: Southeast,, MI
Did you "fine tune" your lenses with the camera? Cameras and lenses have specification ranges, and if the camera is at the high end if it's range and the lens at the low end they may need to be adjusted. I have done it on my D7000 with several of my lenses; 10-24, 18-200 VR ll (my favorite lens), 70-300, 18-105 etc. They all were back focusing.
Shooting at a newspaper on a 45 degree angle, highlight one word on a line. Autofocus on it and check you image. Is the highlighted word the sharpest or are lines above or below sharper.
Good luck
Duane
Shooting at a newspaper on a 45 degree angle, highlight one word on a line. Autofocus on it and check you image. Is the highlighted word the sharpest or are lines above or below sharper.
Good luck
Duane
miller2110 wrote:
I must admit that my photos do not meet my desires... (show quote)
Apr 10, 2014 09:24:43 #
Rongnongno wrote:
Since when does raw needs sharpening??? That makes no sense. It might need a slight contrast adjustment but sharpening??? Wow! One learns everyday.
It's not necessarily a product of raw yet it is. When you download a raw pic into whatever tool for PPing is looks mushy. Yes you can adjust contrast just as many other features such as shadows, highlights, colors, etc.
That said, I don't care how well you get your shot in camera, you can always sharpen to get that Nth degree. So, yes sharpening.
Apr 10, 2014 09:25:58 #
As far as hyperfocal distance and depth of field are concerned, Nikon, in their technical guide, alludes to a slightly shallower DOF with their D800/D800E as compared to earlier cameras;
http://www.nikonusa.com/en_US/o/Y6wrkA9OU_z04IreazIXl_22UII/PDF/D800_TechnicalGuide_En.pdf
Infinity focus varies with the focal length. Normal (50mm) and wider angle lenses infinity will begin closer, and longer lenses will have infinity at a greater distance.
The newer lenses do not have a depth of field scale on them, regardless of whether they are prime lenses or zooms. Here is an older Nikon zoom with a DOF scale on it:
http://www.mir.com.my/rb/photography/fototech/htmls/depth.html
For an 18 mm lens at F11 on a full frame camera, the hyperfocal is 3.19ft, so everything from 1.595 ft to infinity will be acceptably sharp.
It changes slightly for a cropped sensor camera, due to the smaller circle of confusion. The hyperfocal will be 4.76ft so everything from 3.21ft to infinity will be acceptably sharp.
As you use longer focal lengths the difference is greater.
At 50mm at F11, full frame will have an HD of 24.3 ft; cropped will be 36.4 ft
If you want to reply, then register here. Registration is free and your account is created instantly, so you can post right away.