Better B & W
Jan 5, 2012 17:45:15 #
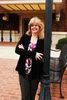
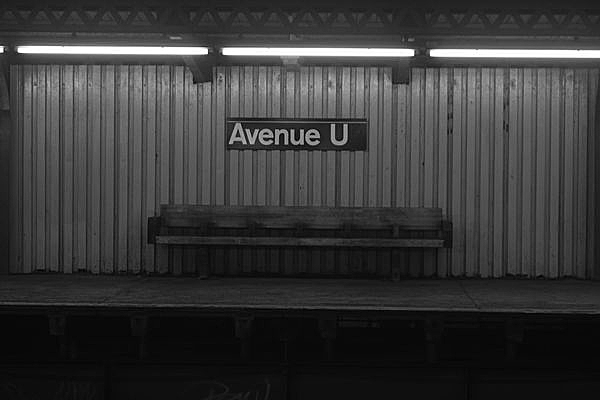
I know how to convert this pic to B & W, but I don't know how to get the look I want. I want it to look like an old "film noir" B & W movie. Do you know what I mean? I have Picasa, and Photoshop Elements 8. I would appreciate if someone could tell me step by little step how to get that look. THANKS!
Jan 5, 2012 18:10:13 #
sscooper38 wrote:
I know how to convert this pic to B & W, but I don't know how to get the look I want. I want it to look like an old "film noir" B & W movie. Do you know what I mean? I have Picasa, and Photoshop Elements 8. I would appreciate if someone could tell me step by little step how to get that look. THANKS!
I am not an expert. You can click on enhance in Photoshop Elements then adjust color and lower saturation till all color is gone. Then enhance, adjust color, then color variation. This will show you some choices of sepia like colors. I'm not including my try, so you can give it a wirl.
Jan 5, 2012 18:14:01 #

Too centered & a tad crooked, it seems that way to me, anyhow. Maybe if you cropped a lil? Just a thought.
Jan 5, 2012 18:22:13 #
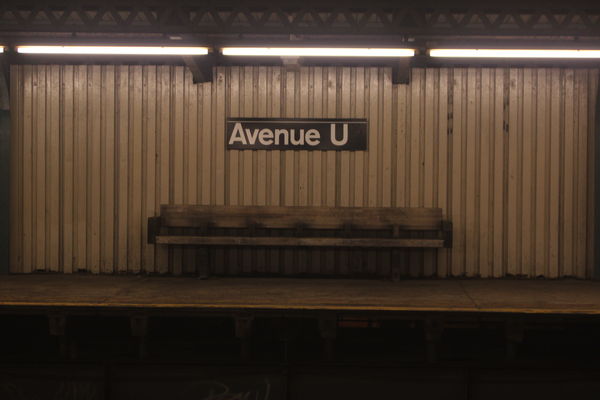
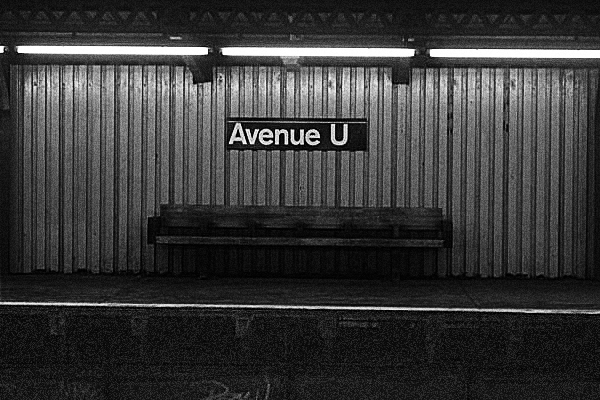
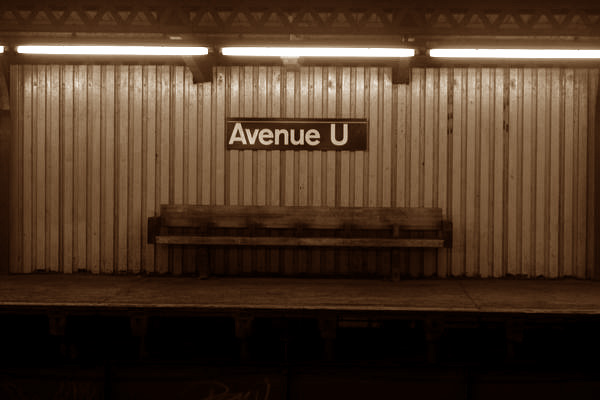
First question is what's your interpretation of the film noir look? Attached is one version. Sharpened, detail brought out below the platform, high contrast B/W, noise added. If this is the sort of thing you're looking for, details to follow.
P.S. Hard to work with the low-res upload.
P.P.S. Sorry if this violates the new rules. If you were just looking for a dialog, I'll happily delete this image. Maybe this should all be moved to the new section.
P.S. Hard to work with the low-res upload.
P.P.S. Sorry if this violates the new rules. If you were just looking for a dialog, I'll happily delete this image. Maybe this should all be moved to the new section.
Jan 5, 2012 18:28:42 #
Jan 5, 2012 19:07:48 #
RMM wrote:
First question is what's your interpretation of the film noir look? Attached is one version. Sharpened, detail brought out below the platform, high contrast B/W, noise added. If this is the sort of thing you're looking for, details to follow.
P.S. Hard to work with the low-res upload.
P.P.S. Sorry if this violates the new rules. If you were just looking for a dialog, I'll happily delete this image. Maybe this should all be moved to the new section.
P.S. Hard to work with the low-res upload.
P.P.S. Sorry if this violates the new rules. If you were just looking for a dialog, I'll happily delete this image. Maybe this should all be moved to the new section.
this one works for me, i like it
Jan 5, 2012 19:08:38 #
Jan 5, 2012 20:59:22 #
sscooper38 wrote:
I know how to convert this pic to B & W, but I don't know how to get the look I want. I want it to look like an old "film noir" B & W movie. Do you know what I mean? I have Picasa, and Photoshop Elements 8. I would appreciate if someone could tell me step by little step how to get that look. THANKS!
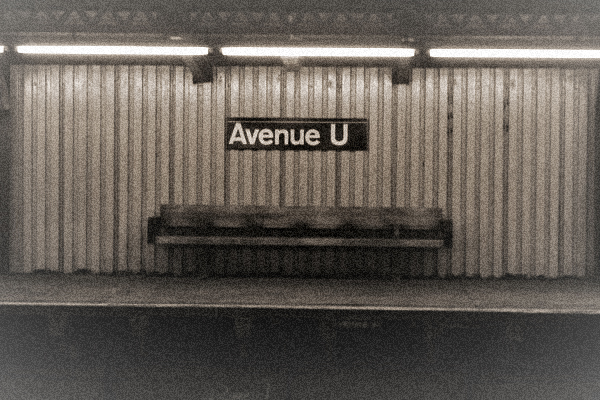
This is my attemp. I like a bit of color as your original one myself.
Jan 5, 2012 21:07:50 #
RMM wrote:
First question is what's your interpretation of the film noir look? Attached is one version. Sharpened, detail brought out below the platform, high contrast B/W, noise added. If this is the sort of thing you're looking for, details to follow.
P.S. Hard to work with the low-res upload.
P.P.S. Sorry if this violates the new rules. If you were just looking for a dialog, I'll happily delete this image. Maybe this should all be moved to the new section.
P.S. Hard to work with the low-res upload.
P.P.S. Sorry if this violates the new rules. If you were just looking for a dialog, I'll happily delete this image. Maybe this should all be moved to the new section.
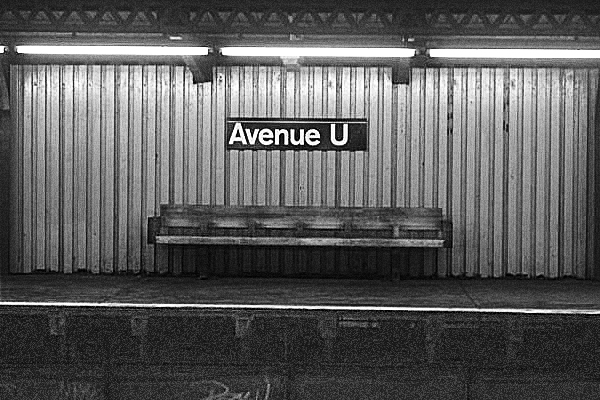
I think I like this one better, (the first one that is ) but with the bench a bit lighter. If you could give me steps, I could work on it, and probably get the look I am looking for!
Jan 5, 2012 21:09:33 #
MissStephie wrote:
Too centered & a tad crooked, it seems that way to me, anyhow. Maybe if you cropped a lil? Just a thought.
It is a tad crooked---this is straight out of the camera. I haven't done any PP. I was actually going for the dead center look.
Jan 5, 2012 23:07:41 #
sscooper38 wrote:
I think I like this one better, (the first one that is ) but with the bench a bit lighter. If you could give me steps, I could work on it, and probably get the look I am looking for!
1. Duplicate image on a new layer.
2. Sharpen to your taste (sharpening is often left to the last step, but I often violate that recommendation)
3. Duplicate again, but set mode to Screen to lighten the image.
4. Add a Hue/Saturation layer and move saturation to 0. This gives you a B/W image while retaining the color information, which you may want to manipulate separately to introduce contrast where adjacent colors have nearly the same grayscale values.
5. Add a Levels adjustment layer. Lighten the image as much as you want to bring out the area below the platform. This will "overexpose" the area on the platform.
6. Click in the Levels layer white image, draw a selection (lasso tool, whatever works for you) around the platform to the top of the image.
7. Make sure your background color is black and hit Delete. This will fill in the upper part of the Levels layer with black, and more importantly, will apply the Levels adjustment only to the area below the platform. You can lighten up the bench area by using the paint brush to paint white over the bench. If that makes it too light, undo it and lower the opacity of your brush.
8. Add a Curves adjustment layer. Use it to create a sort of S curve that gives you the dark/bright contrast range you want.
9. I went back to the top layer of the image (not any of the adjustment layers) and apply a Noise filter (Filter-> Noise_> Add noise...). I added more noise than I wanted, then lowered the opacity of that layer to let the layer below it show through.
10. Go back and forth between layers adjusting until you get the effects you're looking for.
11. Save image (with layers) if you think you want to go back and tweak your settings as a TIFF or PSD (Photoshop) file.
12. Flatten the image and save as a JPEG for a finished product.
I'm attaching a somewhat different version. But you get the idea. The reason for all the layering is that you can turn them on and off, go back and forth to adjust them to see how they interact, and if you quit and come back at a later date, the TIFF or PSD image still has all the pieces you want to work with.
This was all done in Photoshop CS2. It could definitely be done in GIMP or any later version of Photoshop. I'll take a pass on Photoshop Elements, Picasa or other programs I am not familiar with.
If you PM your E-mail address, I could send you the Photoshop file with all the layers.
Jan 6, 2012 06:33:27 #
you do amazing work. You must see in B&W
RMM wrote:
quote=sscooper38 I think I like this one better, ... (show quote)
Jan 6, 2012 06:50:58 #
RMM wrote:
quote=sscooper38 I think I like this one better, ... (show quote)
That is the look I was going fo. Now, I am a techno-dummy, but I will try to follow those steps. I don't know if I have all that in my PSE 8, so I may get lost! But I will try!
Thanks, Susan
Jan 6, 2012 07:31:13 #
sscooper38 wrote:
I know how to convert this pic to B & W, but I don't know how to get the look I want. I want it to look like an old "film noir" B & W movie. Do you know what I mean? I have Picasa, and Photoshop Elements 8. I would appreciate if someone could tell me step by little step how to get that look. THANKS!
I have Elements 10 ... I'm hoping 8 will have the same basic features
In the enhance menu ....choose convert to b&w .. there are a few choices there .. infrared, newspaper, urban snapshot, etc. This one is urban snapshot.
Then in the enhance menu choose adjust sharpness.
original

adjusted
If you want to reply, then register here. Registration is free and your account is created instantly, so you can post right away.