painted portrait tutorial
This topic is locked to prevent further replies.
Feb 18, 2014 13:50:29 #
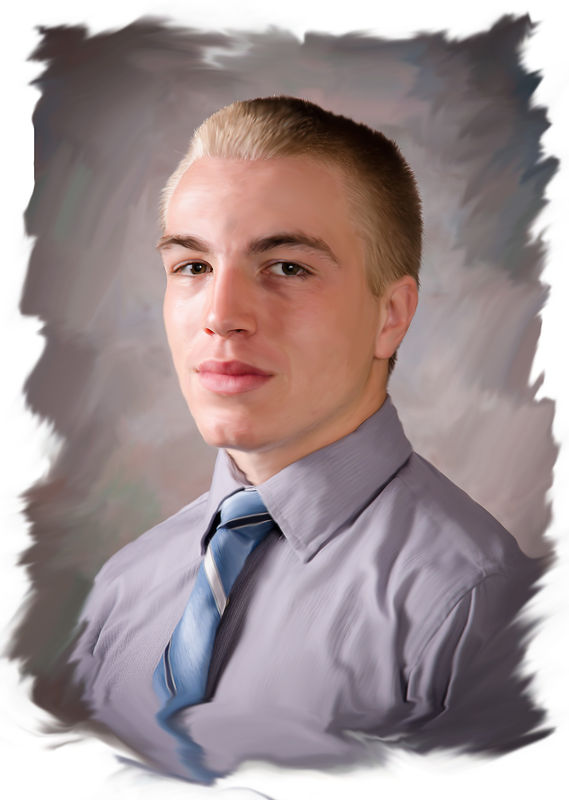
I just posted this in the gallery, (sorry if it is bad form to post the same photo again, but I wanted to put it with the tutorial) and had a few people send me PM's asking how to do it.... so, here's my best attempt to explain it. If you read this, then watch one of the youtube videos, (most are "speed painting") you should be able to put it all together if you are interested.
This can be done with a mouse or a Wacom tablet and stylus, which is what I use for more precise work, but I did mess about a bit with it using just a mouse, and was able to do it as well.
Ill do this step by step, then will also upload it to UHH in case anyone else wants to try it.
Open your image (elements or PS, or even Gimp will work)
Copy the layer so you are not messing with the original, plus you will probably need the original intact for the end.
Select the new layer
bump up the saturation and contrast, it makes a difference.
Select the smudge too. Your settings should be for a round brush (size will change using the bracket keys) but the harness should be 0
Starting with areas of the face that have shape, I usually use the nose, brow area but dont hit the eyebrows or hair, that is a different tool.
Smudge by actually scraping one way, then back over the same stroke, back the other direction, (kind of a scrubbing motion at least once back and forth, sometimes more) follow the curves of the nose, and around the eye area. Change your brush size to very small, and do the same smudge back and forth on the eyelashes. Use very tiny strokes and a brush that wont push the whites of the eyes into the iris, and scrub back and forth a time or two. Like in kindergarten, you really want to stay in the lines, or you will change the shape of the face, take your time.
At the beginning, your strokes may look like you are really messing up, especially the first few, always err on the side of using a smaller brush, but places like the forehead you can get fairly wide, maybe about ¼ the total size of the forhead. Keep following the curves of the face. Do the same thing on clothes, keep following the lines. If there are stripes, follow the stripes.
For the background, do the same thing but with a larger brush. I actually just painted a white border, nothing fancy and not worried about it being too straight, and randomly smudged it in to the background edge, just my personal preference. I could have taken more time with the bottom, as I dont like what I did with the bottom of the tie.
I did not forget about the hair. I wanted to smudge the background before I got to the hair.
Pick one of the square brushes that look like a bunch of dots. For his eyebrows I did basically the same thing, but with that brush, you cant select hardness, but it only smudges the areas where the dots are, so you can use a very light touch and make sure you scrub both directions and try to follow the exact same path. On the hair, I use that same square shaped brush with dots (no idea what the actual name is) For his hair, I only went one direction, but was sure to stop where his hair stopped, or I could have smudged him an afro if I wasnt careful.
I hope that kind of explains it. It was mostly trial and error. The main thing is to smudge back across where you smudged and try to follow the same path.
Next, I play with the opacity of the smudged layer until I like what I see.
Lastly, if needed, I make a layer mask on the top layer, choose gray as the color of the brush, and mask the eyes to bring back a little more clarity of the eyes.
Harder to explain than it is to actually do.
Good luck
Bob
Feb 18, 2014 16:49:27 #

Thanks for the tutorial. This will be added to a list of tutorial topics which is updated often, and folks will be able to link to it in the future. This ended up in the right place after all.
Feb 18, 2014 17:19:17 #

bkyser wrote:
I just posted this in the gallery, (sorry if it is... (show quote)
I appreciate this. I was looking for instructions on this technique recently, and found some on the internet but gave up because they were in such complicated jargon that I couldn't follow them. This looks much more do-able. It's written in plain language that regular folks can understand.
Feb 19, 2014 08:39:41 #
minniev wrote:
I appreciate this. I was looking for instructions on this technique recently, and found some on the internet but gave up because they were in such complicated jargon that I couldn't follow them. This looks much more do-able. It's written in plain language that regular folks can understand.
Feel free to PM me for any questions. Like I said, easier to do than to put in print.
After the fact, I thought I should have started over and done several screenshots of the progress. If I do another tutorial, I will do it that way. Maybe it will make it more clear.
Please post the results you come up with. I'm very interested in seeing them.
Sep 11, 2014 13:09:25 #

Hello bkyser. I'm about to begin work on a portrait of my granddaughter, but before I start, could you tell me what "harness should be 0" means? .... Never mind You meant "hardness." Got it.
Sep 12, 2014 01:08:32 #
Feb 29, 2016 06:54:42 #

I am glad to see you again.
Searcher wrote:
Excellent tutorial with a terrific result. Thank you.
Feb 29, 2016 08:43:12 #
Searcher wrote:
Excellent tutorial with a terrific result. Thank you.
I agree, we've missed you. :thumbup:
If you want to reply, then register here. Registration is free and your account is created instantly, so you can post right away.