suggestions welcome
Dec 28, 2011 17:24:43 #
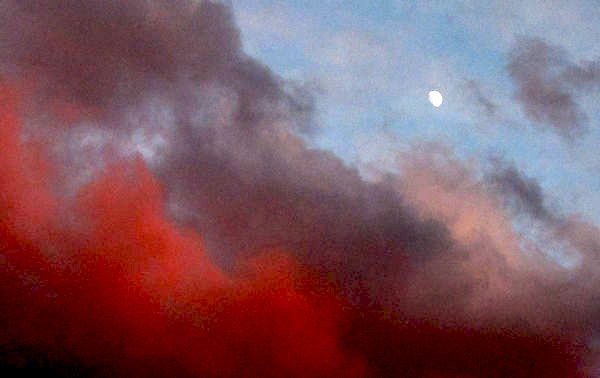
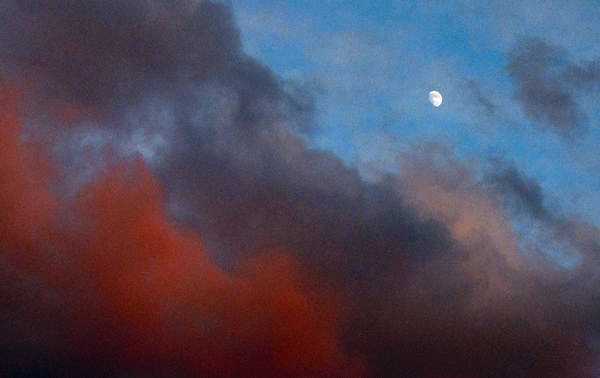
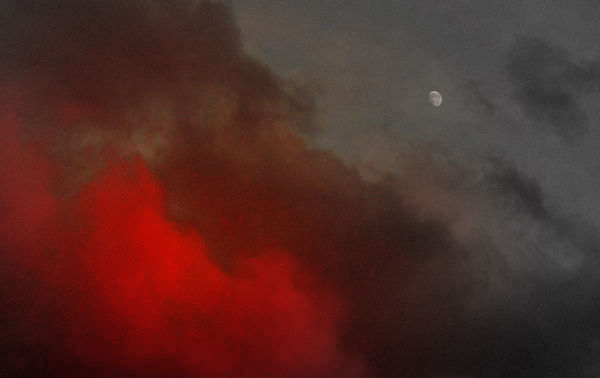
I took this rather dramatic sunset last month, but I don't know what to do with it. I don't believe it can stand on its own as a photograph, but I have no idea what kind of picture it should be in. I posted this last week under sunsets. It is not 'shopped, except to move from raw to jpeg.

Dec 28, 2011 18:23:19 #
If you are into using layers, this could be used to put dramatic color into your pictures.
Dec 28, 2011 19:20:10 #
buckwheat wrote:
I took this rather dramatic sunset last month, but I don't know what to do with it. I don't believe it can stand on its own as a photograph, but I have no idea what kind of picture it should be in. I posted this last week under sunsets. It is not 'shopped, except to move from raw to jpeg.
I don't know what you are wanting to get. The image can be worked in Photoshop other software to lighten the picture. I tried it and it helped significantly. The image becomes very noisy when doing this and thus is not the total answer. I'll post two images one a the photo done in Photoshop; the second is the same but Corel Painter is added. I won't be hurt if you don't like them. How were you shooting the image; that is your camera settings. If you give me those maybe I can see something. Good Luck!
Photoshop
Corel Painter
Dec 28, 2011 23:30:04 #
Dec 29, 2011 15:53:39 #
Thanks to both of you. I tried lightening it up but it didn't look natural. (not that it ever did) I also think you are right about the halloween image. It is interesting, because the was sunset I was shooting was behind me. I just happened to turn around and caught this. Maybe I think its more impressive than it is.
Dec 29, 2011 16:24:14 #
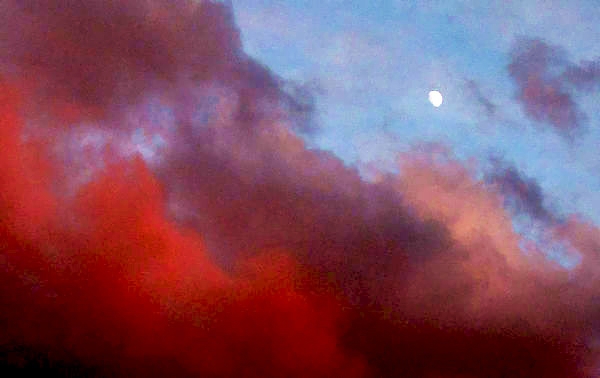
I brought this into Photoshop, converted to LAB color and used a Levels adjustment. Since you were there and I wasn't, I have no idea if this captures what you saw.
Dec 29, 2011 21:04:59 #
RMM wrote:
I brought this into Photoshop, converted to LAB color and used a Levels adjustment. Since you were there and I wasn't, I have no idea if this captures what you saw.
It does a very good job. I have seen "lab color" on the menu, but whenever I tried it, it had no impact on the image. The histogram pulled to the center, but no change in image. Can you explain in 30 words or less? I will attend a photoshop class at the college in two weeks.
Dec 29, 2011 23:13:21 #
I'll try.
1. Image menu -> Mode -> Click on Lab color
2. Layer menu -> New adjustment layer -> Levels
3. It opens in the Lightness channel. Move the white slider over towards the center until you reach the beginning of the histogram. You can slide back and forth to adjust further. You can also move the center slider to affect the midtones.
4. Select the a channel from the dropdown menu (originally on Lightness)
5. Move the left and right sliders in towards the center. Don't bring all the way in, or you'll go blind.
6. Select the b channel from the dropdown menu.
7. Move the left and right sliders in towards the center.
After that, it's just moving from channel to channel and tweaking the sliders until you achieve what you want. Click OK to accept.
You can do the same thing with Image -> Adjustments -> Levels, but that's destructive in that it alters the image itself. Using an adjustment layer, you can turn it on and off to see how the effect worked, and you can tone the effect down by lowering the opacity. It's also a good idea to duplicate the original image and work on that. You wind up with a larger file (if you save as PSD or TIFF with layers), but you can go back to the original at any time.
When you're happy, you can flatten the image, go back to Image -> Mode and go back to RGB, and save as a JPEG if that's what you want to end up with.
OK, that was more than 30 words. I don't do less. Hope it was intelligible, anyway.
Dec 30, 2011 11:24:16 #
like the image. somewhat impressionstic. how about black and white sky to pop the moon out and add a bit of mystery?
Dec 30, 2011 11:30:56 #
RMM wrote:
I'll try. br 1. Image menu -> Mode -> Click ... (show quote)
And every word was well received. Thank you for your succinct instructions, and by the way, I really appreciate your sense of humor on some other posts. (one of which has already gone on for 18 pages.)
Dec 30, 2011 12:26:14 #
buckwheat wrote:
And every word was well received. Thank you for your succinct instructions, and by the way, I really appreciate your sense of humor on some other posts. (one of which has already gone on for 18 pages.)
Glad it was of help. I can't say there's absolute science involved, you have to play with the settings. Using layers helps a lot, you can turn effects on and off to see how they work together. Also, there's an option in Photoshop to turn on/off all the layers except whichever one you're on all at once. On the Mac, you hold the Option key down and click on the eye next to the layer you want to be active. It's probably the Alt key on a PC. All the other layers go on or off together. If you've kept your original image on the bottom layer, you get the whole effect at once.
And thanks for the side comment. Some of these threads require either a sense of humor or a chair and a whip. (Or a check box.)
If you want to reply, then register here. Registration is free and your account is created instantly, so you can post right away.