2201 - LAB Color Replacing Color on a Light Colored Object in PSE-11, et. al.
Nov 26, 2013 15:29:28 #
I've been working on this silly project for days, on and off. :roll: I've replaced color before, using either the Color Replacement Tool (I had it clear back in PSE-4.0) and/or the Replace Color Command (Enhance=>Adjust Color=>Replace Color). I have always had a dreadful time with the Replace Color Command (but Ill keep trying). I've generally done better with the Color Replacement Tool, but have noticed from time to time that it didn't seem to behave as I expected, i.e., I sometimes couldn't get RICH color. Sometimes I could, but other times the color was washed out.
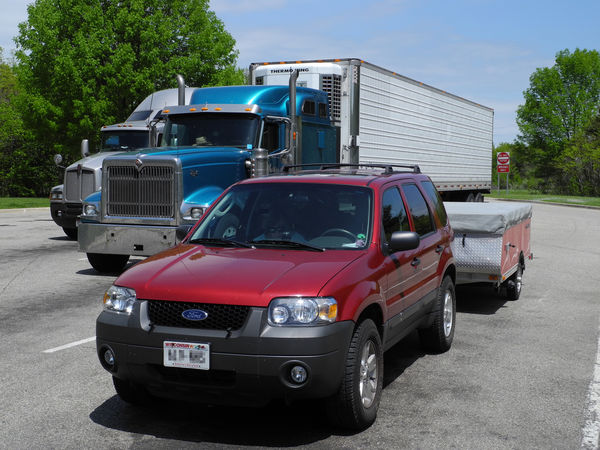
This picture is silly. We have a little red car and a tiny 8 red tent camper that I am frankly a little crazy about, in the crazy sense. :mrgreen: :roll: When on the road, when we stop in a rest stop we have to pull out with the BIG RIGS. I have always found this to be absolutely hysterical (I am a weird personask my wife). I have made several pictures of The Little Sisters of the Perpetually Camped pulled out alongside their, ah, heftier sisters. Ive even made a few that were pretty successful, more successful than this one, but I kept coming back to this and wondering what could be done to improve it. I finally concluded that what was needed was Red Trucks, to go with the Red Sisters.
All went pretty well with the Dark Blue Truck. On my first try I very carefully selected it using various means until I was satisfied, then picked up a color from the car and painted the truck with the Color Replacement Tool. After several tries I was happy. Then I selected the Light Gray Truck and did the same thing, except the Light Gray Truck kept coming out pink!
Bleh. :evil:
I've seen pink trucks, mostly driven by justifiably proud female owner/operators, but most of the truck drivin' community tends to shun the color for some reason. So I was either gonna hafta figure out some way to get the thing a more manly red, or leave it gray, which would defeat the exercise.
I looked through Searchers tutorial index. I reread my two Dummies books. I searched in Adobe Help. I looked at online tutorials.
I have finally concluded, on my own, that when the color to be replaced is a light color, the translucent replacement will also be light, hence the light gray of the far truck kept going pink. I finally painted the whole truck pink, and then I went back over it with a regular soft brush with an intensity about 50% and finally got the result I was looking for. There are mistakes, its not perfect, but it is the best I can do for now. If anyone knows a better way Id love to hear it. :XD:
Unretouched original filecould've been "exposed to the right" a little but I didn't know about it when I made this picture.
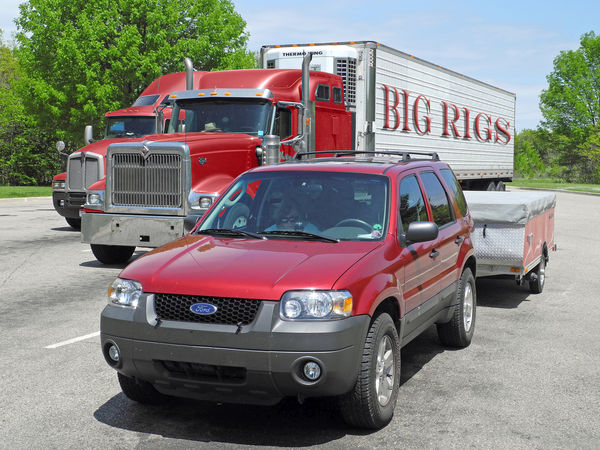
Final (for now) reworked image with the colors of both trucks changed, plus a few other enhancements.
Nov 26, 2013 20:07:59 #

I saw a full tutorial on this but....
It was the same problem and neatly addressed. Let me check on my browser history, it is not too old...
It was the same problem and neatly addressed. Let me check on my browser history, it is not too old...
Nov 26, 2013 20:08:28 #
Nov 26, 2013 20:19:50 #
Things to try:
1) Use the LAB color space. Unfortunately PSE does not have the ability to use the LAB color space(Check me on this.) Often times colors can be targeted selectively if they fall within the A and B colorspace.
See this Video for use of LAB. (Skip to 1:40.. There is a bunch of garbage at the beginning) The video shows how a corvette is changed from RED to Green using LAB...Pretty cool.
http://www.youtube.com/watch?v=KhfRynutmQM
You can target specific colors with the Channel Mixer. It's a bit more challenging to use.
For slight modifications you use the Selective color adjustment layer or use Levels or curves.(Usually doesn't work for big color changes...Like this one.
Create a mask like you did and apply a color overlay via a clipping mask. Set the color overlay to blend mode of color. This works really well with neutral grey.
Nov 26, 2013 21:06:57 #
PalePictures wrote:
I AM FREAKING MAD AT YOU!!!!You just threw me a bone I did not know existed. Now I do not know what to do with it!!!....
LAB COLOR????
Man...
Nov 26, 2013 21:18:04 #
Rongnongno wrote:
I AM FREAKING MAD AT YOU!!!!You just threw me a bone I did not existed and now I do not know what to do with it!!!
LAB COLOR????
Man...
LAB COLOR????
Man...
Hint.
It works real well on landscape foliage.
Nov 26, 2013 21:29:45 #
Thanks but I really need to find HOW to integrate it onto my already shaky workflow.
Nov 26, 2013 22:20:31 #
PalePictures wrote:
Things to try:
1) Use the LAB color space...
1) Use the LAB color space...
Haha! When you first mentioned LAB colorspace, i immediately considered a post suggesting Dan Margulis' books. So I had to chuckle when your Youtube link featured him - the King of LAB!
I have read 3 of his books and still don't really feel like I understand LAB, so was gratified to see in the demo that "just trying stuff" is a major component of his workflow. Anybody who uses Photoshop and prints anything should read Margulis' work.
Chuck - You are aware the lettering on the truck looks really phony, right? My approach would probably have been to replace the truck's whole side panel rather than pasting the text over its obviously ridged texture...
Nov 27, 2013 11:25:57 #
Dr.db wrote:
Haha! When you first mentioned LAB colorspace, i i... (show quote)
Hi, DB, yeah, I know the lettering looks awful. I'm just playin'. I wanted to get "Big Rigs" somewhere into the picture, just for fun :lol: and thought maybe working it onto the trailer would be good. I'm sure that somebody expert could probably make the lettering actually conform to the ribs. :)
I've been playing around with Elements for 6 yearsstarted with 2.0, used 4.1 for several years, and just acquired 11. I joined the Hog less than 2 months ago but it has prompted me to get more serious about PP, learning to use layers &c, but I'm no more than a dabbler at this stage. I mainly wanted to figure out why the light gray truck would not take a deep color in Color Replacement. Russ, you are correct, Elements does not have LAB, nor a Channel Mixer, nor does it seem to have an adjustment layer offering Selective Color. It does have clipping masks which I have not even BEGUN to learn. :shock: What I spent a solid couple of hours on was trying to make the Replace Color Command work (that's different from the Color Replacement Tool or Brush), because when it works it does what I expected, i.e. it changes the color pretty much the way the tutorial showed LAB working, except that my books are inadequate to explain it. I've made it work once or twice, but the trouble is that it seems so complexso many stepsthat if I make it work I cannot remember what I did! :lol: :twisted:
Nov 27, 2013 12:19:03 #
I've "colorized" hundreds of product images, and the process has nearly always consisted of a selection (of varying complexity!), then a fairly straightforward Replace Color with high "Fuzziness", either on a new layer or not. And I have always found that the change from a neutral gray to a deep red is the hardest one to pull off (really easy to do the opposite!) In messing around with your image, I was reminded that the Replace Color 'Saturation' and 'Lightness' sliders are really touchy in that color range.
Hey, maybe the "Red & Fine" crew in Photo Gallery can provide additional tips - they make everything red!
Hey, maybe the "Red & Fine" crew in Photo Gallery can provide additional tips - they make everything red!
If you want to reply, then register here. Registration is free and your account is created instantly, so you can post right away.