2201 How to use Graphics Panel in Expert mode of PSE 11
Nov 26, 2013 12:40:32 #
sjbegres
Loc: Pittsburgh, PA
I would like to superimpose a part of a photo onto one of the backgrounds in the Graphics panel. I assume it involves cut and paste, but I can't seem to get it right.
Can anyone give me directions?
Can anyone give me directions?
Nov 27, 2013 23:53:05 #

1) Open the image you want to blend in to make a selection
2) Select whatever you want to make a selection (magic wand in my case)
3) Adjust the selection tool options (Tolerance in my case). DO NOT select feather, you can do that in the next step (refine edge, step 7)
4) Make sure you are in the additive mode, not the 'new' (this would reset your masking every time you try to mask something more...)
5) Mask whatever
6) To remove stray selection I use a second masking tool, additive (in my case the rectangular marquee)
7) Since my selection is made outside what I want to select, I revert the mask (Ctrl-Shift-I)
8) Magnify the image to see details when working on the selection
9) Refine edge (click on the button)
Couple fo steps:
Select how you want this thing to look, click on the image icon and select the 'look' that feels best for you. I selected overlay (V) but will change that as I go along.
Show radius will help preview what are the masks edges
Leave smart radius check box UN-CHECKED
Adjust edge, smooth, in my case, no way, I am using a 'hairy subject' (Boy my wife would kill me if she ever sees that one)
Feather, also not an option (for me)
Contrast, nope
Shift edge, nope.
Decontaminate color, checked, amount 25%
and now....
Using expand or erase refinement start working on your mask edge
Adjust your brush size using the [ and ] key, if you program beeps like crazy (as did mine, just go to preferences and turn that really annoying thing off)
You can quickly shift from add to mask to subtract by pressing the ALT key as you 'paint'.
Select new layer with layer mask
Click ok
10) Copy your selection onto your background (size and position)
Adjust anything before merging color, luminosity, whatever then save and export.
You are done.
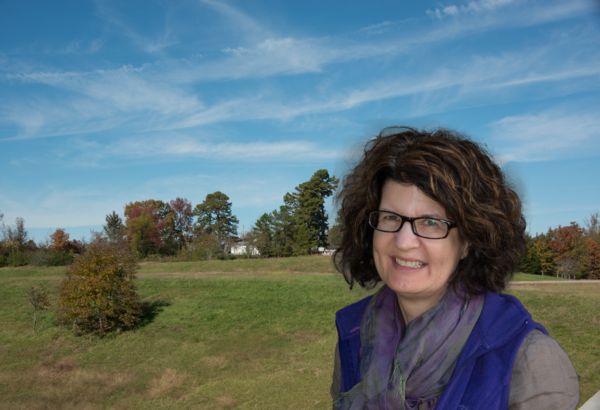
The result...
2) Select whatever you want to make a selection (magic wand in my case)
3) Adjust the selection tool options (Tolerance in my case). DO NOT select feather, you can do that in the next step (refine edge, step 7)
4) Make sure you are in the additive mode, not the 'new' (this would reset your masking every time you try to mask something more...)
5) Mask whatever
6) To remove stray selection I use a second masking tool, additive (in my case the rectangular marquee)
7) Since my selection is made outside what I want to select, I revert the mask (Ctrl-Shift-I)
8) Magnify the image to see details when working on the selection
9) Refine edge (click on the button)
Couple fo steps:
Select how you want this thing to look, click on the image icon and select the 'look' that feels best for you. I selected overlay (V) but will change that as I go along.
Show radius will help preview what are the masks edges
Leave smart radius check box UN-CHECKED
Adjust edge, smooth, in my case, no way, I am using a 'hairy subject' (Boy my wife would kill me if she ever sees that one)
Feather, also not an option (for me)
Contrast, nope
Shift edge, nope.
Decontaminate color, checked, amount 25%
and now....
Using expand or erase refinement start working on your mask edge
Adjust your brush size using the [ and ] key, if you program beeps like crazy (as did mine, just go to preferences and turn that really annoying thing off)
You can quickly shift from add to mask to subtract by pressing the ALT key as you 'paint'.
Select new layer with layer mask
Click ok
10) Copy your selection onto your background (size and position)
Adjust anything before merging color, luminosity, whatever then save and export.
You are done.
The result...
Nov 28, 2013 00:08:14 #
Did not do anything else. If you DL the result you will see that there is a need for correction in the hairs, two or three places only.
Also notice that the picture was taken with a flash and that I selected a background with the shadows sort of matching not only the flash shadows depth but also the orientation.. Details that do not seem important but when you want to be 'realistic' (yeah right) these 'details' are crucial.
Also notice that the picture was taken with a flash and that I selected a background with the shadows sort of matching not only the flash shadows depth but also the orientation.. Details that do not seem important but when you want to be 'realistic' (yeah right) these 'details' are crucial.
Nov 28, 2013 11:44:08 #
sjbegres
Loc: Pittsburgh, PA
Thanks so much. I will try this after turkey day.
Rongnongno wrote:
1) Open the image you want to blend in to make a s... (show quote)
If you want to reply, then register here. Registration is free and your account is created instantly, so you can post right away.