2201 PP for Christmas card ornament
Nov 25, 2013 15:22:34 #

I have tried to take photos of Christmas tree ornament, but don't really want a "selfie" as the image in the ornament.
So here's what I did - and I am sorry, I don't have a finished image to show you...
These instructions are for PSE:
Select a photo of a branch or two of a Christmas tree and give some thought to the composition (background).
Find a picture of, or take a photo of, the hanger part of a tree ornament. Doesn't matter if it is too large, it's easy to reduce the size.
Select the photo you want to put on the ornament, already PP'd for colour, exposure or whatever else was needed.
Determine the size of the background picture: 4x6 inches would be 1200 x 1800 pixels, 5 x 7 would be 1500 x 2100 pixels, at 300 pixels per inch. If needed, crop the pixture to that size.
Here we go:
Open the background image. Press Ctrl+J to duplicate it.
Add a new, transparent layer by clicking the icon that looks like a piece of paper with folded corner, select that layer in the layer bin.
On this layer, create a circle using the elliptical marquee while pressing the shift key. Or use any shape you think you would like. Use the background to "eyeball" the size of the shape, even make it slightly larger than you think you need.
Fill the shape with a single colour (your choice) with the paint bucket tool.
Keep that layer selected and drag and drop the ornament photo to the shape. If by chance the layers don't want to play nice and move out of order, just rearrange them with your mouse, making sure the photo is in the layer above the shape
and press Ctrl + G. Move the photo around, make it larger or smaller (but not so small that a part of the shape shows).
When you're happy, click on the green checkmark.
At this point you can still move the round photo to a spot where you think it looks best.
The next step may be (a lot) easier if you put a layer between the background and the photo, so select the background layer, and click the 'add layer' icon. Fill this layer with any colour you like (paint bucket).
Next, select the layer with the photo, and with the Magic Wand tool (yellow star-on-a-stick), click anywhere on that layer but outside the photo. Then press Ctrl + Shift + I and only the shape will be selected.
Now select from the menu line: Filter-> Distort-> Spherize.
Probably keep the settings at 100% and normal.
Wait a few seconds while PSE does it's thing.
You can now delete the extra layer.
If you took a photo of an ornament hanger, separate it from it's background and add to the image. If you had one already, or found one on the internet, it probably already is on a transparent background and you can just add it.
"Save As" you composition, give it a new name (and your original picture will be preserved), print it on blank cards, or have photos printed to glue on blank cards.
"Save As" a jpg file for printing.
Have fun and show some of your cards in the Gallery!
EstherP
Nov 25, 2013 18:28:08 #

Nov 26, 2013 01:18:26 #
Nov 26, 2013 11:35:46 #
EstherP wrote:
I have tried to take photos of Christmas tree orna... (show quote)
Esther, this sounds great! I would love to see a finished example. I am so visual.
Nov 26, 2013 11:55:51 #
bedgmon wrote:
Esther, this sounds great! I would love to see a finished example. I am so visual.
Look for it this afternoon!
Also pay attention to my second message, as I forgot to include one fairly important point.
EstherP
Nov 26, 2013 14:31:25 #
EstherP wrote:
Look for it this afternoon!
Also pay attention to my second message, as I forgot to include one fairly important point.
EstherP
Also pay attention to my second message, as I forgot to include one fairly important point.
EstherP
Will do! Where will you post? This thread?
Nov 26, 2013 18:16:11 #
bedgmon wrote:
Will do! Where will you post? This thread?
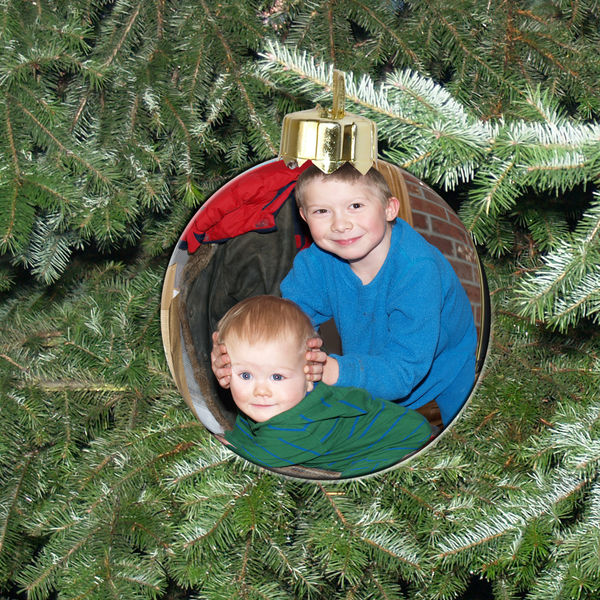
Here it comes!
In addition to what I wrote earlier, I also added a bevel to the layer with the photo: Simple Pillow Emboss, found under Effects (the FX icon) -> Bevels. It helped to make the ornament stand out a bit more from the green branches.
Esther
Nov 26, 2013 20:02:42 #
A great holiday idea. Thank you Esther! By the way, that is a cute photo. Looks like the older is helping focus the younger. :)
Nov 26, 2013 20:50:14 #
bedgmon wrote:
A great holiday idea. Thank you Esther! By the way, that is a cute photo. Looks like the older is helping focus the younger. :)
Thanks!
The little one saw the camera as my toy (I guess it is, at that!) just like Lego and cars are his toys, and I don't think he realized that he'd be 'caught' in that black box ;-)
So, big brother was ready to help!
EstherP
If you want to reply, then register here. Registration is free and your account is created instantly, so you can post right away.