2201 Elements 12 - after copy/paste, how blend in?
Nov 18, 2013 14:12:22 #

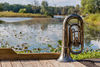
Copy/pasted a better-exposed moon from one image into this one that was white-blob moon. I used a clone tool from another program that I'm a little more familiar with, but then a bit of healing brush from Elements 12.
I just got this program but it's similar to one I had a couple of years ago. When you paste an element like this into another image, what steps do you take to make it appear more natural?
Just basic, easy stuff for now, please :)
THANKS!
I just got this program but it's similar to one I had a couple of years ago. When you paste an element like this into another image, what steps do you take to make it appear more natural?
Just basic, easy stuff for now, please :)
THANKS!

Nov 18, 2013 20:54:46 #
Linda From Maine wrote:
Copy/pasted a better-exposed moon from one image into this one that was white-blob moon. I used a clone tool from another program that I'm a little more familiar with, but then a bit of healing brush from Elements 12.
I just got this program but it's similar to one I had a couple of years ago. When you paste an element like this into another image, what steps do you take to make it appear more natural?
Just basic, easy stuff for now, please :)
THANKS!
I just got this program but it's similar to one I had a couple of years ago. When you paste an element like this into another image, what steps do you take to make it appear more natural?
Just basic, easy stuff for now, please :)
THANKS!
Linda,
Half the battle is having tools you know how to use. The other half is trusting your intuition to tell you when you're getting what you like. And you're on the right path! Trust your instincts and you'll be surprised at what you get!
:thumbup: :thumbup: :thumbup:
Nov 19, 2013 09:13:09 #
MagicMark wrote:
Linda,
Half the battle is having tools you know how to use. The other half is trusting your intuition to tell you when you're getting what you like. And you're on the right path! Trust your instincts and you'll be surprised at what you get!
:thumbup: :thumbup: :thumbup:
Half the battle is having tools you know how to use. The other half is trusting your intuition to tell you when you're getting what you like. And you're on the right path! Trust your instincts and you'll be surprised at what you get!
:thumbup: :thumbup: :thumbup:
Thank you MagicMark :)
Nov 19, 2013 09:13:38 #
Nov 19, 2013 09:46:52 #
Nov 19, 2013 09:52:41 #
mrtobin wrote:
If the moon is on a separate layer try different blending modes.
I was able to find "blending" in the Adobe online help. I think this is just what I was looking for. Thanks much!
Nov 19, 2013 11:14:35 #
Rongnongno wrote:
errr... The blending you see maybe the layer feature and will give you unexpected results.
You can get the full edit on layer STYLE by right clicking on the layer and select blending option.
If you want just a 'transparency effect' w/o affecting the color underneath, use 'opacity'...
If I may post a sample of this you would understand better my rather obscure 'warning'.
You can get the full edit on layer STYLE by right clicking on the layer and select blending option.
If you want just a 'transparency effect' w/o affecting the color underneath, use 'opacity'...
If I may post a sample of this you would understand better my rather obscure 'warning'.
Certainly! Thanks!
Nov 19, 2013 11:53:39 #
Nov 19, 2013 13:06:27 #

Since there is a need for two layers. I am, using one of the pictures that you posted... The bird with the crazy artifact (Still trying to figure it out by the way)
Bird Open as 16 bit (BWA from now on)
Moon sky Open as 16 bit (Referred as MS from now on)
To copy one onto the other:
Two methods, first steps are the same:
.Open MS tab (Click on tab)
.Ctrl-A (select all)
Simplest (Most common):
.CTRL-C (copy)
.Open BWA (Click on tab)
.Ctrl-V
Click-Drag (Preferred -by me):
.Click on move tool (V)
.Click on selection Drag onto BWA image tab then BWA image itself
.Release mouse
In both cases a new layer is created in BWA.
Differences:
Naming:
Copy/paste method: Layer1 (need to rename)
Click drag: MS original name
Positioning:
.Because you are using the move tool in click-Drag you can place the image where ever you want.
.You can do the same thing with copy/paste but you need to select the move tool first.
Due to this I almost always use the move tool to copy another image into another one. In this case it does not really matter.
To expand this layer so that it covers the BWA layer:
Use Edit-> Free transform (Ctrl-T) to adjust its position and proportions
Place the MS layer onto one of the WBA corners, click on the opposite MS corner and drag to cover WBA
Now, Blending
Please not that blending a layer is not about color!!!
Since there is no selection the only method you have is using the layer method
Darken works best
To control the effect:
Opacity option:
.Click on it and dial in the number: either use the mouse wheel (if you have one) or type the number
.Click on the down arrow icon and use the slider
I use the slider first to check the effect then use the mouse wheel for a better incremental adjustment.
Fill layer:
.In this instance it will work the same BUT be aware that it is a different beast
Watch this tutorial to understand the differences: http://www.photoshopessentials.com/basics/layers/opacity-vs-fill/
Both options affect the whole layer. To avoid that, use masking (another tutorial: http://designshack.net/articles/graphics/a-complete-beginners-guide-to-masking-in-photoshop/)
Then to make things a bit more complex you have the blending full options, good luck with that one...
https://www.google.com/search?q=photoshop+blending+options&client=firefox-a&hs=Ivq&rls=org.mozilla:en-US:official&tbm=isch&tbo=u&source=univ&sa=X&ei=P6OLUtzQBKbZ2wWgiYCwDA&ved=0CC4QsAQ&biw=1536&bih=690
Tutorial: https://www.video2brain.com/en/lessons/advanced-blending-options (specifically Blend if)
Now if all you want is to blend the two images as a HDR or panorama like image, un-select the layers you want to blend together and use Edit -> Auto-blend, select option. THIS will not give you any satisfactory result.
I hope this long winded tutorial will help some.
Screenshot, note: No blending style.

Nov 19, 2013 20:55:16 #
Thank you so much! I will print this and review on Weds. (been gone all day, too pooped to take it in right now :) )
btw, I love the robin blended into those moonlit clouds
:thumbup: :thumbup:
btw, I love the robin blended into those moonlit clouds
:thumbup: :thumbup:
Rongnongno wrote:
Since there is a need for two layers. I am, using ... (show quote)
Nov 22, 2013 00:48:12 #
snails_pace
Loc: Utah
Assuming that the new item has been merged onto the main layer, the sharp edge of the new object can be softened a bit to make look more natural. Something to try -
on the "blur" tool (blur, sharpen, smudge in PSE 9), pick a soft brush (fuzzy dot) at top of the working area and set strength to 40%. Adjust size of the brush - something that is learned by trial and error. Then work the edge of the pasted object with the soft brush. Do a little bit at a time until it appears "natural".
Use "undo" as you go if it doesn't look right. As always, copy the layer before starting to edit it.
hmm ... not sure if this is clear.
This also works for things that are a little over-sharpened or even natural edges that just seem to be too abrupt.
Nov 22, 2013 00:55:55 #

Nov 22, 2013 02:08:59 #
snails_pace
Loc: Utah
yep ... paste on one layer and merge the layer down ... then work on the single remaining layer. One method of doing the final blending is on the previous page. No need to keep two layers once the pasted object is in the right position.
Or at least that was what he/she was originally trying to do with the moon.
Or at least that was what he/she was originally trying to do with the moon.
Nov 22, 2013 04:47:52 #
RGG
Great Tutorial but very hard to follow in Elements. Works in PS though.
Have to remember the question stipulated Elements.
Great Tutorial but very hard to follow in Elements. Works in PS though.
Have to remember the question stipulated Elements.
Nov 22, 2013 08:50:17 #
snails_pace wrote:
Assuming that the new item has been merged onto th... (show quote)
Thanks, I will look for a comparable blur tool in Elements.
If you want to reply, then register here. Registration is free and your account is created instantly, so you can post right away.